I Am... The Best Homemade Corned Beef Brisket
Corned beef brisket needs no introduction. Those addictively tender, tart and tangy, savory spiced slices of brisket are the stuff that sandwich dreams are made of. Not to mention breakfast dreams, cabbage dreams, and just about everything else dreams. Is there anything corned beef doesn’t make better? I like to make corned beef brisket at home a few times a year, including of course around St. Patricks day. It’s super easy and really rewarding, and these days I have it down to a well-oiled machine. Corned beef you make at home tastes way better than store bought, and not just because you labored for it, it’s actually objectively way tastier. Even though it seems like a commitment to do, it’s not. It’s only about 5 minutes of work followed by 6 days of waiting and relaxing before you’re rewarded with as much juicy flavorful brisket as you could ever want.
What is corned beef?
Corned beef is a salt-cured beef. It's cured in a salt and pickling spice brine for anywhere from 5-45 days, then boiled or smoked and steamed to finish. It’s called corned because back in the day, that was the term for the larger grained salt that was used to cure things.Why make corned beef brisket at home
Not only is homemade corned beef brisket delicious, when you make it yourself you know exactly what goes into it. You can choose the right quality and size brisket for your budget, adjust the spice mixture, and decide whether or not to add pink salt. It’s also much cheaper pound-for-pound than buying a premade/storebought brisket.What is pink salt
Pink salt is sodium nitrite. It gives cured meats its signature pink color and adds to the flavor. Pink salt, not to be confused with pink Himalayan salt, is regular salt mixed with sodium nitrite and dyed pink so that it’s not eaten by accident. Should you use it? On longer cures, it prevents botulism and listeria, but our 6 day salt brine isn’t at risk of that, so you would be mainly adding it for color and flavor. Nitrites have been correlated with a slightly higher risk of cancer, but that’s usually more of a worry if you’re eating an incredibly large amount of cured meats. Regardless, pink salt is completely optional. You can find it on Amazon as well as locally at any good gourmet store – it’s also called instacure #1, prague powder 1, or curing salt. You may need to ask for it behind the counter.Why this corned beef recipe
I love this recipe because it is a simple bare bones recipe that’s small enough for people without giant kitchens. Most recipes I see need a ton of room in your fridge and large containers. This one uses a 2.5-3 lbs brisket (enough to serve 4) which fits snugly into a standard sized 11 cup baking dish. But most of all, this recipe is really tasty.For the best corned beef brisket, remove the fat
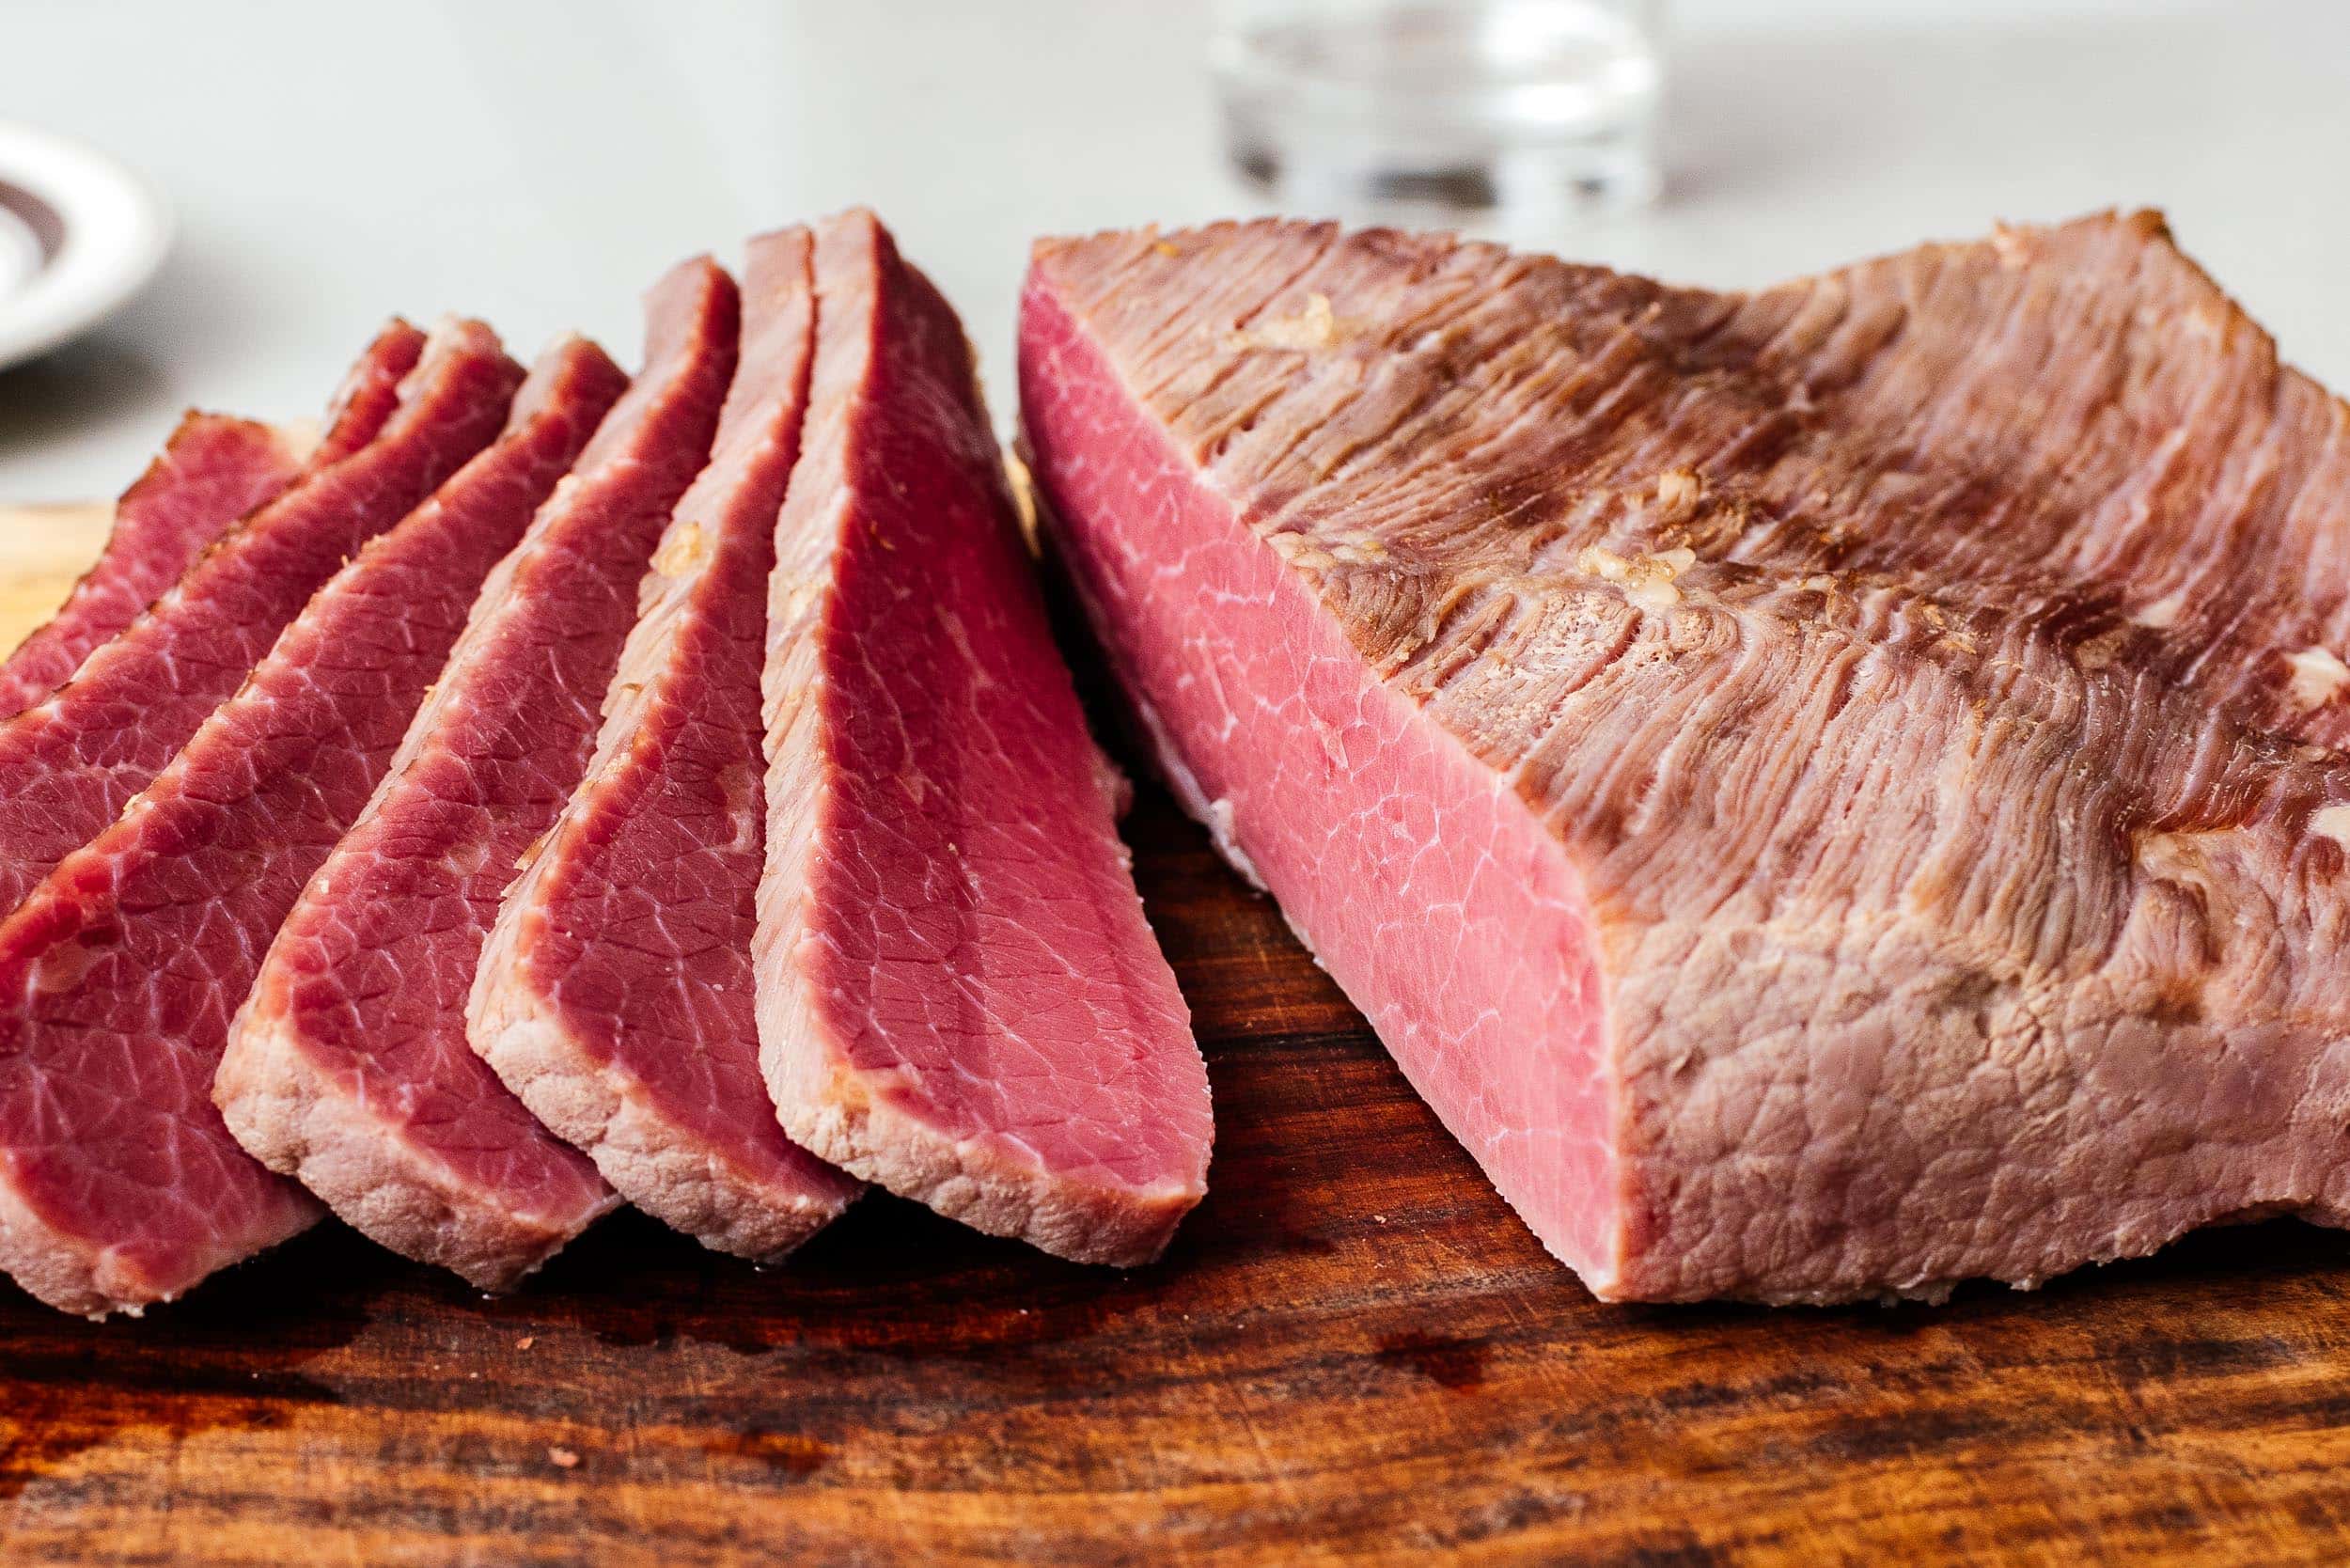
Because we’re going to boil this corned beef brisket, you should remove as much fat from the top and bottom of the brisket as possible. Boiled fat looks lumpy and gummy, and doesn’t add much to the flavor. If you intend to smoke it instead (ie, for pastrami), leaving the fat on would be a great idea, but if not, that fat needs to go.Slow cooker/crock pot corned beef
Instead of an oven, you can cook the corned beef brisket in a crock pot on high for the same amount of time, provided your brisket fits. If you intend to do this, check the fitment of your brisket and give it a trim if needed before soaking it in the brine.How to make corned beef
- Make and cool the brine. Bring 1 quart of water to a boil, then remove from heat. Add the pickling spices to the water and let soak while it cools down to room temperature.
- Trim. If you intend to boil your corned beef, such as for corned beef hash or reuben sandwiches, trim the fat off your brisket.
- Cover. Transfer your brisket to a snug fitting container with a lid. For a 2.5-3lb brisket, an 11 cup baking dish is perfect. Cover with the brine that’s been cooled to room temp, add pink salt if using, and completely submerge the brisket with cool, clear water. You may need to weigh down the brisket with a small plate.
- Cure. Place the covered brisket in the fridge. After 3 days, flip the brisket, and wait another 3 days.
- Cook. Rinse the salt and spices off your brisket, then cook with your preferred method.
How to cook corned beef
Cooking corned beef is super simple, just simmer it below a boil (about 180º-200ºF) for 4-5 hours. Depending on your stove, this could either be easy or hard. For me, I prefer the oven, which keeps everything at a consistent temperature. All you need to do is preheat your oven and boil a quart of water with pickling spice. Transfer the brisket to a large oven safe vessel like a dutch oven. Add the pickling spice infused water as well as enough water to cover. Finally, transfer to a 200ºF oven for 4-5 hours, and you're done! Corned beef for life -MikeCorned Beef Recipe
Super easy tender, juicy, and delicious homemade corned beef brisket that tastes way better than store bought.
- 1/3 cup kosher salt
- 1/4 cup sugar (brown preferred)
- 6 tbsp pickling spices (divided, see below or use store bought)
- 2.5-3 lbs brisket
- 2 qt water
- 1 tsp pink salt (optional)
Homemade Pickling Spice Mix (optional - makes 1 batch, you need 2 for this recipe)
- 1 tbsp mustard seeds
- 1 tbsp coriander seeds
- 1 tsp cloves
- 1 tsp white pepper
- 1 stick cinnamon (broken)
- 1 bay leaf (torn)
- 4 cardamom pods
- 1/2 tsp sichuan peppercorns (optional)
An hour before you start preparing your meat, make the brine: bring 2 quarts of water to a boil then remove from the heat. stir in sugar and salt until dissolved, about 1 minute, then add pickling spices. Let cool.
Trim any large caps of fat off your brisket (optional) then place in a snug fitting container with a lid.
Stir the pink salt into the brine, if using. Add the cooled brine until covered. You shouldn't need all the brine - discard the remainder. If you need a little more than 2qt, cover with cool water as needed, or make a new batch of brine if a lot.
Weigh the brisket down with a plate if needed. Seal and store in the fridge for 3 days. After 3 days, give the brisket a flip, and store another 3 days.
To cook: After 6 days, preheat your oven to 200ºF. Find an oven-proof pot (such as a dutch oven) large enough to hold your brisket and fill it halfway with water. Set it over high heat. Carefully remove the brisket from its container and give it a good rinse. Add brisket and the remaining 3 tablespoons of pickling spice and wait until the pot comes to a boil, then transfer to oven and braise for 4 hours.
Remove the brisket from the braising liquid from and slice. Store brisket with the braising liquid and reheat together to retain maximum moisture, avoiding a boil. Brisket keeps for 3-5 days in the fridge.
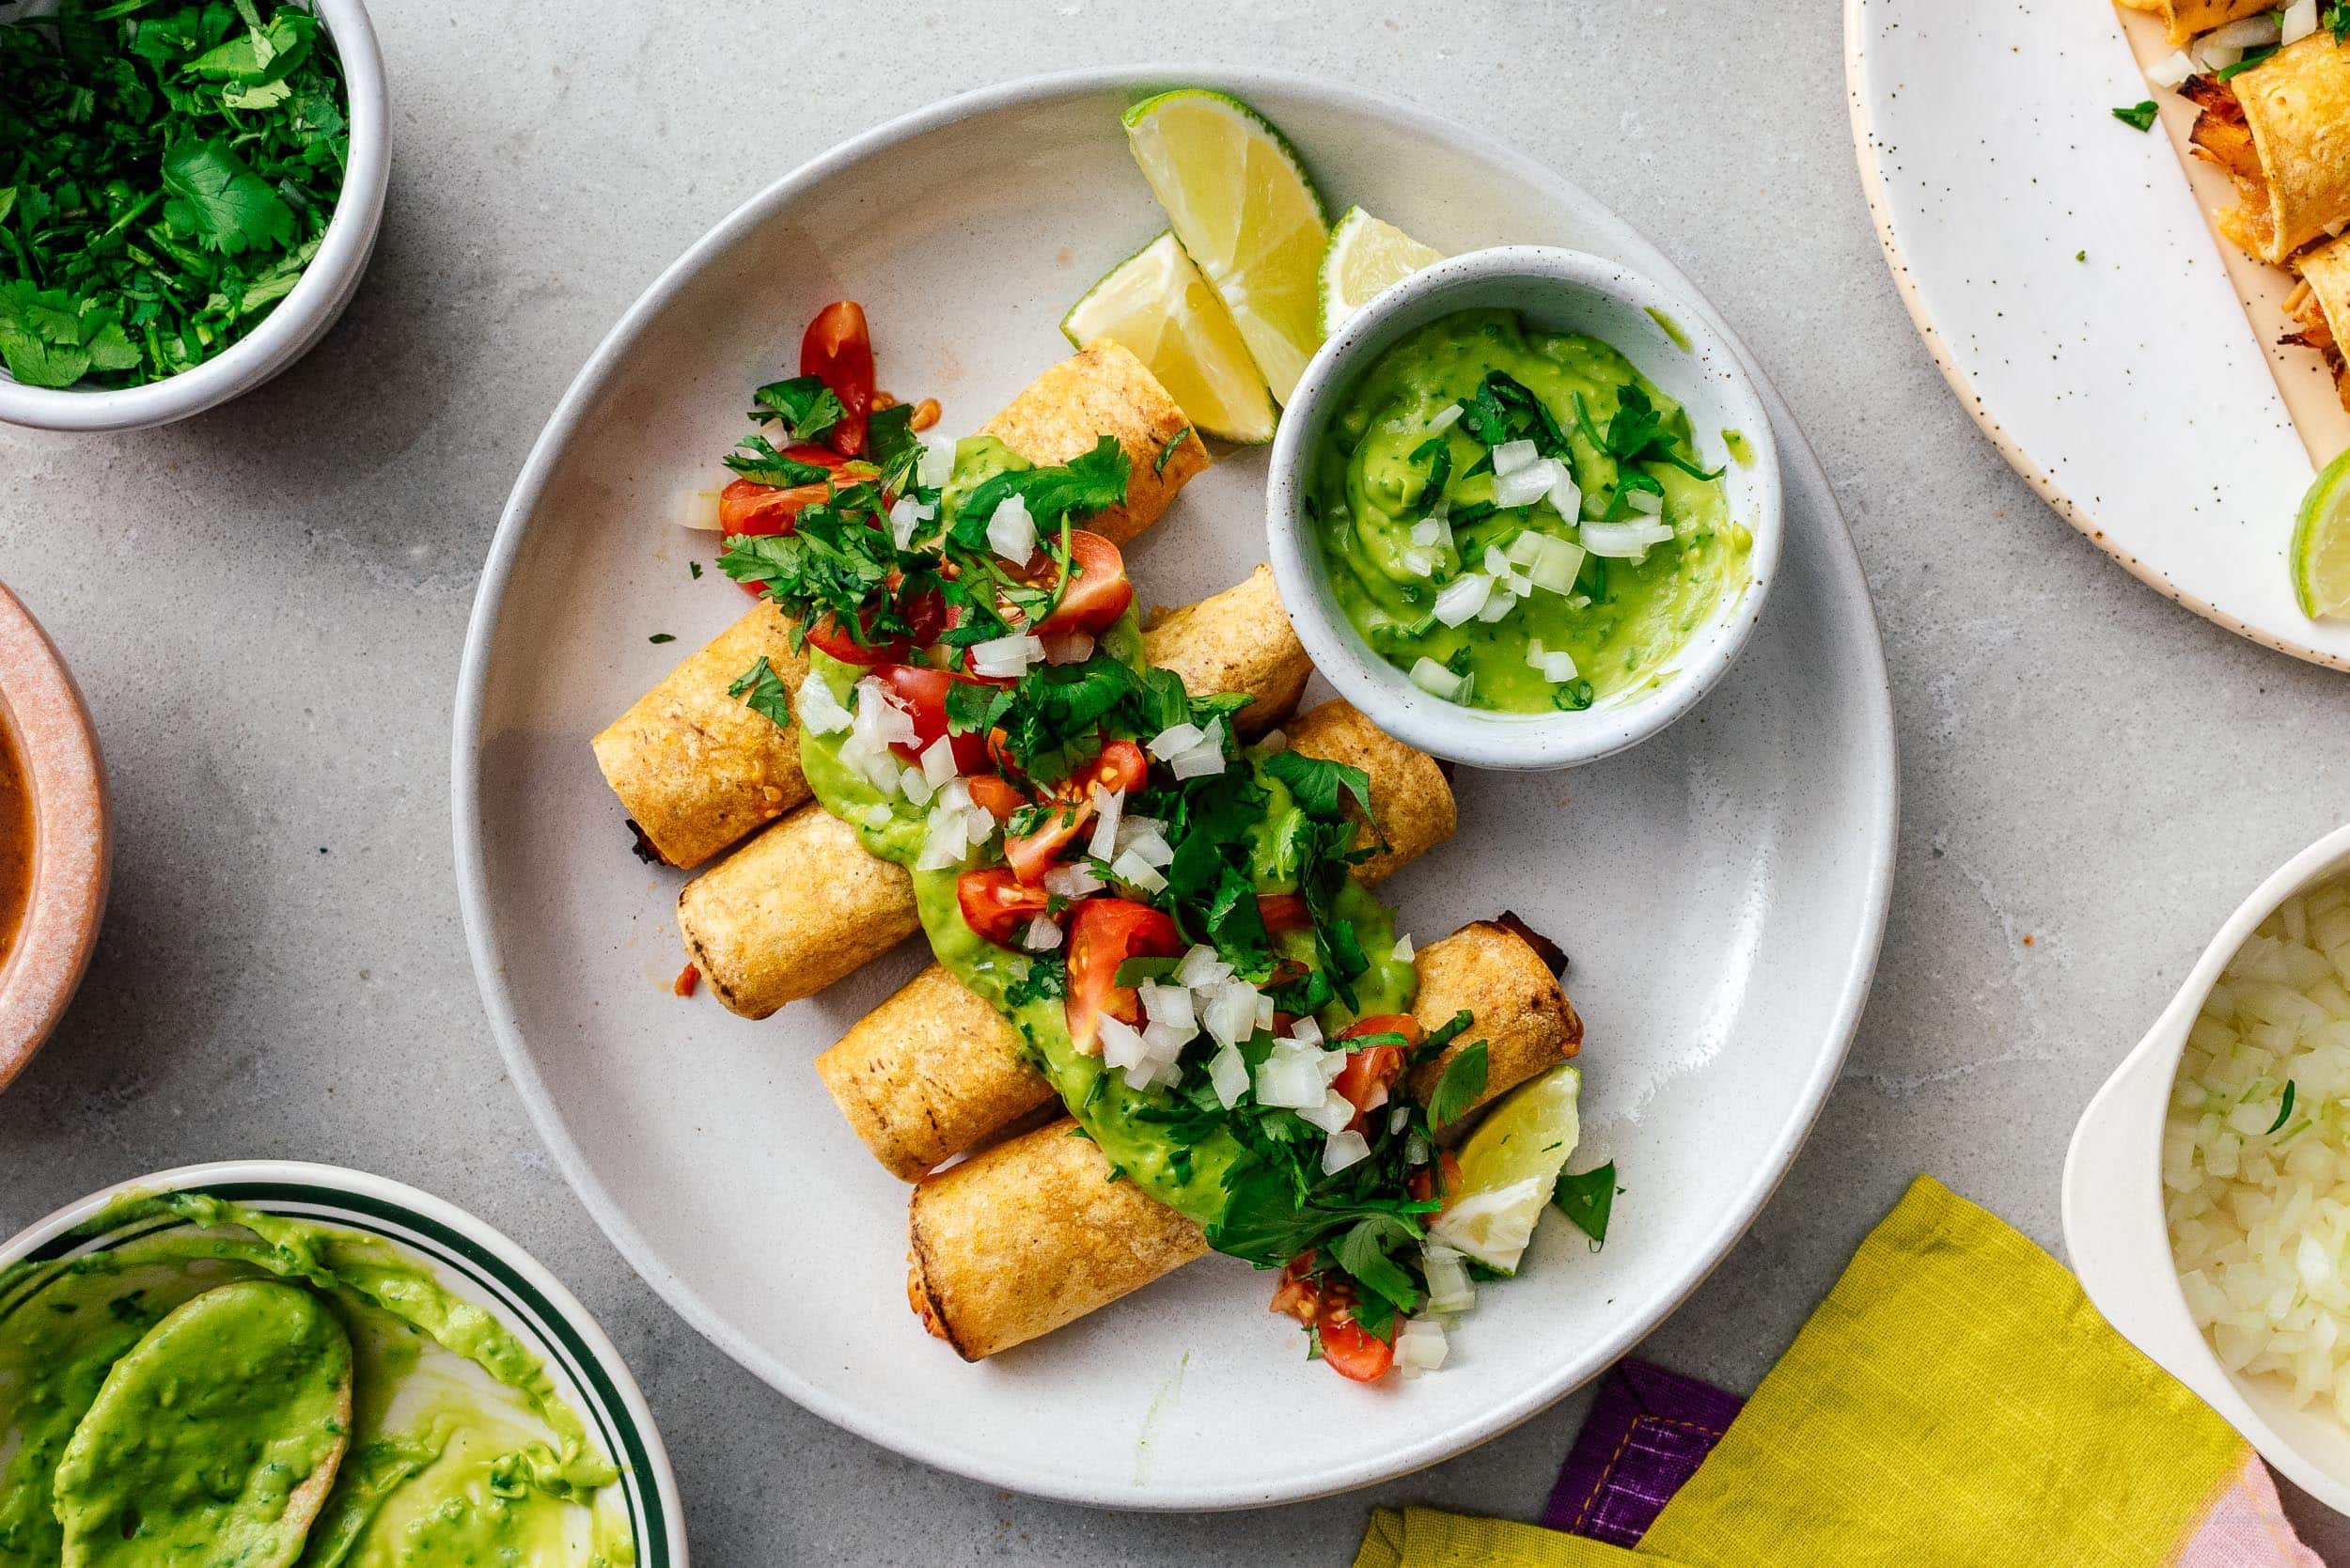
I Am... Air Fryer Taquitos
Crispy crunchy chipotle chicken air fryer taquitos perfect for taco night. Ever since I made crispy crunchy chicken tacos in the air fryer, I’ve been dying to make taquitos. There’s something about rolled tacos that is so incredibly addictive. Maybe it’s because they’re more dip-able? It doesn’t really matter why I love them so much because you will too: golden yellow hot and crisp tortillas rolled around a chipotle tomato-y chicken and melty cheese filling finished off with avocado-cilantro crema. SO GOOD.
Why air fryer taquitos
The best part about this recipe is that you don’t need to break out the deep fry oil. Air fryer for the win! You could shallow/deep-fry or bake the tortillas for that crispy crunch you’re looking for, but really, the air-fryer is the answer. Less oil, less mess, more crunch. Everything you could want in a crispy crunchy homemade taquito.What is a taquito?
Taquitos are rolled corn tortillas filled with juicy chipotle chicken and cheese, crisped up in the air fryer for the ultimate in crunch.How to make taquitos
- Make the filling. Super simple, especially because this filling uses already cooked shredded chicken. Just blend up the sauce, mix the chicken in, and simmer to meld all the flavors.
- Roll. Warm up your tortillas: wrap them up in a damp paper towel and microwave briefly so they don’t crack and break when you’re rolling. Oil the tortillas on both sides, then top with chicken and cheese and carefully roll.
- Crisp. Place the taquitos, seam side down in the air fryer basket (I like to line it with foil for easy clean up) and crisp them up, flipping once. They tend to get a bit crispier as they cool, so you can take them out once they feel crunchy.
- Enjoy. Finish the tacos off with toppings of your choice and enjoy!
Air fryer taquitos ingredients
- Corn tortillas. If you want crispy crunchy tortillas, you’re going to want corn tortillas. Flour tortillas are great too, but they don’t fry up the same way in the air fryer. Usually we like street taco size small corn tortillas (about 4 inches) but we also use the slightly bigger corn tortillas too, the ones that are about 6 inches. We have a local tortilleria where we get tortillas, but you know, Mission street taco corn (or flour) tortillas work well too! Technically if you use flour tortillas you’re making flautas.
- Cooked shredded chicken. You can use thighs or breast, whatever cooked chicken you have on hand. Leftover rotisserie chicken works or you can even use your air fryer to quickly cook up some plain air fryer chicken thighs or breasts.
- Chipotle in adobo. Those little cans of chipotle in adobo are perfect! This is what adds such a huge amount of flavor to your tinga. Chipotle in adobo and are ruby red salty-sweet-spicy-tangy-smoky deliciousness. They are the base of so many Mexican stews and marinades. You can pretty much find them in all grocery stores (pictured below).
- Cheese. I use a shredded Mexican 4 cheese mix for the ultimate melty cheese pulls. You want a nice meltable cheese (mozzarella, pepper jack, colby, cheddar, monterey jack, queso, asadero) and any combination will work.
- Tomatoes, oregano, cumin. The tomatoes add umami, sweetness, and acidity. The cumin adds a warm earthy aroma and the oregano adds lemon-y citrus flavors, if you’re using Mexican oregano. Mexican oregano can be found near the Mexican food stuffs in the grocery store it tastes quite a bit different from the typical oregano. If you don’t have any, you can always sub regular oregano, but try and find some Mexican oregano if you have a chance, it’ll really up your Mexican food game.
Do I need an air fryer for these taquitos?
Technically you don’t need an air fryer because an air fryer is really just a very tiny convection oven that heats up super quickly. So if you have convection mode on your oven or don’t mind waiting for your oven to heat up, you can bake these taquitos for that same crispy crunch. We love the current air fryer we have though because it has such a giant fry basket and cleanup is a lot easier than washing baking trays.What air fryer do you have?
If you’re wondering which air-fryer we have, it’s this one. I don’t know if it’s the best on the market because it’s the only one we’ve used, but it works great. It’s quiet and easy to clean and really big (which is good because you can put a lot of food in it and bad because it takes up a lot of room).How to bake taquitos in the oven
If you don’t have an air fryer and need to bake these in the oven, you totally can. Bake them seam side down on a rack in a rimmed baking sheet in a preheated 425°F oven for 15-20 minutes or until golden brown and crispy.How to fry taquitos on the stovetop
Heat up 1/2 inch of oil in a deep pan over medium heat. Roll the taquitos and holding the seam together with tongs, carefully place them seam side down into the hot oil. Cook until golden, flipping as needed.What to serve with air fryer taquitos
Air Fryer Taquitos
Crispy crunchy chipotle chicken air fryer taquitos perfect for taco night.
Chicken Taquitos
- 2 cloves garlic
- 1-2 chipotle peppers in adobo (depending on spice preference)
- 1 tbsp adobo sauce (from can)
- 2 tomatoes (diced)
- 1/2 tsp dried oregano (Mexican oregano preferred)
- 1/2 tsp ground cumin
- 2 cups cooked shredded chicken
- 1/2 cup chicken stock (low/no sodium preferred)
- 2 cups mexican cheese blend (shredded)
- 20 small corn tortillas (warmed)
Lime Avocado Crema
- 1 avocado (roughly chopped)
- 1/4 cup fresh cilantro (roughly chopped)
- 1 clove garlic
- 1 lime (juice only)
To Serve
- 1/4 cup fresh cilantro (chopped)
- 1/4 medium onion (chopped)
- hot sauce (as desired)
Add the garlic, chipotles and sauce, tomatoes, oregano, and cumin to a blender and blend until smooth.
Add the sauce to a pan with the shredded chicken and chicken stock. Simmer, covered for 10 minutes. Taste and season with salt and pepper if needed. Set aside.
Warm your tortilla shells in the microwave to make them pliable. Rub both sides with oil (or spray with cooking spray), lay flat and top with chicken and a layer of cheese near one end. Gently roll the tortilla and place seam side down into a foil lined air fryer basket.
Air fry on 400°F for 6-7 minutes, flipping once, or until the tortilla is crispy and the cheese is melted. Repeat as needed. The taquitos will continue to crisp up as they cool. Let rest on a rack while you make the remaining taquitos.
To make the lime avocado crema, place all the ingredients in a blender or food processor and blend until smooth. Taste and season with salt and pepper.
Enjoy!
To make the chicken in the air fryer, simply toss the chicken with the sauce in an oven safe dish that fits inside the air fryer. Loosen with a bit of chicken stock (you won’t need the full 1/2 cup). Place the dish in the air fryer and cook at 350°F for 5-8 minutes.
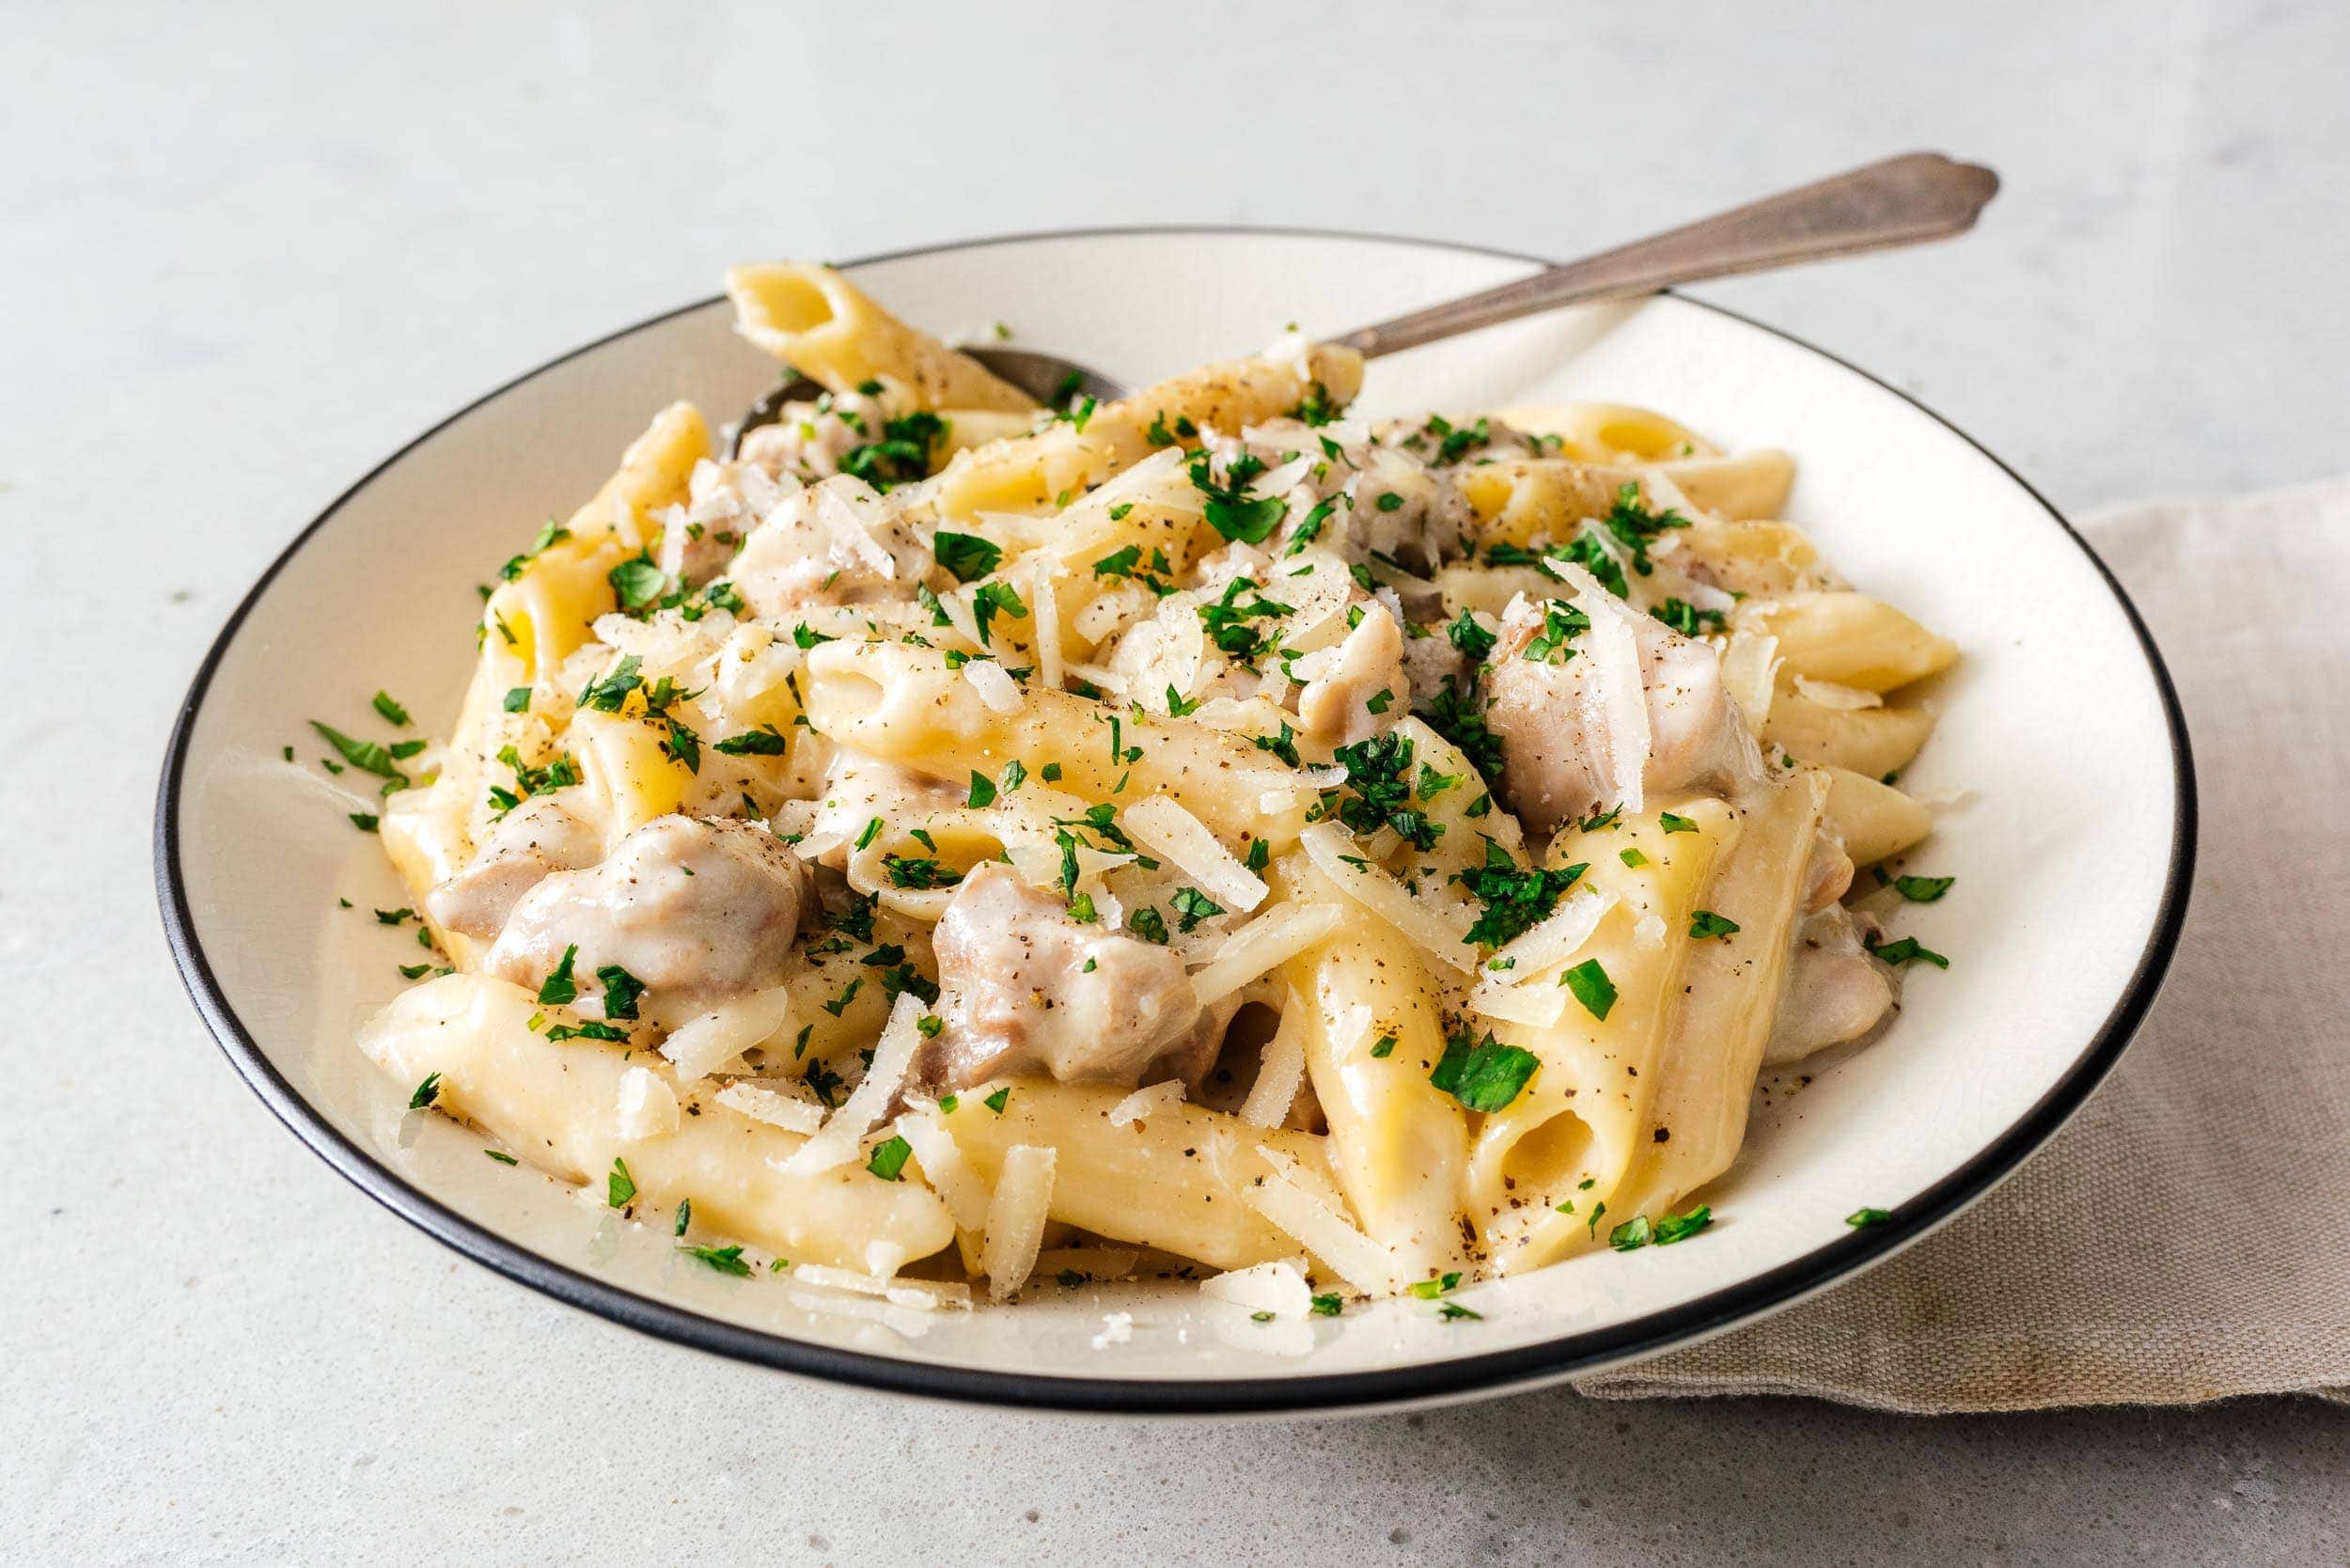
I Am... Creamy Chicken Alfredo
Chicken Alfredo is perfect for a weeknight dinner: Super juicy pieces of chicken in a smooth and creamy, extra cheesy alfredo sauce. It’s been SO cold lately! I have been hibernating underneath our kotatsu (a Japanese heated table with a blanket on it to trap all that delicious warmth; it’s the best thing ever invented) and spooning up bowl after bowl of this creamy chicken alfredo. It’s comfort food at its best: spoonable, cheesy, creamy, carb-y goodness. This dish hits just right. The parmesan cheese is full of salty umami, the chicken is perfectly juicy, and the noodles are the perfect vehicle for the rich, savory, buttery alfredo cream sauce.
What is alfredo sauce?
Classic alfredo sauce has just three ingredients: butter, cheese, and pasta water. That’s it! They combine together into a smooth and rich sauce that’s perfect with pasta (read more about classic alfredo here!). But, like so many foodstuffs that have been lovingly adapted, nowadays, especially in America, people think of alfredo as a thick white cream sauce, made with heavy cream and garlic, a la Olive Garden. Alfredo is kind of used as a blanket term for almost all Italian white sauces.This isn’t actually authentic and that’s okay
Italians, look away! I know what you are thinking, this alfredo is a travesty and in no ways does it resemble your beloved simple, three ingredient alfredo. I absolutely agree with you! This is just a super simple weeknight take on alfredo that comes together in 15 minutes. I know regular alfredo is also super simple and only takes about 15 minutes too, but this is the kind of recipe where you throw everything in a pot, set it and forget it. There are juicy pieces of chicken, perfectly al dente noodles, and a rich sauce that clings to each and every piece of pasta. It’s satisfaction in a bowl and it’s all made in the instant pot.You can make pasta in the instant pot?
Yes! You can put raw pasta in the instant pot and pressure cook it. While it cooks, it soaks up all the creamy delicious sauce that you’re pressure cooking it in. As a bonus, the starches that are released help thicken up the sauce, making it cling to the pasta perfectly. The best part is that cooking pasta in the instant pot means that it’s truly a one pot dish without any draining or extra steps.How to make chicken alfredo in instant pot
- Add chopped up chicken, penne (or pasta of choice), chicken stock, and garlic powder to the insert of the instant pot. Stir well to combine then cook on high pressure for 5 minutes.
- While the instant pot is doing its thing, whisk together some cream with a tiny bit of cornstarch in a small bowl. Take this time to finely grate the parmesan cheese.
- When the instant pot is done, quick release the pressure, then carefully open the lid. Turn the pot on sauté medium and stir in the cream-cornstarch mix as well and butter. Simmer, stirring occasionally, until slightly thickened, then stir in the parm until it melts and all the noodles are coated and creamy. Taste, season, spoon into a bowl and enjoy!
Creamy chicken alfredo ingredients
I love this recipe because it really only takes 9 ingredients. Heck, if you wanted to leave out the parsley, it would be 8! All you need is chicken, penne, chicken stock, garlic powder, cream, cornstarch, butter, and grated parm.- Chicken - I used chicken thighs because I love how juicy they are, but you can definitely do this with chicken breast.
- Penne - Short pastas are perfect in the instant pot and penne is great because the lil holes fill up with so much saucy goodness. Feel free to use any short pasta here or even fettuccine. If you do use fettuccine, you’ll have to break the pieces in half.
- Cream and cornstarch - we’re going to help our sauce be super glossy with the help of heavy cream and cornstarch. The cornstarch is going to help thicken everything and the cream is going to add a gorgeous creamy flavor.
- Parmesan - go for freshly grated! It melts nicer and taste so much better than the stuff you buy pre-grated at the store.
Chicken Alfredo Recipe
Super juicy pieces of chicken in a smooth, creamy, extra cheesy alfredo sauce.
- 1 lb boneless skinless chicken thighs (cut into 1" pieces)
- 8 oz pasta (penne preferred)
- 1.75 cups chicken stock
- 1 tsp garlic powder
- 1/2 cup cream
- 1 tbsp cornstarch
- 2 tbsp butter
- 4 oz Parmigiano Reggiano cheese (finely grated)
- 2 tbsp fresh flat leaf parsley (chopped)
In the Instant Pot insert, add the chicken thighs, penne, chicken stock, garlic powder. Stir well to combine.
Cook on high pressure for five minutes. While the Instant Pot is doing it’s thing, whisk together the cream with the cornstarch in a small bowl. When done, quick release the pressure and carefully open the Instant Pot.
Turn on sauté mode on medium heat and stir in the cream and cornstarch mix, and the butter. Simmer, stirring occasionally, until slightly thickened. Stir in the parmesan and parsley, taste and season. Enjoy!
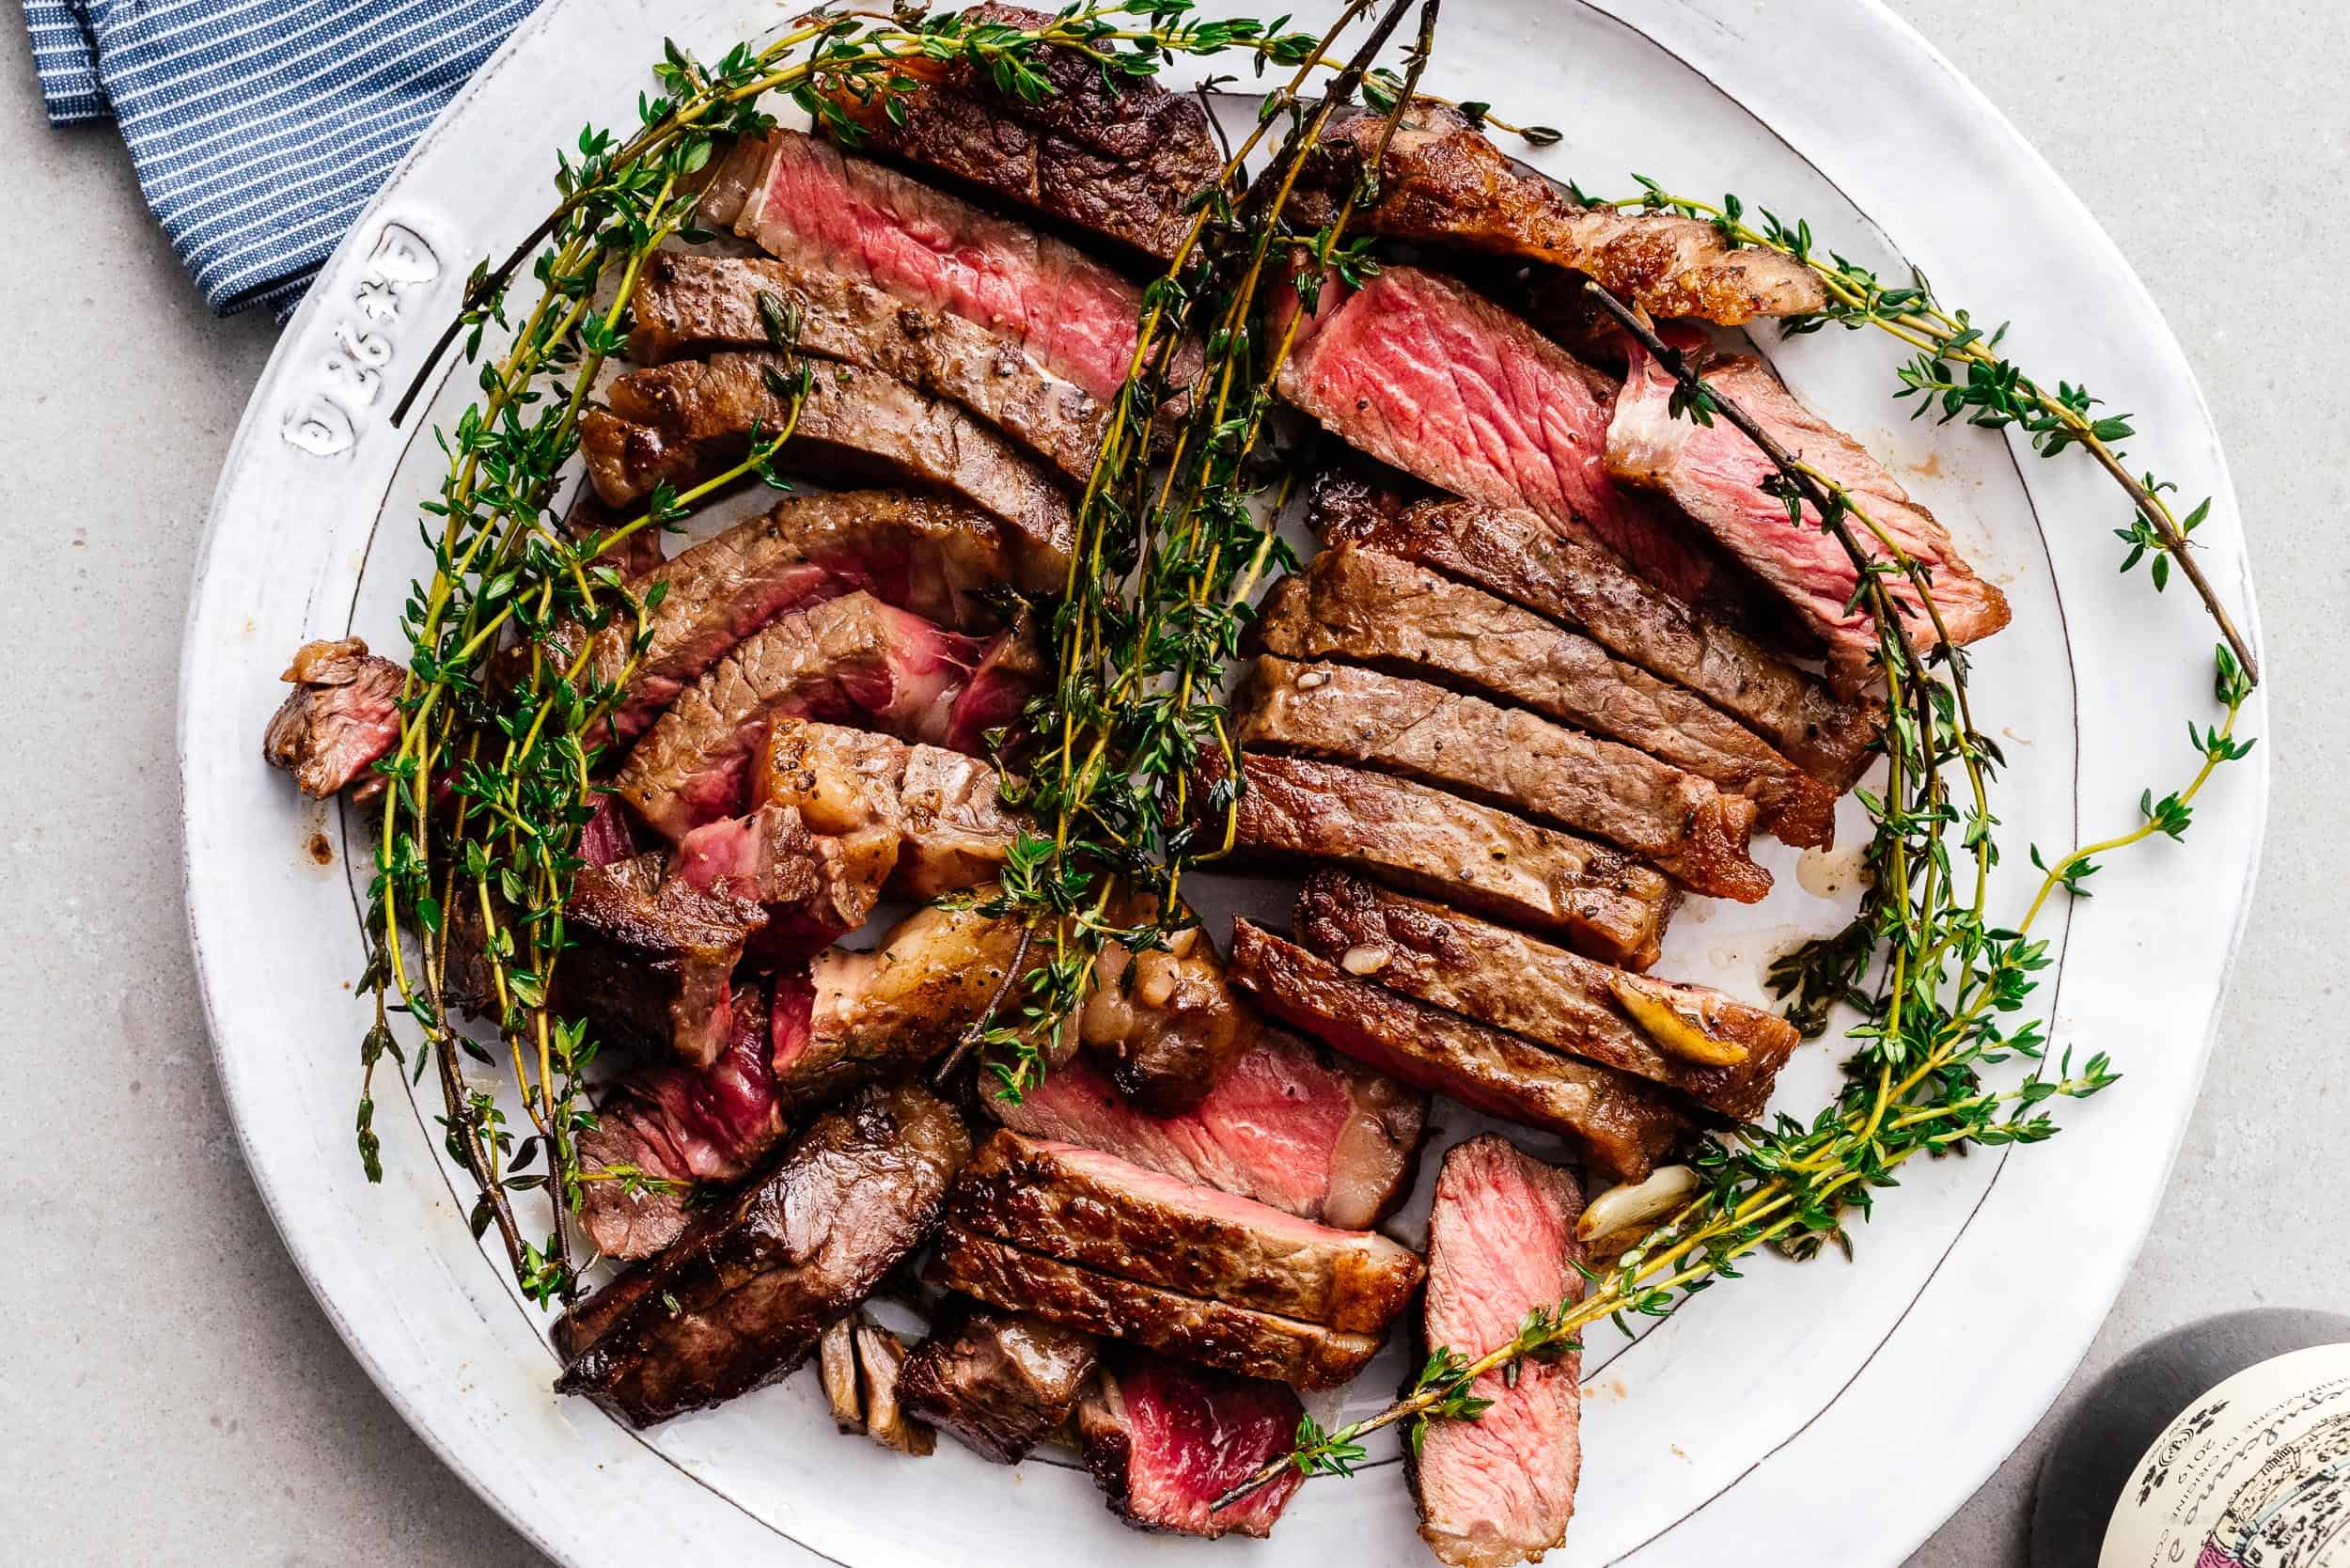
I Am... How to Cook Steak
Steak is one of those polarizing-to-cook foods: either you think you’re awesome at making steak and don’t need to learn anything new or you think only steakhouses can do things right. The truth is, most people tend to be a little nervous and feel they don't really know how to cook steak. If you're new to cooking, this is the post for you! Steak is one of the easiest and most impressive things you can make. With a little bit of knowledge, pizzazz, and finesse, you can make steakhouse chef quality steaks right at home. If you're already a steak-pro, you probably don't need to read any further, but if you’re not that experienced at cooking steak and a little bit nervous, don’t be, it's super easy! This is the all-time best technique for cooking steak: finishing it in a garlic-thyme butter. It’s easy, flavorful, and works with high dollar thick cut bone-in steaks as well as supermarket on-sale steaks. The butter, infused with garlic and thyme bastes the steak giving it a glistening, delicious sheen as well as infusing all the nooks and crannies with a rich garlic-thyme butter flavor.
Steak is always good
I love steak. It’s one of my all time favorite meals. Once, while Mike and I were at REI lining up to pay for some camping gear, Mike said we should grab some stakes too. Of course, me being me, I heard that we should grab some steak. I responded with a very enthusiastic yes then was crushed when I realized he meant that we needed some new tent stakes, not go out for steaks. We ended up getting steak that night anyway so all in all it was good.And doesn't need to be super expensive
I love all steaks, from weeknight supermarket steak with a multitude of steak sauces to a crazy over the top tomahawk steak. Steaks are juicy and meaty and full of umami and flavor. When you bite into a deliciously seared steak with a caramelized crust that gives way to a blushing ruby pink center, the juices and flavors flood your mouth and it’s pretty much the pinnacle of eating.The best way to cook steak depends on your steak
Thinner supermarket steaks have the potential to overcook if you’re following a recipe for a thick cut bone-in ribeye and similarly, a thick cut bone-in ribeye would end up charred on the outside and raw on the inside if you used a recipe for a thin steak. Our general rule is: thinner steaks get cooked on the stove or in the air fryer and thick cut or bone in steaks get reverse seared.- Thinner supermarket steaks: on the stove or in the air fryer
- Thick cut and bone in steaks: reverse seared or on the grill (or even in a pizza oven!)
Thick vs thin steaks
It's not always a clear cut choice between thick and thin steaks. The biggest difference between thick and thin steaks (besides the price) is that thick steaks allow you to get a thicker, deeper crust without overcooking your steak. If you prefer your steak on the medium-well side of things, a thin steak might be a cheaper, easier to cook, maybe even tastier choice, since it'll have more char per bite.How to cook steak on the stove
For thin steaks: Lightly pat your steak dry with paper towels and season it generously, then let it temper at room temp for at least 10 minutes. Heat a cast iron or stainless steel skillet up over high heat and add some oil to the pan, swirling to evenly coat. When the oil is hot, shimmery, and on the verge of smoking, add the steak to the pan and let to cook, without moving, for 1-2 minutes (1 minute if you like your steak on the rare side, 2 minutes for medium rare and above). Flip and sear the other side for 1-2 minutes. Reduce the heat down to medium low and add butter, garlic, and thyme to the pan. Check the internal temp of the steak. Spoon the melted butter over the sauce and when the steak is 5-10 degrees from your desired temp, remove from the pan and let rest on a cutting board for at least 5 minutes. For thick steaks: Same directions as above, but let sear for 3-4 minutes a side, then baste with the garlic butter until it hits your desired temp, flipping the steak every 2-3 minutes. This will take a little longer, about 5-10 minutes, depending on the thickness of your steak. You can also reverse sear as described a little further down, or finish it in a 450ºF oven for 5-10 minutes as well.The best pan for steak
You probably already know cast iron is the best pan to use for steak (and maybe even the cheapest!) but if you don't have one, the next best thing is the largest stainless pan you have. Not only does the size mean more thermal mass so your pan doesn't cool down as much, it'll catch more splatter too. Try to avoid nonstick unless you have no other choice. Speaking of splatter, consider investing in a splatter shield. You'll be glad you did!How to cook steak in air fryer
Best for thin steaks: Preheat the air fryer at 400°F for 5 minutes. Lightly oil a tempered, dried and seasoned steak. Air fry flipping halfway through, until the steak hits your desired temp, 5-6 minutes for rare, 7-8 for medium rare. While the steak is cooking, mix together minced garlic and fresh thyme leaves with room temp butter. When the steak is done, remove immediately from the basket and let rest for 5-10 minutes, then slice and serve with the garlic butter.How to cook steak: reverse sear
For thin or thick steaks:- Lightly pat dry and season generously, then temper your steak. Place the steaks on a rack on a baking sheet. Heat the oven to 200ºF. Cook the steaks the oven until the internal temp reaches 10 degrees below your desired doneness, anywhere between 20 to 40 minutes depending on thickness and size, checking the temp every 10 minutes if you don't have an oven probe.
- When the steak reaches temp, remove it from the oven. Heat up a pan over high heat and sear the steak 1 minute per side if using a stainless steel pan, and 30s per side if using cast iron. In both cases, use a liberal amount of high heat oil and allow the oil to get hot and shimmery.
- When brown and crusty, remove the pan from the heat and add some butter, smashed cloves of garlic, and fresh thyme to the pan. Remove the steak immediately from the pan and plate. The butter should melt from the residual heat. Spoon up and over the top of the steak, then serve.
How to cook steak: grill
Best for thick steaks: Pat your steaks dry and season with oil, salt, and pepper. Let temper while you preheat your grill on one side as high as it will go with the lid covered. When the grill reaches temp (ideally 500ºF or higher), place the steaks in the center of the heated side, 1-2 minutes per side. Transfer the seared steaks to the unheated side of grill and cook, covered. Flip the steaks every 2-3 minutes until the internal temp of the steak reaches your 5º-10ºF below your desired doneness, about 10 minutes. Let the steaks rest on a cutting board for 5-10 minutes, then slice and enjoy.Key points when making steak
- Temper the meat. This is a fancy way of saying take the steak out of the fridge and leave it at room temp for 20-30 minutes so the steak isn’t freezing cold when it touches the hot pan - if it comes straight from the fridge, it’ll drop the heat of the pan and you’ll get less of a flavorful brown crust.
- Pat it dry. This has to do with the crust again - patting your steak dry removes the moisture from the outside so when it hits the pan, the heat can (almost) instantly evaporate what moisture there is so you get a beautiful sear.
- Season it well with salt and pepper. Nothing beats the classic combo of salt and pepper, they bring out the beefiness of the beef, accentuating all of the flavors.
- Use a thermometer. If you are a steak-pro, you already know all this, and if you aren’t, I highly recommend getting a good thermometer, like an instant read thermocouple style meat thermometer. It takes all the guesswork out and gives your perfect steak temp every time.
- Let it rest. After you take your steak off the heat, let it rest for a bit so the residual heat can do its thing and the juices can redistribute.
How to choose a good steak
- Thickness: If you can, find a steak that is at least 1 inch thick. The rule of thumb is, the thicker the better. Most supermarket steaks are cut thinner to save you money and it’s not a bad thing, just know that they cook a lot faster.
- Marbling: The white streaks you see running through steak is fat, also called marbling. It’s what provides tenderness and flavor. Look for a well marbled piece, meaning lots of thin streaks of white evenly distributed throughout the steak.
- Cut: The right cut for you depends on what you want in a steak:
- Least expensive (but still good): Supermarket sirloin
- Big beefy flavors: Striploin
- Tender melt in your mouth-ness: Filet or Ribeye
- Butteriness: well-marbled wagyu sirloin
- A little different: tri tip (it's beefy and lean, if you live on the west coast, this is a pretty normal cut)
- Rare and expensive: whole ribeye cap, aka spinalis - you'll need to find a butcher for this, tender and beefy
- Source: A good steak comes from a happy cow. If you're buying a more expensive cut, look for steaks from free range, grass fed cows. If you're getting a supermarket steak, consider upgrading to an Angus or something from a farm proud enough to label its steaks.
Steak temps
For a quick and easy reference, steaks are roughly done at: Rare: 125ºF Medium-rare: 135ºF Medium: 145ºF Medium-well: 155ºF Well done: ?♂️To pre-slice or not
This is a preferential thing. Most classic American steakhouses give you a whole steak and a sharp knife and let you go to town, but fancier places around the world like to preslice your steaks into easier to handle 1/2" strips against the grain for you. You still get a knife and get the slicing experience, but it's easier to work with. It's also a much prettier presentation. Whatever you do, be sure to cut the steak against the grain.What to serve with steak
Steak sauce! Steak sauce makes any steak taste better. If you're a purist, serve it on the side. Even if it's the greatest steak in the world, if it's on the larger side, something to dip once in a while is always a welcome change.And of course you need sides!
- The creamiest mashed potatoes
- Triple cooked chips
- The crispiest roast potatoes
- The best baked potato
- Umami rich mushroom risotto
- A bright and creamy lemon pasta
- Refreshing cucumber and avocado salad
How to Cook Steak
Steakhouse chef quality steaks right at home, perfect every time!
- 16-24 oz steaks (8-12oz each, steak of choice)
- 2 tbsp butter
- 2 cloves garlic (or more, if you love garlic)
- 2 sprigs thyme
Lightly pat it dry with paper towels and season it generously. Temper for 10-20 minutes if possible.
Heat a cast iron pan up over high heat and add 1-2 tablespoons of a high smoke point oil such as grapeseed oil to the pan, swirling to evenly coat. When the oil is hot, shimmery, and on the verge of smoking, add the steaks to the pan and let to cook, without moving, for 1-2 minutes
High smoke point oils: canola, sunflower, safflower, grapeseed, and peanut.
Flip and sear the other side for 1-2 minutes, then transfer to a cutting board or plate. Using a pair of tongs and working with one steak at a time, sear the edges of the steak for 20-30 seconds each until all the edges are cooked.
Reduce the heat down to low and add butter, garlic, and thyme to the pan. The residual heat of the pan should melt the butter almost immediately.
Add the steaks back to the pan, then spoon the melted butter over the steaks, checking the temp every minute or so. When the steak is 5º-10ºF from your desired doneness, remove the steaks from the pan and let rest on a cutting board for at least 5 minutes.
Temps
Rare: 125ºF
Medium-rare: 135ºF
Medium: 145ºF
Medium-well: 155ºF
Well done: ?♂️
Slice the steaks if desired, then plate and enjoy!

I Am... Air Fryer Oreos
We are deep into winter and all I want to do is eat ALL THE THINGS. So when I saw those super easy air fryer oreos on TikTok and I had oreos in the pantry, it was a done deal. Air fryer oreos are a little trip to the state fair, in the middle of winter. We could all use a bit of sweet, melty, gooey deliciousness, am I right? Crisp and fluffy deep fried crescent roll outsides with melty oreo frosting and chocolate cookies…I am dead. Don’t sleep on dusting them with powdered sugar for those donut vibes. This is barely a recipe but I thought I would share it because deep fried oreos, but make it air fryer!
Deep fried oreos vs air fryer oreos
Deep fried oreos are classic fair food: oreos dipped in donut batter and deep fried in hot oil so they’re crispy on the outside and gooey on the inside. Air fryer oreos are wrapped in crescent roll dough then air fried so they’re crispy on the outside and gooey on the inside. Same, but different!- Deep fried oreos: batter, hot oil, kind of an ordeal, at least 30 minutes, lots of clean up
- Air fryer oreos: crescent rolls, super easy barely an inconvenience, 10 minutes max, minimal clean up.
How to make air fryer oreos
- Pop open your roll of crescent dough and lightly roll it together so it forms one sheet, pinching the perforated parts together, if needed. Cut the dough into 8 pieces.
- Lay the oreos onto each piece of dough, then wrap the oreos, pinching and tucking in the corners. Preheat the air fryer while you’re wrapping.
- Air fry for 6-7 minutes or until golden. Be sure to line the air fryer basket with foil or parchment paper.
- Dust with powdered sugar and dream about summer.
Deep fried oreos ingredients
All you need are oreos and a tube of crescent roll dough. Oh, and powdered sugar because it adds donut vibes and makes everything pretty.Pancake batter vs biscuit dough
There are air fryer oreo recipes with pancake batter out there but these are air fryer oreos without pancake mix because it’s a heck of a lot messier with pancake batter. There’s dipping and dripping and trust me, crescent rolls are superior.Do I need to preheat my air fryer?
Most of the time I say that you don’t need to, but we did some A/B testing and preheating the air fryer made it so much better. Preheat your air fryer for 2-3 minutes at 320°F.Which air fryer do you have?
If you’re wondering which air-fryer we have, it’s this one. I don’t know if it’s the best on the market because it’s the only one we’ve used, but it works great. It’s quiet and easy to clean and really big (which is good because you can put a lot of food in it and bad because it takes up a lot of room in our place).What if I don’t have an air fryer?
You can bake these guys on a parchment paper lined baking sheet in a preheated oven at 425°F for 7-8 minutes, or until golden.Make it rain icing sugar
Pro tip, if you’re going to dust with icing sugar, don’t just use a spoon to sprinkle it on. Using sieve will make your powdered sugar as pretty as untouched snow. And you don’t have a sieve, you can use a tea strainer!What else can you make with an air fryer?
Air Fryer Oreos
Crisp and fluffy deep fried crescent roll outsides with melty oreo frosting and chocolate cookies.
- 1 tube crescent rolls
- 8 oreos
- 1/2 cup powdered sugar
Release the crescent roll dough from the tube and lightly roll it out so it is one big sheet. Use a knife to cut the dough into 8 even pieces.
Wrap each oreo with a piece of dough, tucking and pinching the corners together.
Preheat the air fryer for 2-3 minutes at 320°F. Line the bottom of you air fryer with foil parchment paper and add the oreos, with plenty of space in between.
Air fry for 6-7 mins at 320°F or until golden brown.
Remove from the air fryer, let cool slightly, dust with powdered sugar and enjoy!

I Am... Alfredo Sauce – Pasta al Burro e Parmigiano
You know how once you’ve had real nigiri sushi or a really good steakhouse steak, the stuff you grew up with suddely doesn’t compare? For me it was like that with Alfredo sauce. Once you’ve had the real thing, you’ll wonder why the jarred/fast food version even exists. I recently had dinner with a buddy at a new Italian place and we ordered the cacio e pepe. It was so well executed that he was sure they added something special to the dish – it couldn’t just be cheese and cracked pepper (it was). He and his wife are both great cooks who can make fresh pasta from scratch, so I was a little surprised and asked him if he’d ever had good Alfredo sauce. He’d never even tried it! I was shocked to my core – real Alfredo sauce is a work of art that everyone needs to try at least once.
Roman-style Alfredo sauce
Alfredo sauce is like nigiri sushi: a master class in minimalism. It's just butter and cheese, but just like cacio e pepe, Alfredo sauce’s two ingredients combine to produce a huge world of flavor you’d never believe. In Italy it’s seen as basic home cooking, like how boxed mac and cheese is for us, but here, most people never consider making it from scratch, or if they do, they try to replicate the jarred stuff with dozens of ingredients and a lot of work to produce an inferior sauce. If you’ve never made the real deal 2 ingredient version, you owe it to yourself to try it today.What is Alfredo sauce
Alfredo sauce is pasta with butter and Parmigiano-Reggiano cheese. It differentiates itself from being just buttered pasta by dramatically increasing the amount of butter you’d reasonably use in a classic Italian pasta dish – if you’re even using butter at all. It was invented by Alfredo di Lelio at a trattoria in Rome and made-to-order tableside, as was the style at the time. Imagine having it somewhere here, in the before times:How to make Alfredo sauce
- Cook your pasta 3 minutes shy of the time on the box in well salted boiling water.
- Melt your butter on low heat in a small nonstick skillet while you wait for the pasta.
- Transfer the pasta with tongs to the skillet along with 1 cup of pasta water. If you don’t have tongs, reserve 1 cup of pasta water and drain, then add to the skillet without rinsing (never rinse your pasta unless it’s for salad).
- Toss the pasta in the pasta water and butter for 3 minutes on high heat, or until the sauce becomes glossy and saucy. Be sure to flip your pasta every so often so that it’s cooked evenly. Remove from the heat.
- Add the cheese and toss until the cheese has melted evenly. Season with sea salt if needed. Enjoy immediately.
Almost authentic Alfredo sauce
The original Alfredo sauce was a mix of fresh pasta, young Parmigiano cheese, and butter. In this version, I’m using aged Parmigiano-Reggiano and dried pasta. As the Italians say, Alfredo sauce is just simple home cooking, and we happen to always have Parmigiano-Reggiano in the fridge and boxed pasta in the pantry.Cream vs no-cream Alfredo sauce
But maybe you feel that you prefer the super creamy version and wonder why you should try this recipe? Well, done right, this version is creamy too! More importantly, most versions have a long laundry list of ingredients to differentiate themselves from the original. Why do the extra work and buy the extra ingredients? The richness and complexity of real deal Parmigiano-Reggiano + grass fed butter will blow your mind without any need for cream, cream cheese, garlic, or mixed dried herbs. It make look plain, but not only is this version easier with fewer ingredients and cheaper, it’s tastier too.Fresh pasta vs dried pasta
I’ve tried this with both fresh pasta and dried pasta, and prefer the dried pasta personally, both for ease and because I find it highlights the flavors better. Some of these photos were taken with fresh homemade tagliatelle, but if I’m honest I’m happier with boxed bucatini.What kind of butter to use
There’s only two ingredients in this sauce, so I vote you go with the best butter you can get. For me that's grass fed butter, either local or Irish. My actual best butter in the world is Icelandic, but you’re super lucky if you can get that where you live.What size skillet you need
You need as small of a skillet as fits your pasta. For 2 people's just about an 8" skillet. If all you have is a larger skillet, it will still work, but your pasta won't cook as much, so you should cook it to 1-2 minutes before the box time before transferring to the skillet.Grating cheese
If you’re melting cheese, you don’t need to use a labor intensive microplane or fine grater. I use the rough holes of a box grater (this one) and the cheese looks fantastic and melts evenly.Variations
This sauce is the most perfect base for anything you could want to make with pasta:- If you add fresh cracked pepper, you have amazing cacio e pepe.
- Cook shrimp in the butter (and remove) before you add the pasta to make the best scampi ever.
- Even simply toss in some cooked chicken to have classic Chicken fettucine alfredo.
- Add garlic and brown butter.
Alfredo Sauce
Just two ingredients produce a huge world of flavor you’d never believe.
- 7 oz dried pasta (or 12oz fresh pasta (I used dried bucatini))
- 4.5 tbsp butter (about 65g, salted grass fed butter preferred)
- 1 cup Parmigiano Reggiano cheese (grated, about 65g)
Cook your pasta 3 minutes short of the package time in heavily salted water.
Meanwhile, melt your butter in an 8" nonstick skillet over very low heat.
When the pasta is ready, transfer it over with tongs along with 3/4 cup pasta water to the skillet. Alternately, reserve 3/4 cup of pasta water, then drain and transfer to skillet.
Turn the skillet to high and continue cooking your pasta, stirring and flipping with a soft silicone spatula, for another 3 minutes. Flip your pasta every minute or so to ensure that all strands are evenly cooked.
When the 3 minutes are up, remove from heat and dump in the cheese. Toss for another minute or two to ensure all the cheese is melted. Taste and season if needed, then serve immediately.
I Am... Bun Rieu: Vietnamese Tomato and Crab Noodle Soup
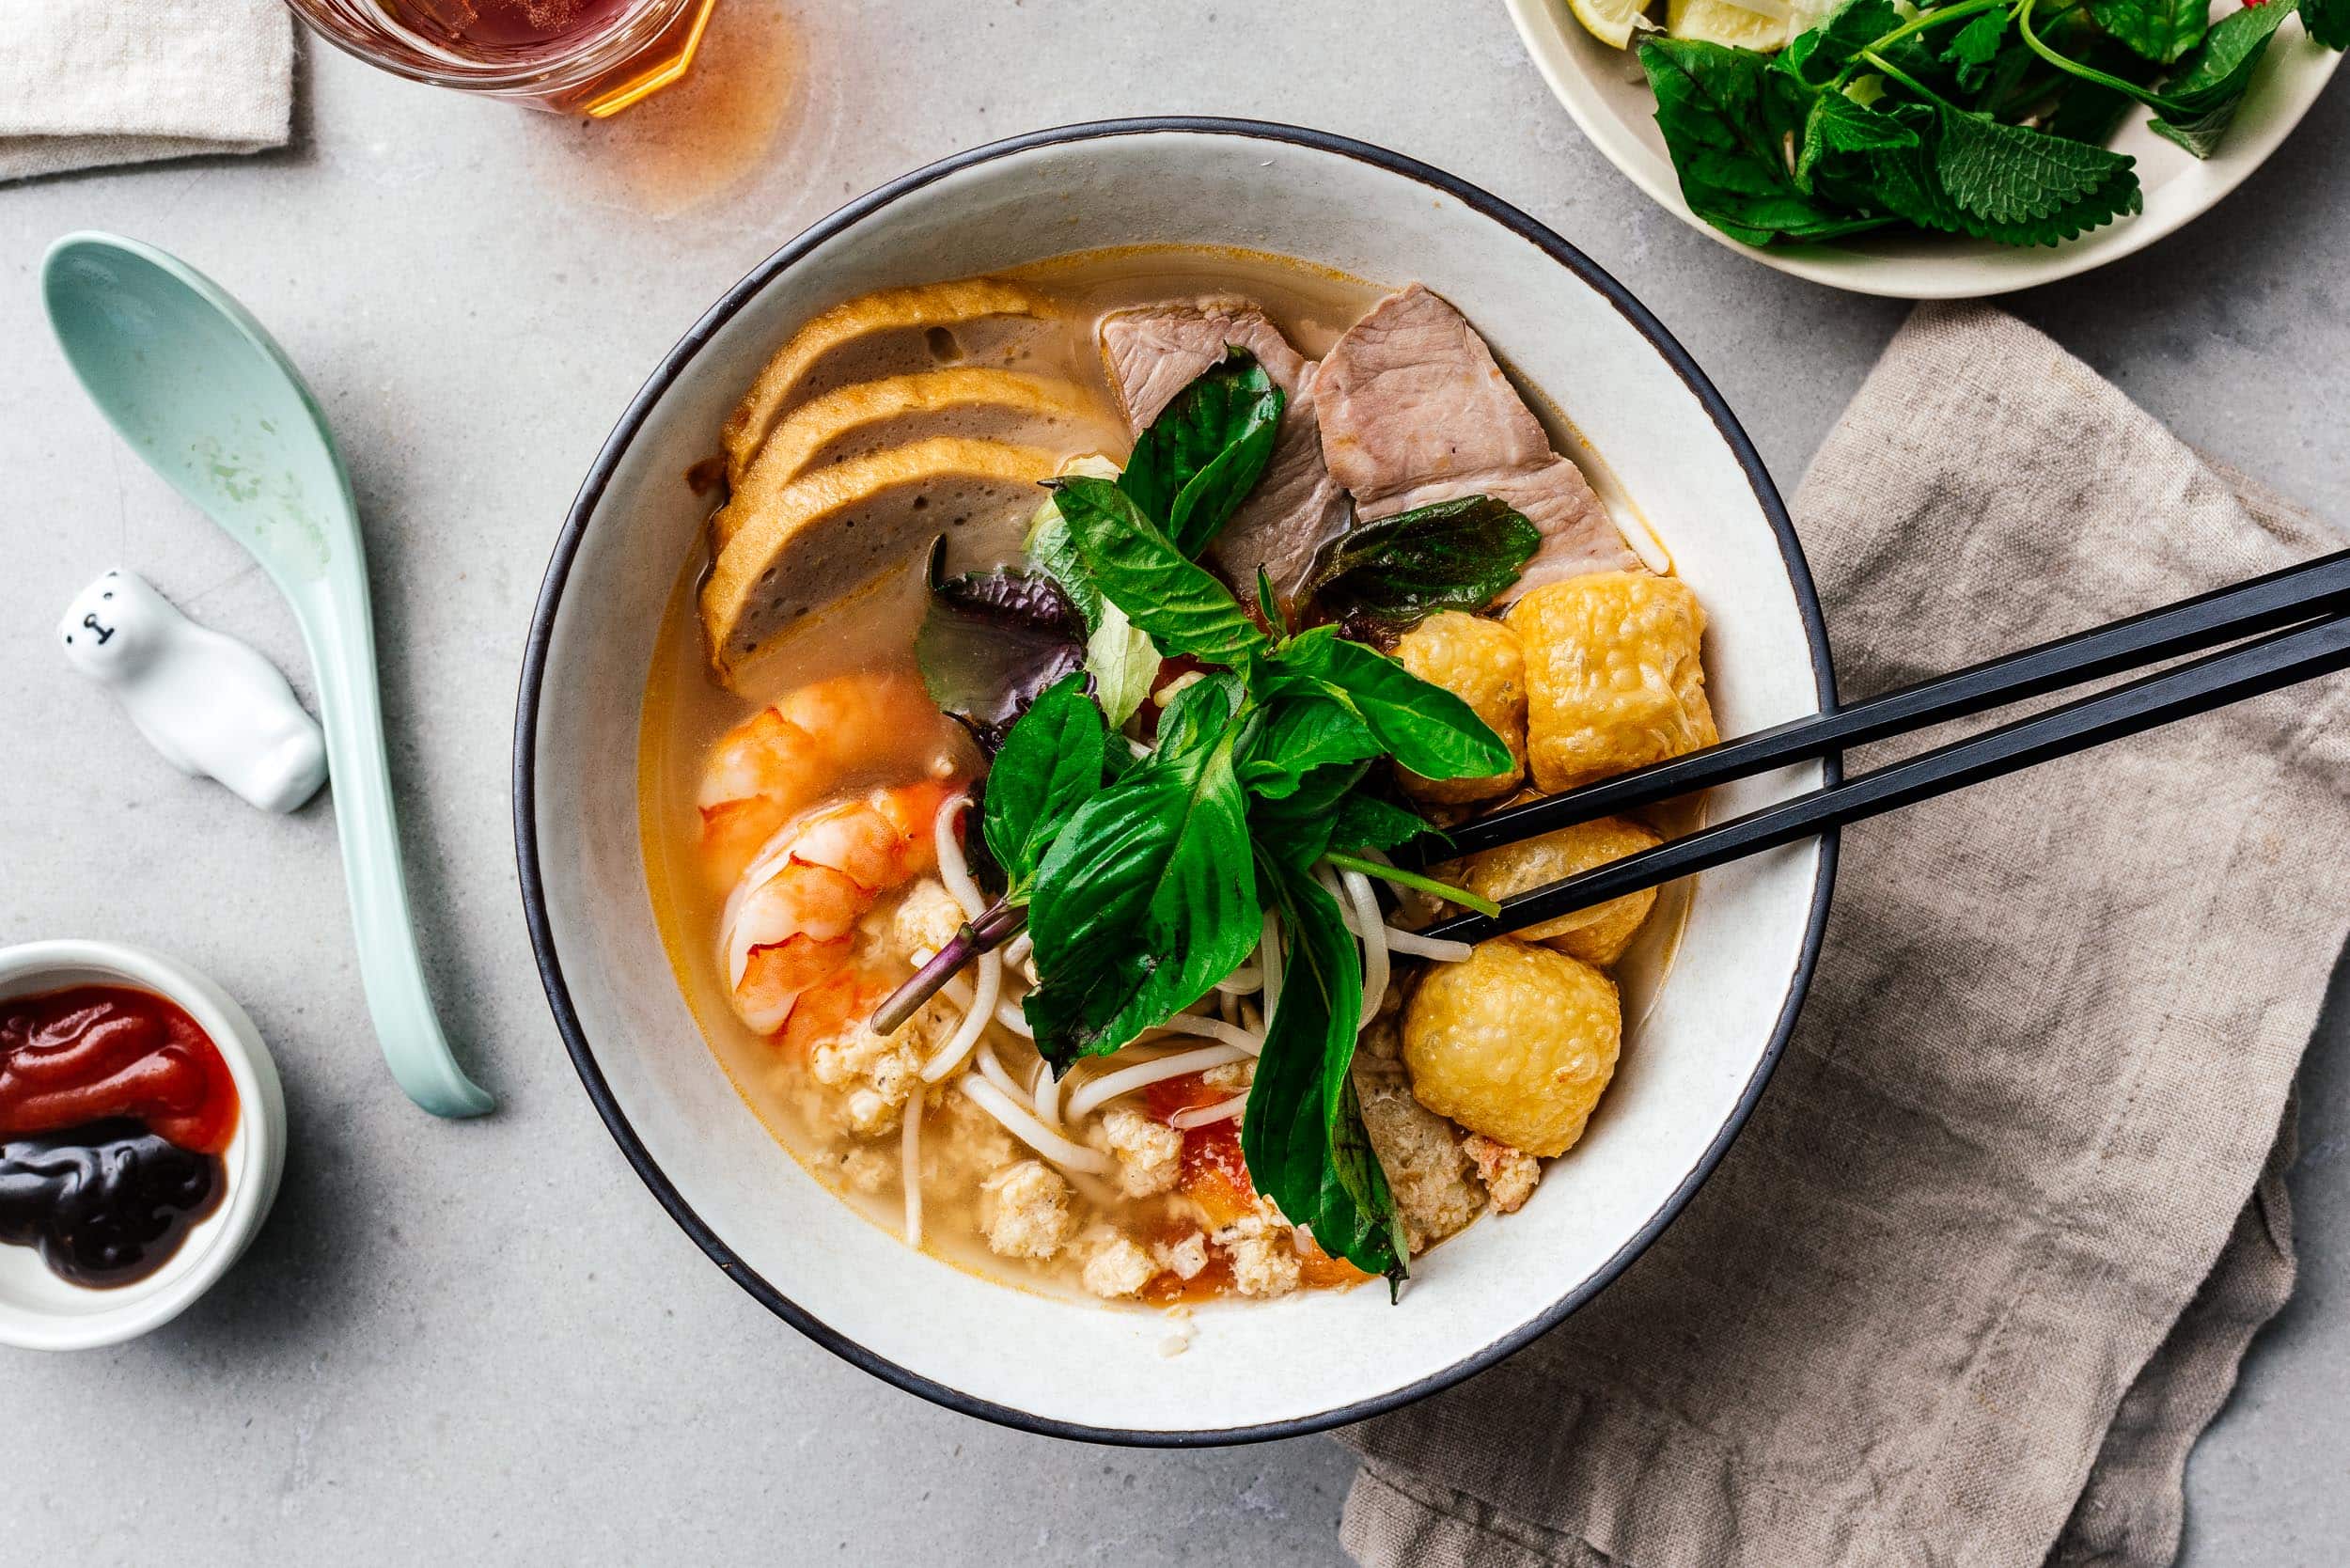
What is life without amazing noodle soups? And if you’re talking about amazing, bun rieu is up there with the greats. In terms of Vietnamese noodle soups, Bun rieu is not as well known as pho or bun bo hue, but it’s a hidden gem maybe only you’ll know about among your friends: a time tested combination of al dente rice noodles, flavorful seafood and tomato soup, and intensely delicious and really pretty toppings. Think of it like a Vietnamese bouillabaisse. The depth of flavor and complexity you get from a few simple ingredients just can’t be beat. It’s a little tart from the roma tomatoes, a little sweet from the pineapples, and so full of umami from the pork, shrimp, and crab. This one is one of my favorites.
What is bun rieu
Bun rieu (properly: bún riêu) is a Vietnamese vermicelli noodle soup featuring tomatoes and seafood – usually crab. The rieu in bun rieu means sea foam, and if made correctly, there is a crab meatball mixture that is supposed to look like seafoam and adds a punchy hit of umami to every bite. Like with most Vietnamese noodle soups, it’s finished with a variety of meats and herbs and it’s like a tiny, really delicious universe in a bowl.Why this bun rieu recipe
I was looking around on the internet and only found recipes that needed esoteric ingredients you’re not likely to find outside of a specialty Vietnamese supermarket, or super simplified ones featuring premade boxed soup mix combined with chicken stock and not much else. This version is a totally-from-scratch ode to bun rieu that’s not "seasoning packets" easy, but not so hard that it requires crushing crabs in a mortar and pestle. It’s kind of a middle ground: a little effortful, very rewarding, and authentic, but not painful. I hope you give it a try.How to make bun rieu
- Make the soup. Blanch your bones, then transfer to clean, clear water with aromatics and simmer for 4 hours.
- Blanch the shrimp and pork shoulder. Drop the shrimp and pork into the simmering soup. The shrimp should take about 10 minutes to start floating. Once they do, remove and shock them in an ice bath, then peel. Add the shells back to the stock and store the shrimp in the fridge. The pork takes 30 minutes to come to an internal temp of 135ºF. Once done, remove and refrigerate as well.
- Make the crab meatballs. Crush shallots, garlic, and sugar in a mortar and pestle, then add fish sauce. Finely chop raw shrimp in food processor, then add an egg, the shallot mix you made earlier, and drained crab meat and pulse to mix. Refrigerate.
- Prepare the vermicelli and toppings. Cook and drain the vermicelli. Chop your herbs and slice the pork loaf and shoulder. Add the tofu puffs to the soup for 3-5 minutes to soften, then remove.
- Cook the crab meatballs. Bring the soup back up to a boil, then drop small patties of the crab into the soup and let them cook for 5 minutes. It should look foamy-ish.
- Assemble. Add the dried vermicelli to the bowl. Add toppings, then cover with soup and serve immediately. Enjoy!
The best bun rieu is overnight bun rieu
Most of this recipe is passive time that you could spend making the rest of the components, but I think you should split this into a two day affair instead. Make the soup, shrimp, pork shoulder, and crab mixture on day 1, and then reheat, assemble, and enjoy on day 2. This allows you to relax, enjoy the process, and allows the crab meatballs and pork shoulder time to firm up. It’s just easier and way more fun.Where to buy pork bones
In this recipe you make a scratch pork and shrimp stock. If you're feeling lazy and want something right now, you can use store bought stock and add shrimp shells, or forgo the shrimp entirely. But if you have the time, it’s about the same difficulty, and you'll feel proud that you made this whole thing out of not much more than water and bones. It’ll taste 100x better, too. On the subject of bones, pork bones can be hard to find at your average supermarket. My usual strategy is butchershop first, then the Mexican or Asian supermarkets. As a last resort ask the meat dept of a large grocery store (such as whole foods), they can order it in for you if they don’t already have it in the back. While this recipe calls for pork neck bones, any pork bones will work, ideally bones with a little meat still on them. In a pinch you can use pork ribs or shank, which should be available everywhere.How to blanch pork bones
You need to blanch pork bones if you want a clean, clear soup. My favorite way to blanch is:- Put all your bones into a pot that’s just slightly larger, then fill up with water and bring to a boil.
- Meanwhile, fill your main stock pot with the correct amount of water and bring that to a boil on your back burner.
- By the time the pork is done blanching – approx 20 mins if you do it straight from the fridge and with cold water – the main soup will be already boiling and no time is lost. Then you just transfer the bones over with tongs, drain the smaller pot, and throw it in the dishwasher – super easy.
Pork shoulder
You’ll usually find this served in Vietnamese restaurants with sliced pork hock. I personally don’t really like working with pork hock and find it very finicky. I love eating it though, so instead of omitting it, I’ve switched it out for sliced pork shoulder. Cooked the way it says in the recipe (including the overnight rest), this pork shoulder will taste just like pork hock without the pain. If you're more masochistic (and authentic) than me, you can replace the pork shoulder with pork hock or skin-on pork leg. You’ll notice the pork is stopped at 135ºF. It’ll look a little pink when you slice it but it’ll finish another 10 degrees higher when you add it back to the boiling hot soup.Vermicelli
I’ve tried this with lots of different sized noodles and prefer a thicker vermicelli for this dish. The ones we use for bun bo hue are perfect. But you can use any size you like. In a pinch, you can even use spaghetti. To cook noodles Vietnamese style: cook to package directions, then drain and rinse under cold water. Allow to dry for 5-10 mins before assembling your bowls. This way, when you add your soup, the noodles absorb a bit of the soupy flavor as they rehydrate.Shrimp paste
Like with ketchup and everything else in life, there is shrimp paste and there is shrimp paste. Most likely, you won’t be able to find any locally and will need to resort to ordering it online, but if you live near a Vietnamese supermarket, you might be able to find the authentic stuff: mam ruoc hue. It’s a shrimp paste made from tiny shrimp caught during the winter in the area my parents grew up in, and they’ve regaled me with stories of how happy their little town was when the big shrimp boats came in. I’ve tried the various Chinese/Thai/Indonesian/etc shrimp pastes and I’ve tried this stuff, and this is what I’ve come to prefer. It doesn't smell great, but it's out of this world good.Fish sauce
Look for first press fish sauce (mắm nhĩ) such as Red Boat if you can. It will cost a little more but tastes far better. Avoid fish sauce that is opaque and has the word fermented on the label (mắm nêm) as it's crazy pungent.Fried pork loaf
If you live near a well stocked Asian or Vietnamese supermarket, be sure to pick up a package of fried pork loaf (chả chiên). It’s an optional but highly recommended topping.Shrimp
I bought individually frozen easy peel shrimp. The heads were already removed and the shrimps were cleaned with an easy cut on the shell. Peeling these were a breeze and you should definitely check them out.Crab
Authentically this dish requires pounding crab in a mortar and pestle. In this version, I used a combo of canned crab (salad crab) and raw shrimp and it tasted great. You could go the distance and buy tiny raw crabs, but you’re already making soup from scratch. I feel the crab is very forgiving in comparison to everything else.Tofu puffs
Tofu puffs are delicious little nuggets of deep fried tofu. You should be able to find them wherever you find tofu. If you can’t, just use any fried tofu or omit entirely.How big of a pot do you need for bun rieu?
This recipe, as written, is very large. There is a lot of time invested, so why not make a few extra bowls? Unfortunately, you'll need a very large pot to hold everything if you do. To make this recipe I used an 8qt stockpot as my main pot. If you don’t have a large pot, you’ll need to scale this down to the size of the pot you have, plus a little extra for the bones . I base it on 2 cups per bowl, aka 2 servings per quart. So, eg, if you have a 2.5qt pot, you should scale this down to 4 bowls.Noodle bowls for bun rieu
On the subject of bowls, you need proper bowls for any noodle soup. You’re looking for a bowl at least roughly 3” high and 9” wide. Plan ahead so you don’t find yourself eating tiny portions or eating out of mixing bowls. We’ve never regretted our noodle bowl investments, they’ve made eating everything from homemade soups to takeout ramen delightfully easy and fun. Before serving, warm your bowls with hot tap water to keep the soup hotter, longer.Chopsticks
If you’ve ever thought it was really hard to pick up noodles, you probably don’t have bad chopstick skills but instead, probably have the wrong chopsticks. There are specific chopsticks for each kind of food, and the ones we use for noodles have a rough finish at the tips so the noodles don’t slide. At the very least, use cheap wooden takeout chopsticks over smooth plastic chopsticks, your hands (and shirt) will thank you.Authenticity
Many Vietnamese people will read this recipe and say that it's not authentic. It's true, unlike my other recipes, this bun rieu is not all that authentic, technique-wise. It's meant to be easy and fun and doable with ingredients you can find at a western supermarket - but it tastes almost identical to the real thing. It's a little bit of a moot point anyway as it's a hotly debated recipe in Vietnamese circles. Some claim it's from the North, with no pork, and others claim it's central with pork, but with pork leg, not pork shoulder, or dried shrimp, not fresh shrimp. It doesn't matter, this will taste right. This is a really good and easy soup to make, and an easy gateway into homemade Vietnamese noodle soups. I hope you give it a try! -MikeBun Rieu
A delicious seafood and tomato soup featuring crab foam and delicious pretty toppings.
Soup
- 16 cups water
- 2.5 lbs pork neck bones
- 1 can pineapple (slices in juice (13oz or 20oz))
- 4 roma tomatoes (quartered)
- 1 onion (halved)
- 1 lb pork shoulder/butt
- 8 large shrimp (about 1/2" - go for 16 if you like shrimp)
- 2 tbsp sugar (or to taste)
- 3 tbsp fish sauce (or to taste)
- 1 tbsp shrimp paste
Crab Meatballs
- 1 can crab (salad crab, 120g/4oz)
- 3 large shrimp (peeled, raw)
- 1 egg
- 1 shallot (minced)
- 2 cloves garlic (crushed)
- 1 tsp sugar
- 1 tsp fish sauce
Assembly
- 28 oz vermicelli (3.5oz per bowl, look for bun bo hue vermicelli)
- 1 lime (cut into wedges)
- 1 package tofu puffs (optional but highly recommended)
- 1 package fried vietnamese pork loaf (cha chien, optional but highly recommended)
- 1 bunch Thai basil (optional but highly recommended)
- 1 bunch cilantro (optional)
- 1 bunch green onions (sliced, optional)
- 1 bag bean sprouts (washed, optional)
- 8 Thai chilies (optional)
Soup
Blanch the pork bones in a small pot while you bring a larger pot of water with the onion, pineapples, and tomatoes to a boil, then back to a simmer. When the pork bones have boiled for 5 minutes, transfer the pork over to the larger and discard the blanching water.
When the soup has stabilized to a simmer (about 1 bubble every 30 seconds), blanch the shrimp and pork shoulder and prepare an ice bath. When the shrimp start to float (about 10 min), transfer them to the ice bath, then peel and refrigerate. Add the shells back to the soup. When the pork hits 135ºF internally (about 30 min) remove and refrigerate.
Continue to simmer the soup for 4 hours slightly covered on low while you make the crab meatballs. Check back every hour or so and replenish the water as needed.
When the soup is done simmering, strain into a smaller pot or remove as many solids as you can with a spider. Season with shrimp paste, sugar, and fish sauce, a tablespoon at a time and tasting as you go. The dark red color happens after the fish sauce and shrimp paste are added, so don't worry if your soup is clearer at the end of your simmer. The soup should be on the very verge of being overseasoned. The noodles and lime will balance it out.
Crab Meatballs
In a mortar and pestle, crush shallot, garlic, and sugar until it becomes a fine paste, then stir in the fish sauce and set aside.
In a food processor (or by hand chopping) pulse the shrimp until it becomes a rough paste. Add drained crab and the shallot mixture and continuing pulsing until an evenly mixed paste is formed. Transfer to an airtight container and refrigerate.
Assembly
Give yourself about 30 minutes to assemble the soup. The vermicelli takes about 15 minutes to cook to al dente so do that first. Taste one before draining in a colander, then rinse under cold water and set aside to dry.
While the vermicelli is cooking, bring the soup up to a rolling boil and, using two spoons, spoon little crab meatballs into the soup. When the meatballs look cooked through, reduce the heat to a very low simmer.
Add tofu puffs to the soup. Slice your pork shoulder and, if using, pork loaf. Warm them in the soup. Let simmer while you prepare your bowls.
Heat up your bowls and prepare your vegetable toppings.
Assemble the bowls by adding noodles first, then pork, shrimp, and tofu puffs. Ladle the soup on top, ensuring every bowl gets an even amount of tomatoes and crab.
Enjoy immediately, with toppings.
I Am... Sushi Rice
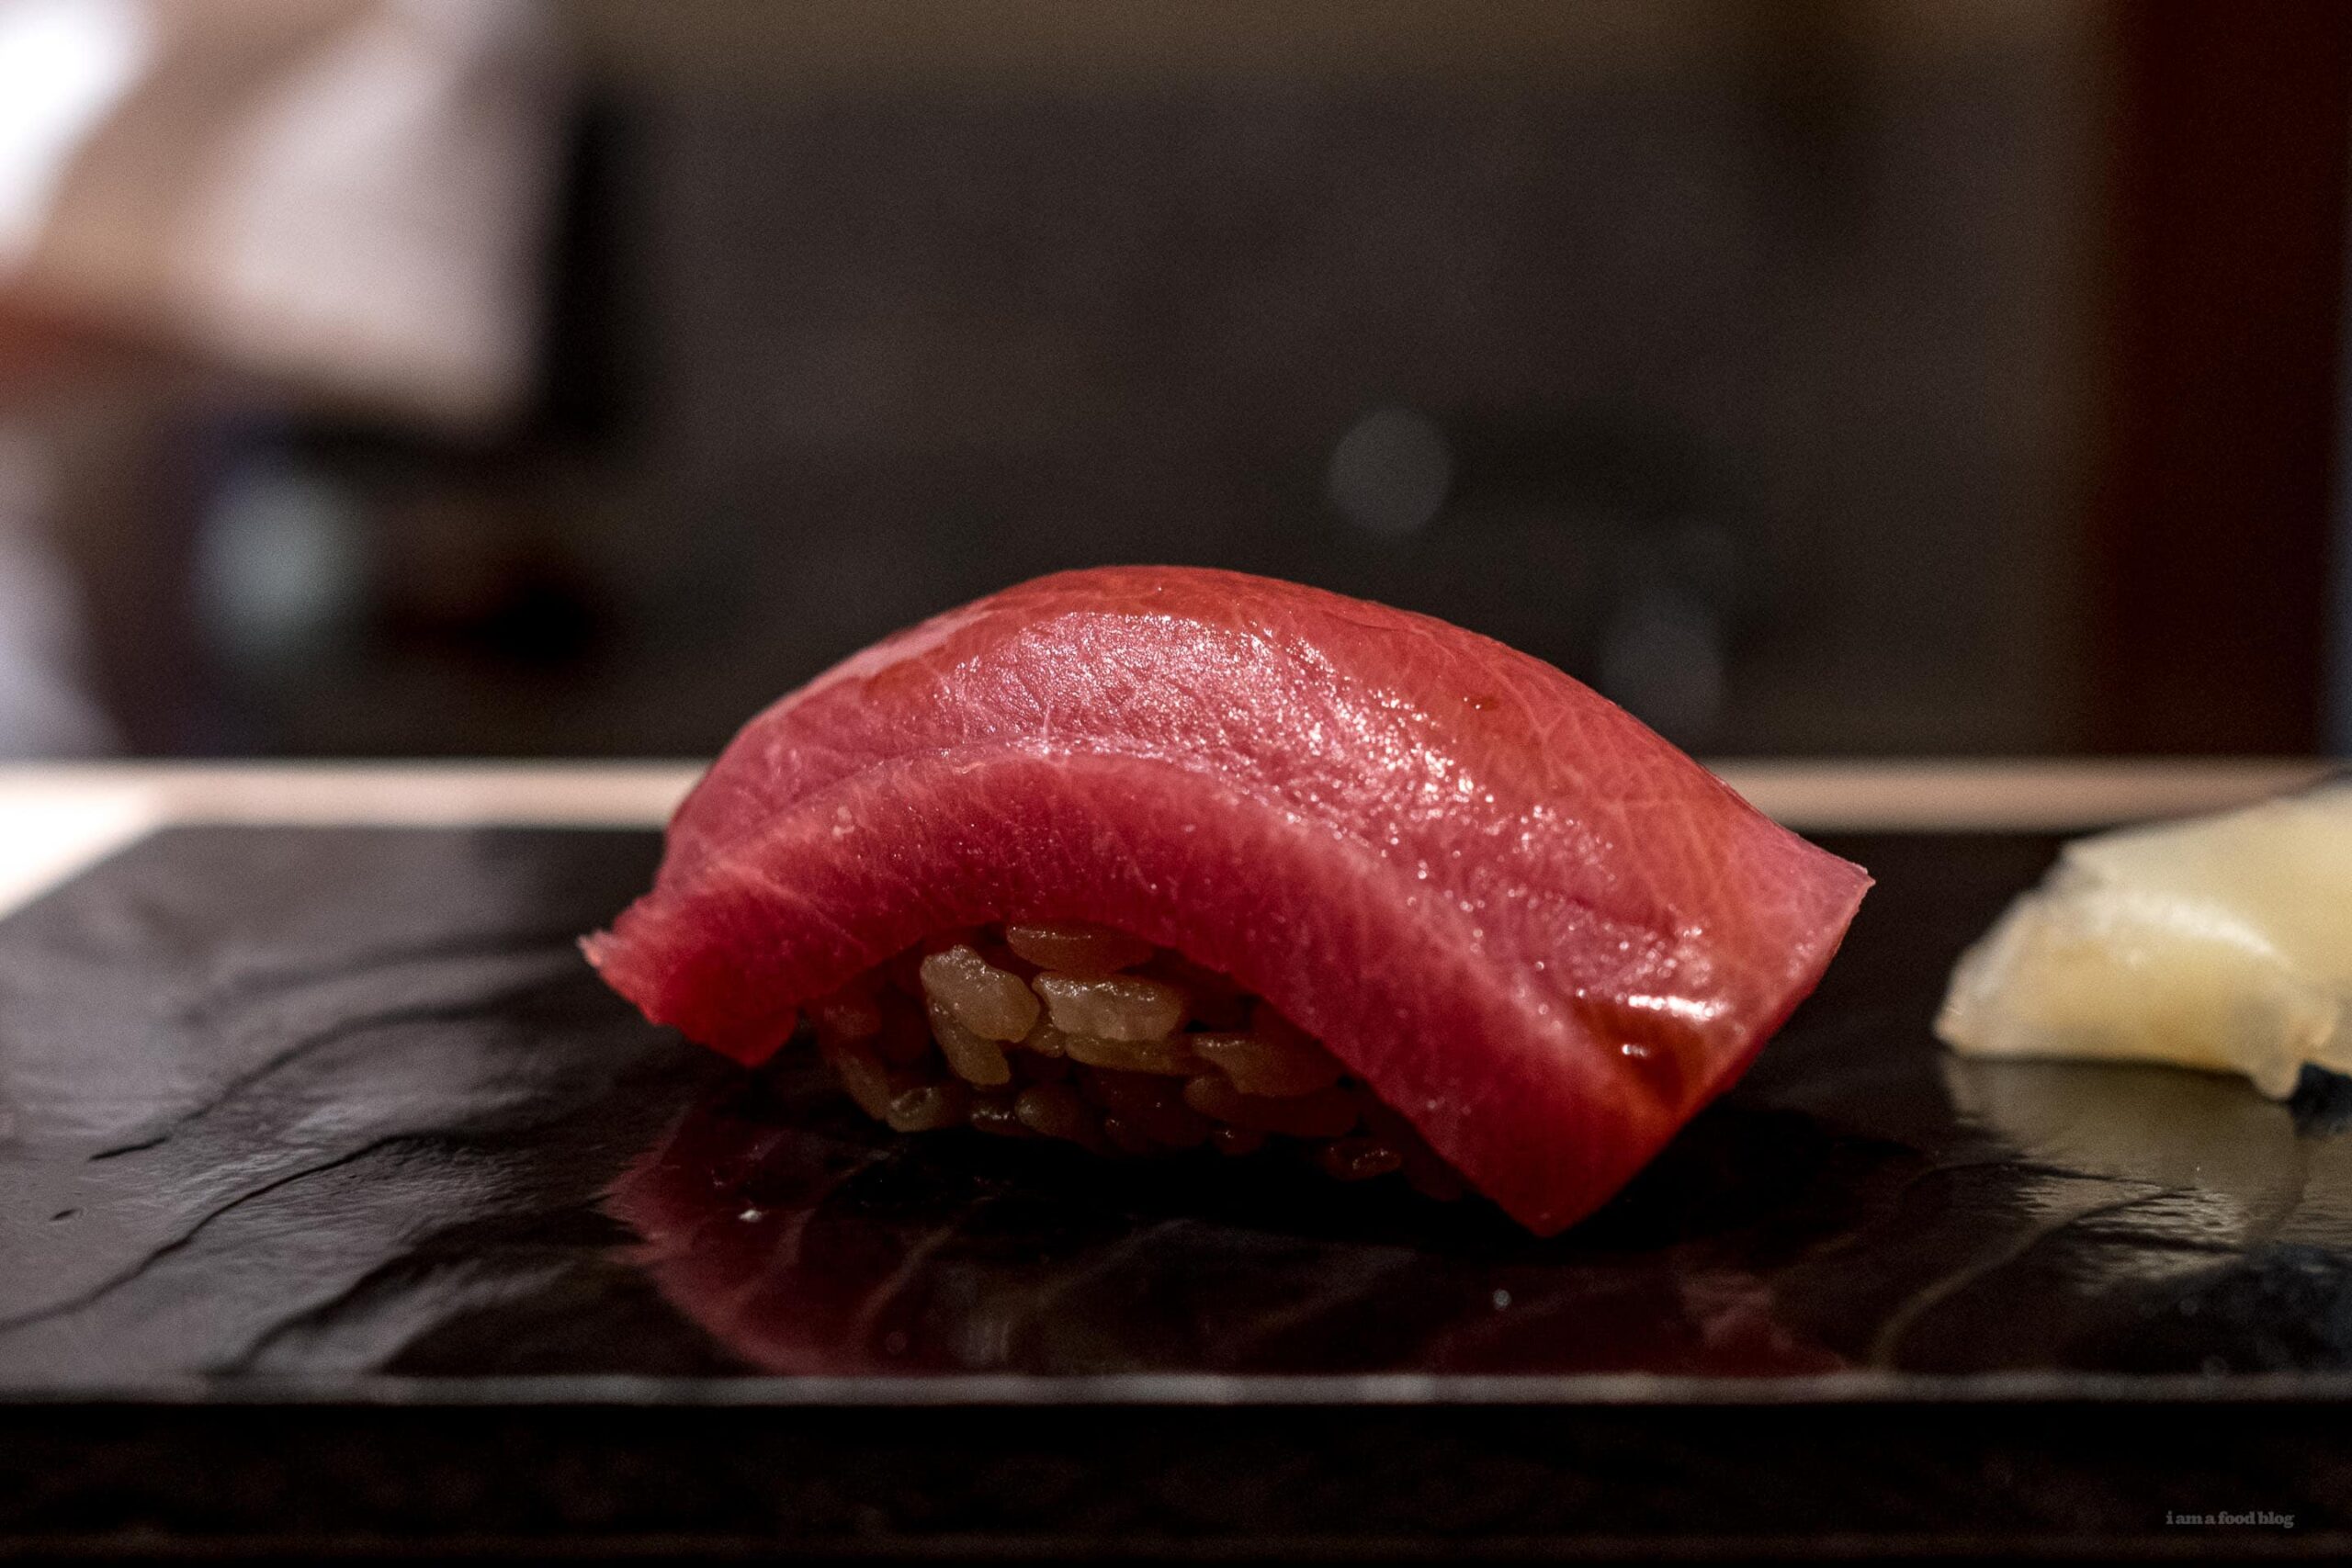
Did you know that the term sushi refers to the rice, and not the fish at all? In Japan, getting that sushi rice right is seen as the highest art. The best, most perfect in-season fish is a matter of connections and deep pockets, but the rice is an art. Ordinary nigiri is such a pale imitation of the highest grade good stuff it’s like chef boyardee vs fresh handmade pasta from a really good Italian restaurant. While the fish could concievably be the same quality, the sushi rice, even in Japan, can run the gamut from poorly-machine-made conveyor belt sushi (pictured below) to so crazy good they could just put some grass on top and it would taste good – one of Steph's favorites. But, getting the taste of sushi rice right is not nearly as hard as shaping it properly. Unless you live in a major sushi city (or Japan) it'll make for way better sushi than most anything you’ll find locally. You will instantly upgrade your homemade sushi with this simple recipe.
What is sushi rice
Sushi rice is Japanese short grain rice seasoned with salt, vinegar, and sugar to form the base for nigiri, maki, and all other kinds of sushi. At some sushi places in Japan, they often tune the rice to the specific fish – that is, they have more than one batch of sushi rice with different seasonings depending on the fish you're being served.Why is this the best sushi rice recipe
This recipe is by Masaharu Morimoto, aka Iron Chef Morimoto. He’s a super nice guy who downplays his sushi accomplishments but is definitely the real deal. For me this is the best sushi rice recipe because it’s the one that tastes closest to the best stuff we've had in Japan.How to make sushi rice
- Make the rice. You can either use a rice cooker or Instant Pot to get perfect rice, or use my usual 27 minute stovetop method which has never failed me: 1.25 cups water to 1 cup of rice, bring to a boil, cover tightly with a lid and reduce the heat to the lowest it goes. After 17 minutes, remove from heat but leave the cover on. After another 10 minutes take off the lid and continue with the steps below.
- Make the seasoning. While the rice is cooking, combine the rice vinegar, sugar, and salt in a small sauce pan and warm over medium-low heat until the sugar dissolves.
- Season the rice. When the rice is done cooking, transfer to a very large bowl. Sprinkle on half of the vinegar mixture and use a rice paddle or silicone spatula to gently mix the vinegar into the rice with a slicing motion. The idea is not to break a single grain of rice.
- Cool the rice. If you have a fan, or even a clean magazine, fan the rice for a few minutes while you gently toss it to help it absorb the sweet and sour vinegary goodness. You want it to be easily cool enough to handle. Definitely cool enough not to cook any raw fish you put on top.
- Enjoy! Taste and adjust the seasoning, adding more if needed. Cover with a damp towel until ready to use.
Red vs white rice vinegar
Most sushi rice recipes will only tell you to use rice vinegar and leave it at that, and that’s alright. But the mixing of different vinegars is one of the most important ways sushi masters show their personal style. Some will do a 50/50 mix of akazu (red rice vinegar, pictured below) with regular white rice vinegar, for instance. It completely changes the flavor profile of the rice, fish, and sushi as a whole. We bring back lots of rice vinegars from Japan (where they have whole aisles of rice vinegars) and play with them. Obviously, there’s not a lot of need to invest in these, but if you were ever interested in mixing up your usual sushi, this is where I would start. Amazon has an ever growing selection of more obscure vinegars, such as this unpolished brown rice vinegar from Mizkan, this amber rice vinegar from Kagoshima, or even this black rice vinegar (kurozu) for a wild (but real) black sushi style.Rice vinegar vs seasoned rice vinegar
But speaking of vinegar. the standard plain rice vinegar should be a green cap. Don’t buy the orange capped pre-seasoned rice vinegar (aka sushi vinegar). Or do, but don’t add the sugar and salt in this recipe and just use it out of the bottle as-is. It’s not nearly as good to go the premix route but it certainly is much more painless. I prefer going the distance. In this recipe, the assumption is that you are using unseasoned rice vinegar.The best rice to use
I’ve seen on the internet that some people suggest using glutinous rice. This is just wrong. I’ve also seen recommendations for sushi rice, which sounds ambiguous and weird at best to me. My recommendation is to get a simple koshihikari. It doesn't matter whether its from Japan or California. You should be able to find koshihikari at any Asian grocery store or, of course, online. My favorite rice is nanatsuboshi from Hokkaido.Instant pot sushi rice
You can make great sushi rice in an Instant Pot! Just cook your rice as normal, then release the lid and you can season and fan the rice right inside the instant pot. No other changes needed.What to use this sushi rice for
- california roll cones!
- make an ehomaki to celebrate the beginning of spring
- order up some assorted sashimi from your favorite sushi-ya and make a chirashi bowl
- or fry up a salmon filet and go to town. Sushi rice and fish is a combination that can’t be beat – it doesn’t matter whether the fish is raw or cooked.
- And heck, forget everything I said up top about about the art of nigiri and just have some fun making it at home!
Sushi Rice
Instantly upgrade your homemade sushi
- 1 cup rice (Short-grain Japanese rice such as koshihikari preferred)
- 1/4 cup rice vinegar (see notes)
- 2 tbsp sugar
- 1 tbsp salt (sea salt preferred)
Place the sushi rice in a colander, rinse throughly and let drain for 15 minutes. Cook rice according to the package instructions or your preference.
While the rice is cooking, combine the rice vinegar, sugar, and salt in a small sauce pan and warm over medium-low heat until the sugar dissolves.
When the rice is done cooking, transfer to a very large bowl. Sprinkle on half of the vinegar mixture and use a rice paddle or spatula to mix the vinegar into the rice while using a slicing motion. Fan the rice while mixing to dry it out slightly – it helps if you have a friend to fan while you mix. Taste and adjust the seasoning, adding more if needed. Cover with a damp towel until ready to use. Enjoy!
You can use regular rice vinegar, but experimenting with a combination of red and white vinegar is recommended.
Courtesy of Masaharu Morimoto via food & wine.

I Am... Keto Soufflé Pancakes
Why should regular fluffy pancakes have all the fun? Keto soufflé pancakes can be friends too! If you’re doing keto January and are looking for a bit of food inspiration, these keto soufflé pancakes are here for you! Have you ever seen those giant, fluffy Japanese jiggly pancakes floating around the internet? They’re soft and sweet and incredibly jiggly. If you’ve had the pleasure of traveling to Japan maybe you cheated on keto and tasted them? They’re wonderful, I have to admit! Well, you can have them too, with just a couple of tweaks!
What are soufflé pancakes?
A soufflé pancake is a pancake made using soufflé techniques. They were popularized in Japan where you can find all sorts of jiggly, fluffy pancakes topped with just about anything. They’re made by whipping up egg whites with sugar into a glossy thick meringue then mixed with a batter made with the yolks. Soufflé pancakes are fluffy, jiggly, sweet, soft, and so, so delicious. They taste like you are eating a sweet pancake cloud, with butter and syrup!How are these keto soufflé pancakes?
Regular soufflé pancakes have sugar, flour, and milk, all which are on the no-eat list for keto. We’ll do a couple of simple swaps to make these low carb and keto-friendly! Instead of sugar, we’re going to use swerve, which is my favorite one-to-one sweetener. You can use whatever kind of sweetener you have on hand, but you’ll need to adjust the amount accordingly if it isn’t a one-to-one swap. As for the flour, there is such a tiny amount in regular keto soufflé pancakes, that swapping it out for fine almond flour works perfectly. The milk is simply switched out for cream with a bit of water.How to make keto soufflé pancakes
- Mix. Mix the egg yolk and sweetener until frothy, then mix in the cream and water. Sift in the almond flour and baking powder, making a smooth batter. Set aside.
- Whip. Make the meringue by beating together sweetener, egg whites, and cream of tartar. When the egg whites hold their shape and are stiff and glossy, they’re ready.
- Incorporate. Fold the egg yolk batter into the whites, being careful not to deflate.
- Cook. Heat up a pan (or a crepe maker) on very, very low heat. Lightly oil the pan then scoop out a large dollop of batter, cover and cook for 4-5 minutes. Remove the lid then pile some more batter on and add a couple drops of water. Cover and cook. When the bottoms are golden, very carefully flip, add a couple more drops of water, then cover and cook. Remove from the pan and enjoy immediately with butter, keto-friendly syrup, and keto-friendly powdered sugar. The pancakes will deflate as they cool down.
Keto Pancake ingredient notes
- Eggs. Eggs make up the bulk of the pancakes. It’s best to use room temp eggs.
- Sweetener. Swerve is my go to sugar-free alternative and it adds just the right amount of sweetness.
- Cream. We’ll thin the cream out with a touch of water so it becomes the consistency of milk.
- Almond flour. You need just the tiniest amount of almond flour to help your pancakes hold their shape. Superfine almond flour will give you the best results!
- Baking powder. Baking powder is what makes the pancakes rise tall and fluffy.
- Cream of tartar. Cream of tartar is a stabilizer that will help your egg whites whip up to their potential. Stable fluffy egg whites are the key to successfully making soufflé pancakes. If you don’t have cream of tartar, you can sub in 1/2 teaspoon of lemon juice.
Tips for successful keto soufflé pancakes
Make a proper meringue. Make sure your utensils are clean and there is absolutely no oil or fat residue on your whisk or bowl. Any possibility of oily residue will make it hard for your eggs to whip up properly. Whipping egg whites takes time, so don’t be surprised if it takes a while for them to whip up. Properly whipped whites are what make the keto pancakes fluffy, so be sure to take your time. Be careful while incorporating the meringue and the rest of the batter. Over mixing can lead to deflating the pancakes, so do a gentle scoop and fold motion when mixing. Cook on low! You’re almost steaming the pancakes. If you cook them on high, the outsides will burn and the insides will be raw. Patience is key.Keto Soufflé Pancakes
A super easy keto version of the soft and sweet and incredibly jiggly Japanese pancakes we all know and love.
Yolks
- 1 egg yolk
- 1 tbsp Swerve
- 1 tbsp cream
- 1 tbsp water (to mix with the cream)
- 1 tbsp almond flour
- 1/4 tsp baking powder
Whites
- 2 large egg whites
- 1/8 tsp cream of tartar
- 1.5 tbsp Swerve
Whisk the egg yolk with 1 tablespoon of swerve until pale and frothy. Mix the milk (or cream mixed with water) in batches. Sprinkle the almond flour and baking powder over the yolk mixture and whisk well making sure everything is incorporated.
Whip the egg whites with the cream of tartar until frothy and pale, adding in the swerve in bit at a time until the whites are whipped into a glossy thick meringue that holds a peak. Be careful not to over whip.
Take 1/3 of the whipped egg whites and whisk it into the bowl with the yolks until completely incorporated. Add half of the remaining whites and whisk into the yolk batter, being careful not to deflate. Transfer the egg yolk mixture to the remaining egg whites, whisk and then use a spatula to fold together.
Heat up a large non stick frying (with a lid) pan over low heat. Very lightly brush with oil and use a paper towel to rub it around. You want a very light film. Using an ice cream scoop or measuring cup, place scoops of pancake batter 2-3” apart on the pan (see notes). Cover and cook for 4-8 minutes.
Lift the lid and use a spatula to gently peek under the pancake. The pancake should release easily – don’t force it. Gently flip. Cover and cook for 5-6 minutes. The pancakes will grow even taller and fluffier when they’re done.
Once the pancakes are golden and cooked through, gently remove and serve on a plate with keto powdered sugar, butter, whipped cream, and keto maple syrup. Enjoy immediately!
Unless you have a very large pan with a lid, it’s probably best to make these two or even one to a pan. If you have a crepe maker or griddle with a lid that will cover the entire thing without touching the pancakes, use that on the lowest setting.
I Am... Salisbury Steak
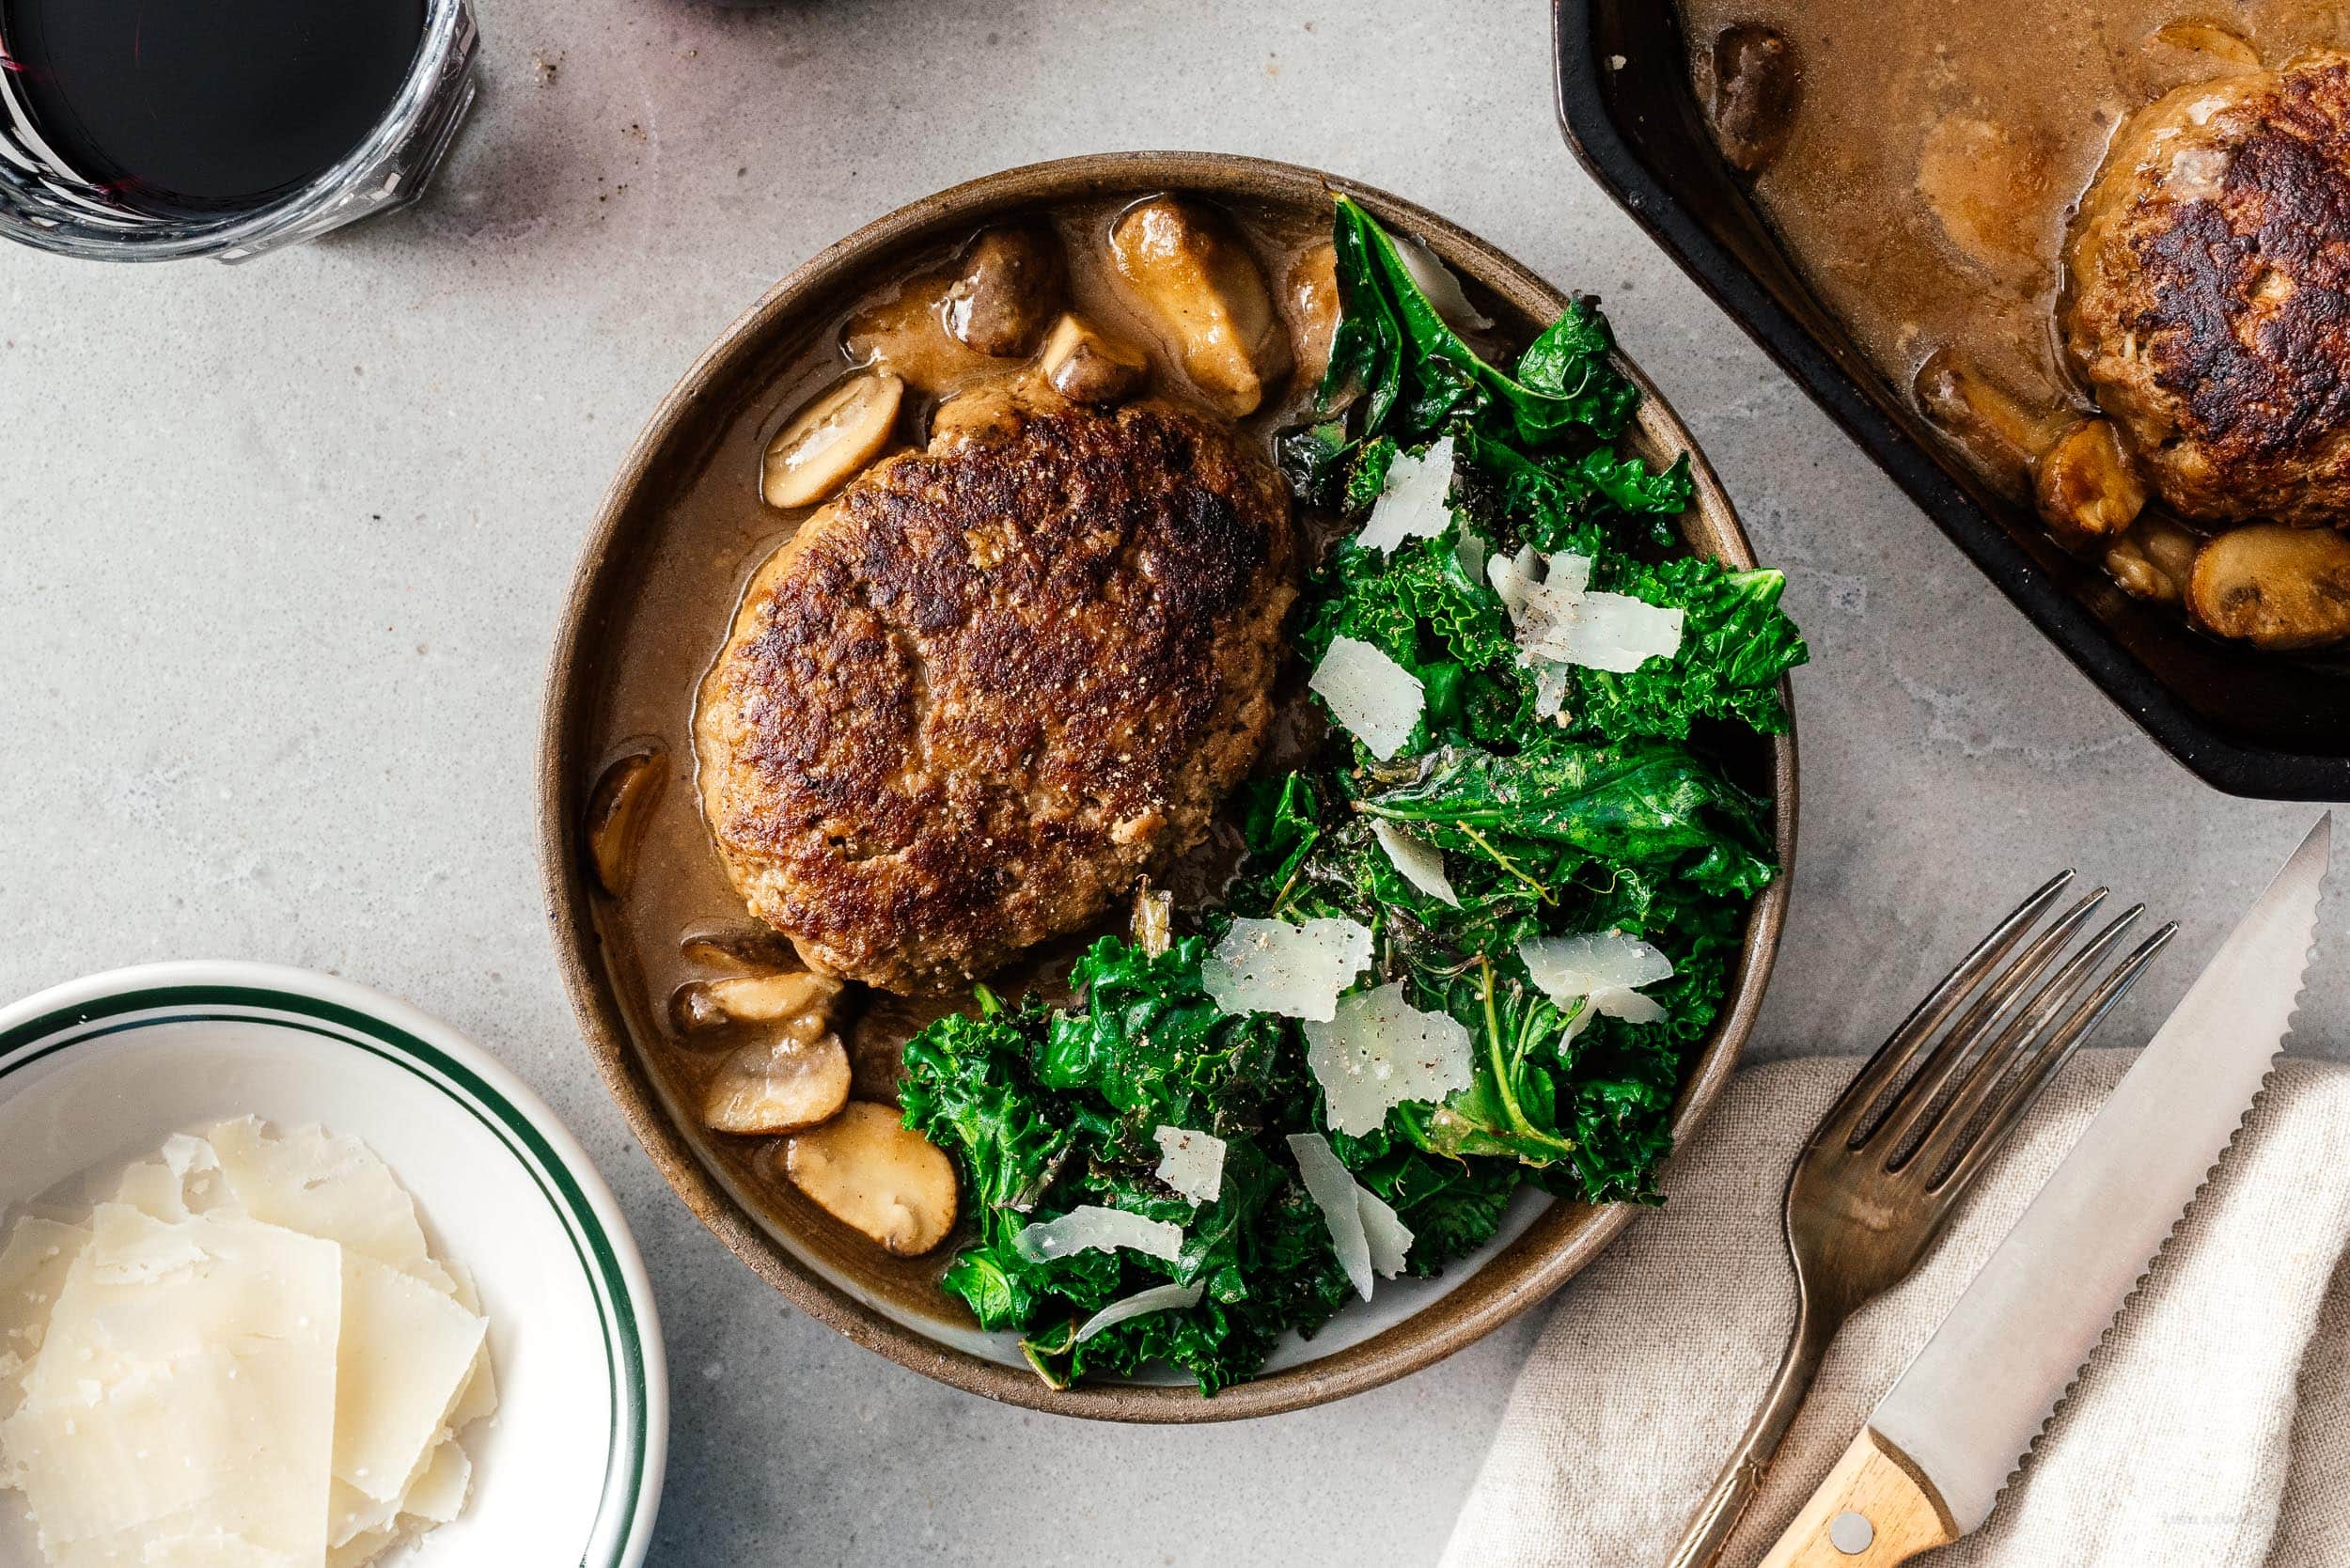
When you feel like a retro, super comforting throwback meal, salisbury steak is here for you. Super juicy, tender beef patties swimming in a umami rich mushroom gravy is my idea of heaven on a plate! I have a thing for retro food. Mike always says I have the taste of an old person because I like things like chicken a la king, steak Diane, chicken tetrazzini, tuna casserole, and of course, salisbury steak! But really, how could you not love what is essentially a hamburger with mushroom sauce?!
What is salisbury steak?
Salisbury steak is an American take on Hamburg steak. Essentially, it’s a seasoned ground beef patty served with gravy or a brown sauce. Salisbury steaks used to be popular way back in the 1900s. Mr. Salisbury promoted a meat-centric diet (he was keto before keto was a thing!) for health reasons and one of his most popular dishes was the salisbury steak. Modern salisbury steak is kind of like a giant meatball or mini meatloaf: a mix of ground beef, seasonings, breadcrumbs and egg. The result is super moist, tender, juicy, and full of flavor.Why you should make salisbury steak
This is a grown up better-than-you-remember salisbury steak. If you grew up eating TV dinners and have a nostalgic warm feeling towards those little divided trays but can’t bring yourself to buy a frozen dinner but still want to capture that feeling, this salisbury steak recipe is for you!! It’s full of big beefy flavors thanks to the Worcestershire – which absolutely amps up the beefiness – and mushrooms. Seriously, mushrooms and steak are a match made in heaven. Plus, this recipe is awesome for when you want that steak feeling of eating with a knife and fork, but you don’t want to pay the big bucks for a rib eye. Sometimes you just want a big plate of comfort and trust me, salisbury steak delivers.How to make salisbury steak
Mix, shape, fry, simmer, serve!- Mix: Mix together ground beef with onions, garlic, bread crumbs, an egg, and seasoning until everything is incorporated. Shape: Shape the meat into patties.
- Fry: Heat up a touch of oil in a pan and sear the patties on both sides. Remove from the pan and set aside while you make the gravy.
- Simmer: Make a quick gravy to finish the steaks in. Melt some butter and brown the mushrooms. Sprinkle on a bit of flour and cook, stirring. Slowly stream in some beef stock, then add the steaks back in and bring everything to a simmer to thicken the gravy and finish cooking the steaks.
- Serve: Taste and season the gravy then enjoy!
Ingredient notes
The beauty of salisbury steak is that all the ingredients are pretty much in your pantry aside from the ground beef. Here’s what you need: ground beef - this is pretty straight forward, I used lean, so these patties were extra juicy thanks to the fat content, but if you’re looking to be a bit healthier, you can go extra lean too. onion - most Salisbury steak recipes call for finely chopped onions but I like to pop the onion into the food processor and blend them into an onion-y pulp so it mixes into the ground beef better. If you don't have a food processor, you can just mince everything together as finely as you can, but those little mini prep food processors are small and really easy to use. We have this one but there are some that are as cheap as $20 or less. garlic - you can mince this, or even easier, put it into the food processor! bread crumbs - I like panko breadcrumbs, because they’re big and fluffy and give a really nice texture to things like meatballs and this salisbury steak. If you only have regular breadcrumbs, you can use those too. egg - the egg helps bind everything together. ketchup - yep, there’s a tiny bit of ketchup in this! It’s what gives it that hint of retro-taste. dijon - the dijon adds a nice tiny bit of background heat and mustard flavor. Worcestershire - this adds a huge boost of umami! mushrooms - you can go for whatever mushrooms you like, just give them a slice. If you want to make this a bit fancier, you can try a wild mushroom medley. I went with regular brown mushrooms. butter - this is going to give the gravy a rich flavor. flour - just a touch of flour to thicken the gravy. beef stock - go for unsalted beef stock so you can control the salt content.What to serve with salisbury steak
Classically salisbury steak is served with mashed potatoes and a green. We went with kale because I loved the contrast of rich gravy and meat with the healthy vibe of kale. Try this recipe if you’re looking for a super smooth, lux mashed potato. Serve up some broccoli or Brussels sprouts too!Salisbury Steak
This is a grown up better-than-you-remember salisbury steak. It’s full of big beefy flavors thanks to Worcestershire sauce and mushrooms.
- 1/2 medium onion (roughly chopped)
- 2 cloves garlic
- 1 lb ground beef (lean preferred)
- 1/4 cup panko
- 1 egg
- 1 tbsp ketchup
- 1 tbsp Worcestershire sauce
- 2 tsp dijon mustard
- 1/2 lb mushrooms (sliced)
- 2 tbsp butter
- 2 tbsp all purpose flour
- 2 cups beef stock (no/low sodium preferred)
Place the onion and garlic in a food processor with 1 teaspoon water and purée, until the onion and garlic is very well blended. If you don't have a food processor, you can just mince everything together as finely as you can.
Gently mix the blended onion and garlic with the ground beef, panko, egg, ketchup, 1 teaspoon Worcestershire, and 1 teaspoon dijon until completely incorporated. Divide the mix into 4 and shape into oval patties.
Sear the patties: Heat a bit of oil in a skillet over medium-high heat. Add the patties and sear until the patty crusts and browns, about 3-4 minutes per side. Flip and cook the other side until it browns. Remove from the pan and set on a plate.
Make the gravy: In the same skillet, add the butter and melt over medium heat. Add the mushrooms and cook, stirring, until the mushrooms are golden, 2-3 minutes.
Sprinkle on the flour and cook for 30 seconds, stirring to coat the mushrooms in flour. Slowly stream in the beef stock, stirring. Stir in the remaining 2 teaspoons Worcestershire and 1 teaspoon of dijon.
Add the steaks, along with any juices on the plate, back into the pan with the gravy and bring to a simmer. Cook, uncovered, for 5-7 minutes, or until the gravy thickens. Remove from the heat, taste, and season the gravy with salt and pepper.
Estimated nutrition includes all the gravy
I Am... Egg Roll in a Bowl Keto Recipe
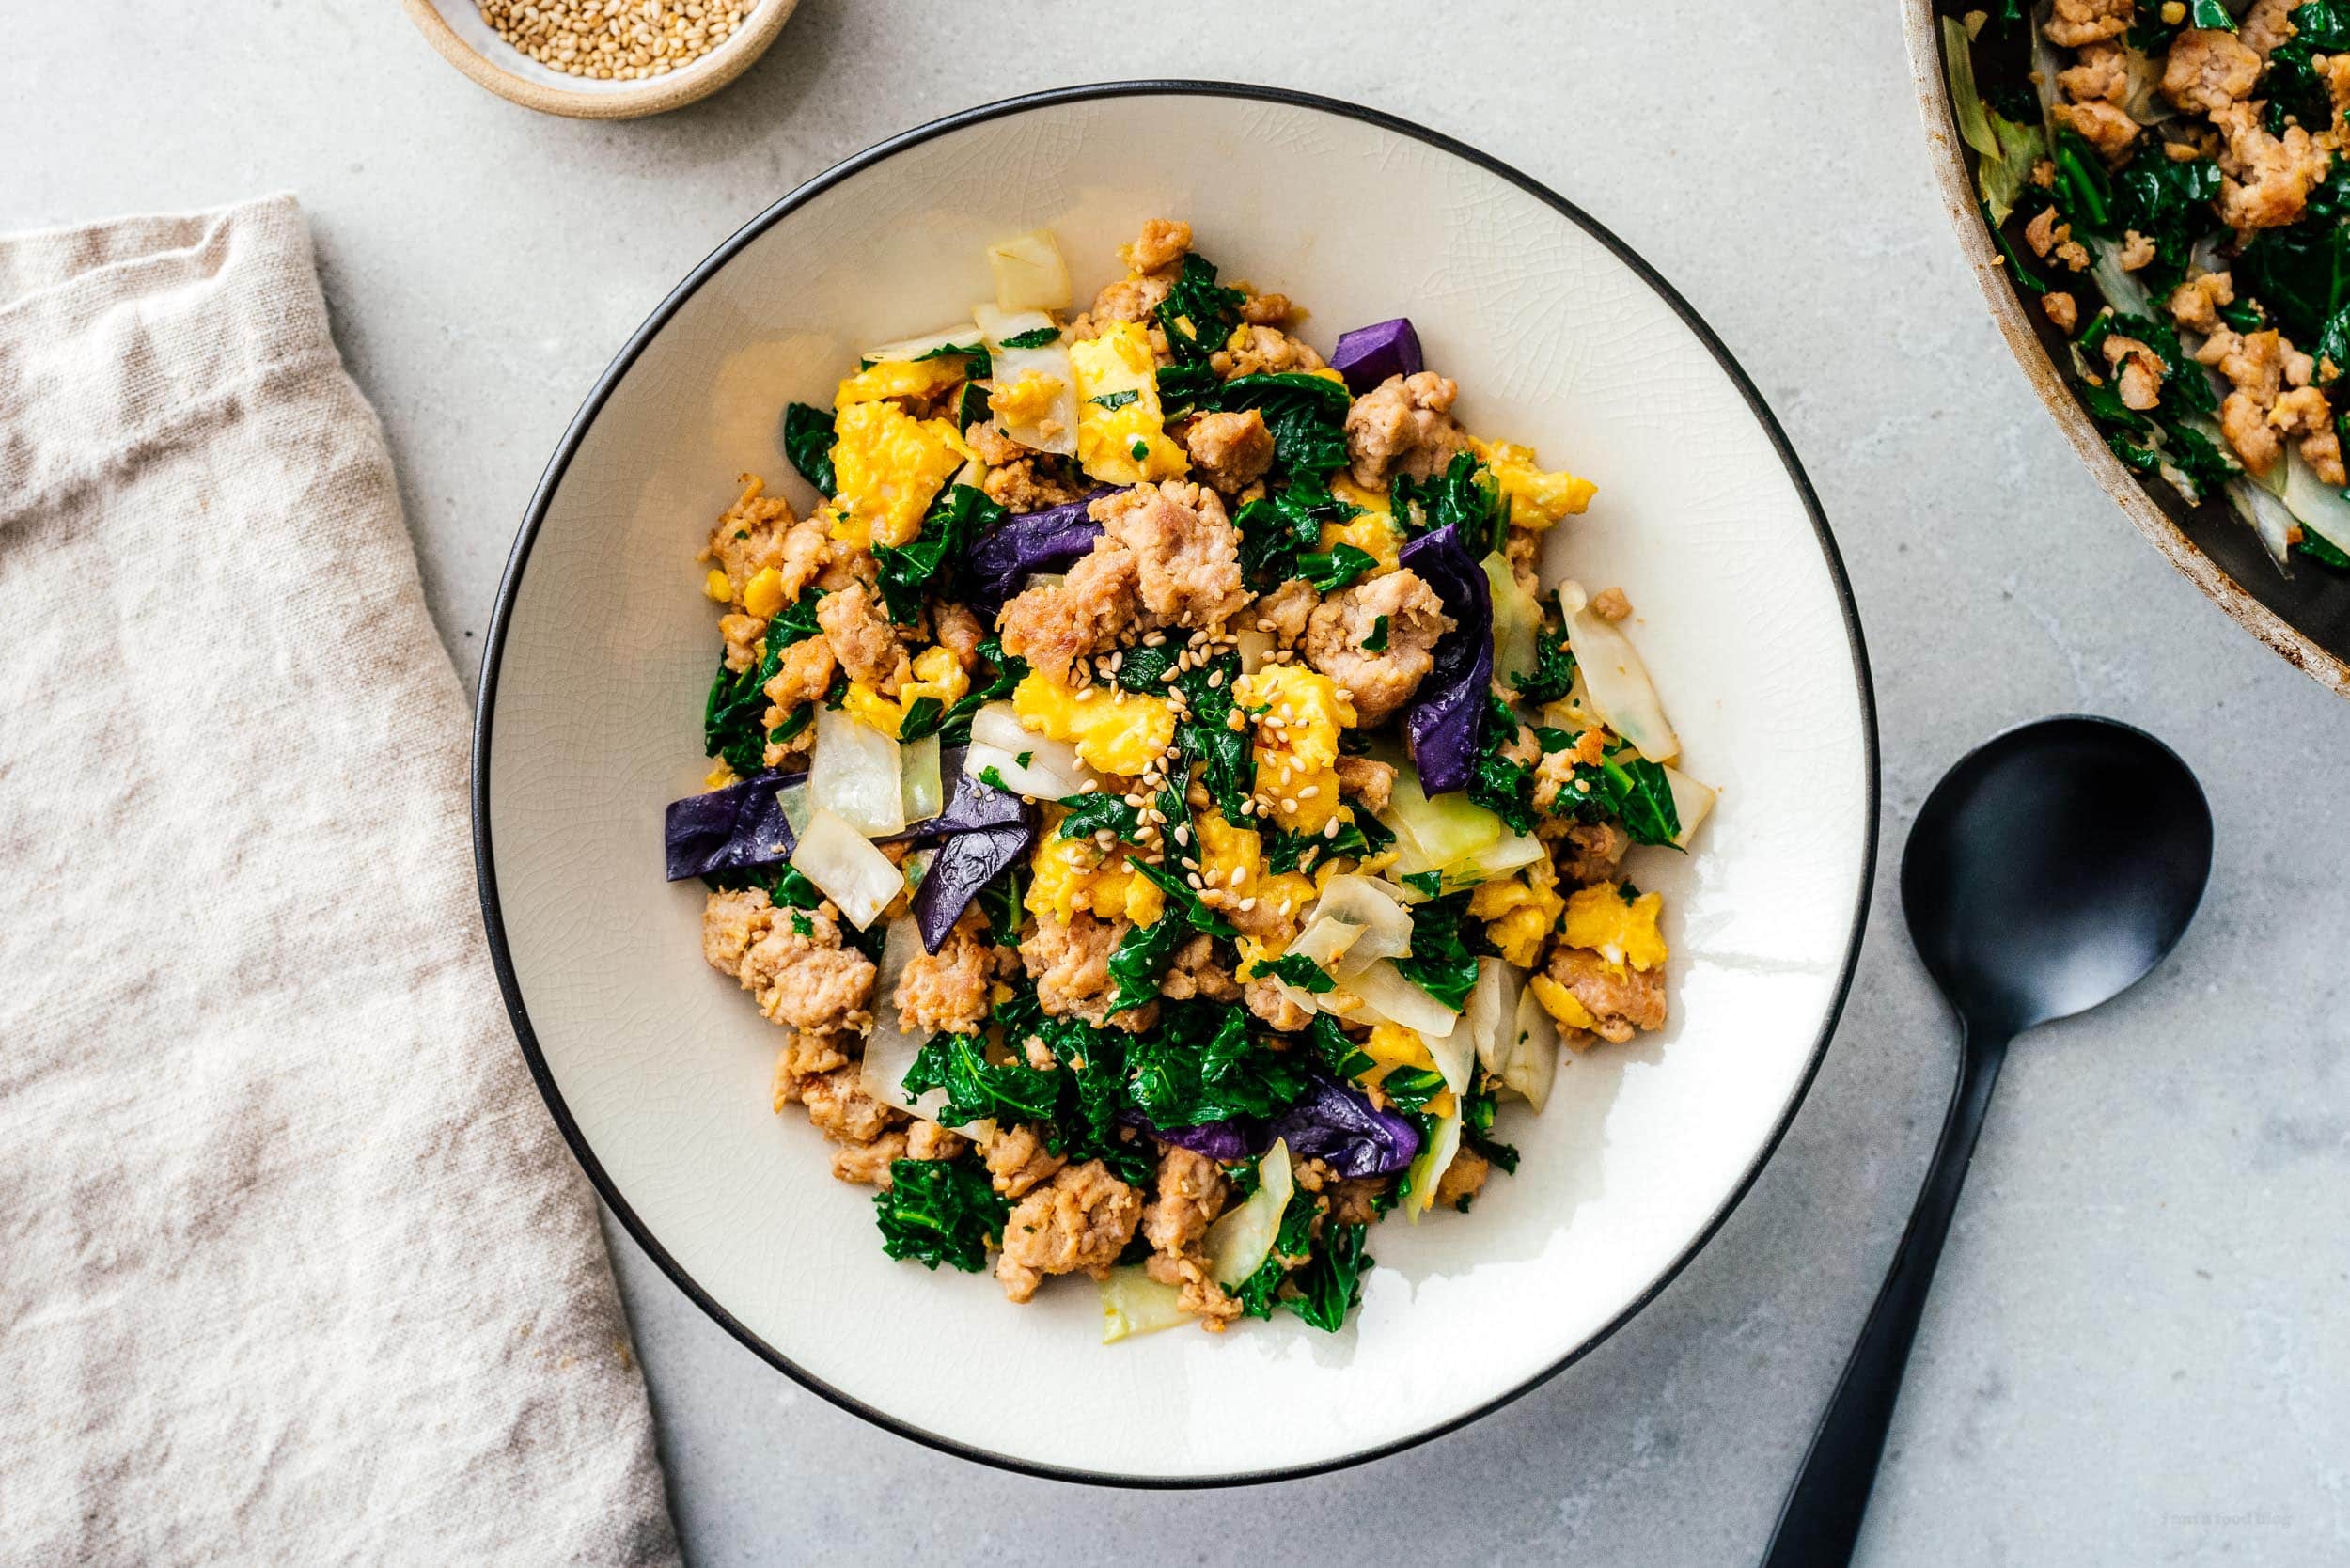
Egg roll in a bowl is everything I dream of: juicy, sesame-soy pan fried pork with tender crisp gingery garlic cabbage and just a hit of spice. It’s just like eating an egg roll, minus the wrapper because it’s keto-friendly! I love love love egg rolls/spring rolls – that crispy crunchy chew and the meaty, savory juicy filling. I even love the bits of vegetables. What I don’t love is the fact that I can eat dozens of spring rolls in a row. Thus, this egg roll in a bowl! I’m back on the keto train and this is one of my most satisfying low carb meals. It’s one pan, it’s fast, it’s packed with protein, and it’s delicious. I am an egg roll addict. I mean, to be technical about it, I am a spring roll addict. At least, that’s what I grew up calling egg rolls because that’s what they’re called in Chinese – when you translate the Chinese to English they’re spring rolls. Spring rolls, egg rolls, no matter which, they’re delicious so I just roll with it.
What is egg roll in a bowl
Egg roll in a bowl is essentially an egg roll without the wrapper. Egg rolls usually have ground pork, vegetables, and seasoning wrapped up in a crunchy, chewy wrapper. We’ve ditched the wrapper to make a low-carb, keto friendly meal in a bowl. Usually the vegetables are cut up really small in an egg roll, but here I keep them nice and chunky so they have some heft and chew.How to make egg roll in a bowl
- Brown. Give your meat a nice sear for that delicious maillard reaction. Wilt. Add in the ginger, garlic, and vegetables/cabbage and cook just until the greens is tender.
- Scramble. Push everything to one side and add the lightly beaten eggs. Cook the eggs to your liking.
- Season. Stir in the soy sauce, toasted sesame oil, and chili garlic sauce. Scoop it into a bowl, top it off with some toasted sesame seeds and enjoy!
What kind of meat should I use?
I made my egg roll in a bowl with ground turkey but you can use whatever you like and fits into your macros: ground pork, ground beef, ground chicken, even ground lamb. Or, ooh, imagine if you did ground duck?! That would be so luxe.Is there egg?
This egg roll in a bowl has egg in it! I couldn’t resist adding in eggs because the extra protein makes it even more filling. Plus I thought it just made sense to include eggs since “egg” is in the title. The egg is completely optional, but I love the happy little pops of yellow that it adds.Egg roll in a bowl ingredients
- Ground meat. You can use whatever ground meat you like. Inside classic egg rolls it’s ground pork. I like using a lean ground meat so I will typically go for ground turkey breast because I am always aiming to go below my fat macros.
- Garlic and ginger. The dynamic duo that will add so much flavor to your egg roll in a bowl.
- Greens. Cabbage, kale, anything goes as long as it’s leafy. If you’re in a hurry, do yourself a favor and pick up coleslaw mix from the store.
- Eggs. Extra protein for the win! Plus it gives the egg roll in a bowl a little bit of color.
- Tamari or soy sauce. Technically tamari is better than soy sauce because soy sauce has quite a few carbs in it. If you’re not strict or are just doing low-carb, go for the soy sauce because it has so much more flavor. I usually use low-sodium soy sauce for the flavor and season with salt so I can up my electrolytes.
- Shaoxing wine. This is the secret ingredient that will make your at home Chinese food taste just like your favorite Chinese restaurant.
- Toasted sesame oil. Toasted sesame oil will add so much flavor you won’t believe it. It’s nutty and aromatic and addictive. You can find it in the Asian aisle. You want toasted sesame oil, not the regular stuff.
- Hot sauce. Add some hot sauce for a bit of kick! I like sambal oelek, which is a chili garlic hot sauce that has very few carbs in it, but go ahead and use your fave.
How is this a keto egg roll in a bowl?
It’s keto (which is a super low carb diet) because it’s low in carbs and high in protein, which is perfect for fitting into your keto macros.Egg roll in a bowl macros
Net carbs 3.6 grams Protein 32.6 grams Fat 19.4 gramsEgg Roll in a Bowl
It’s just like eating an egg roll, minus the wrapper because it’s keto-friendly!
- 1 lb ground pork (or beef, chicken, or turkey)
- 2 tsp Shaoxing wine (or rice vinegar)
- 1 tbsp oil
- 2 cloves garlic (minced)
- 2 tsp ginger (grated)
- 4 cups kale (shredded, or cabbage/coleslaw mix)
- 2 large eggs (lightly beaten)
- 1 tbsp tamari (or low sodium soy sauce, to taste)
- 1 tbsp toasted sesame oil
- 2 tsp hot sauce (such as sambal oelek/sriracha, optional)
Mix the ground meat with the shaoxing wine or rice vinegar and season with salt and pepper.
In a large non stick skillet, heat up the oil and brown the marinated meat over medium high heat, breaking up with the back of a spoon, until golden brown and cooked through.
Stir in the garlic, ginger, and cabbage and cook until the cabbage is just wilted.
Push the cabbage to the side and add the eggs to the pan and scramble.
Stir in the soy sauce, sesame oil, and hot sauce. Taste and season with white pepper and extra tamari or soy sauce if needed. Finish with toasted sesame seeds. Enjoy immediately!
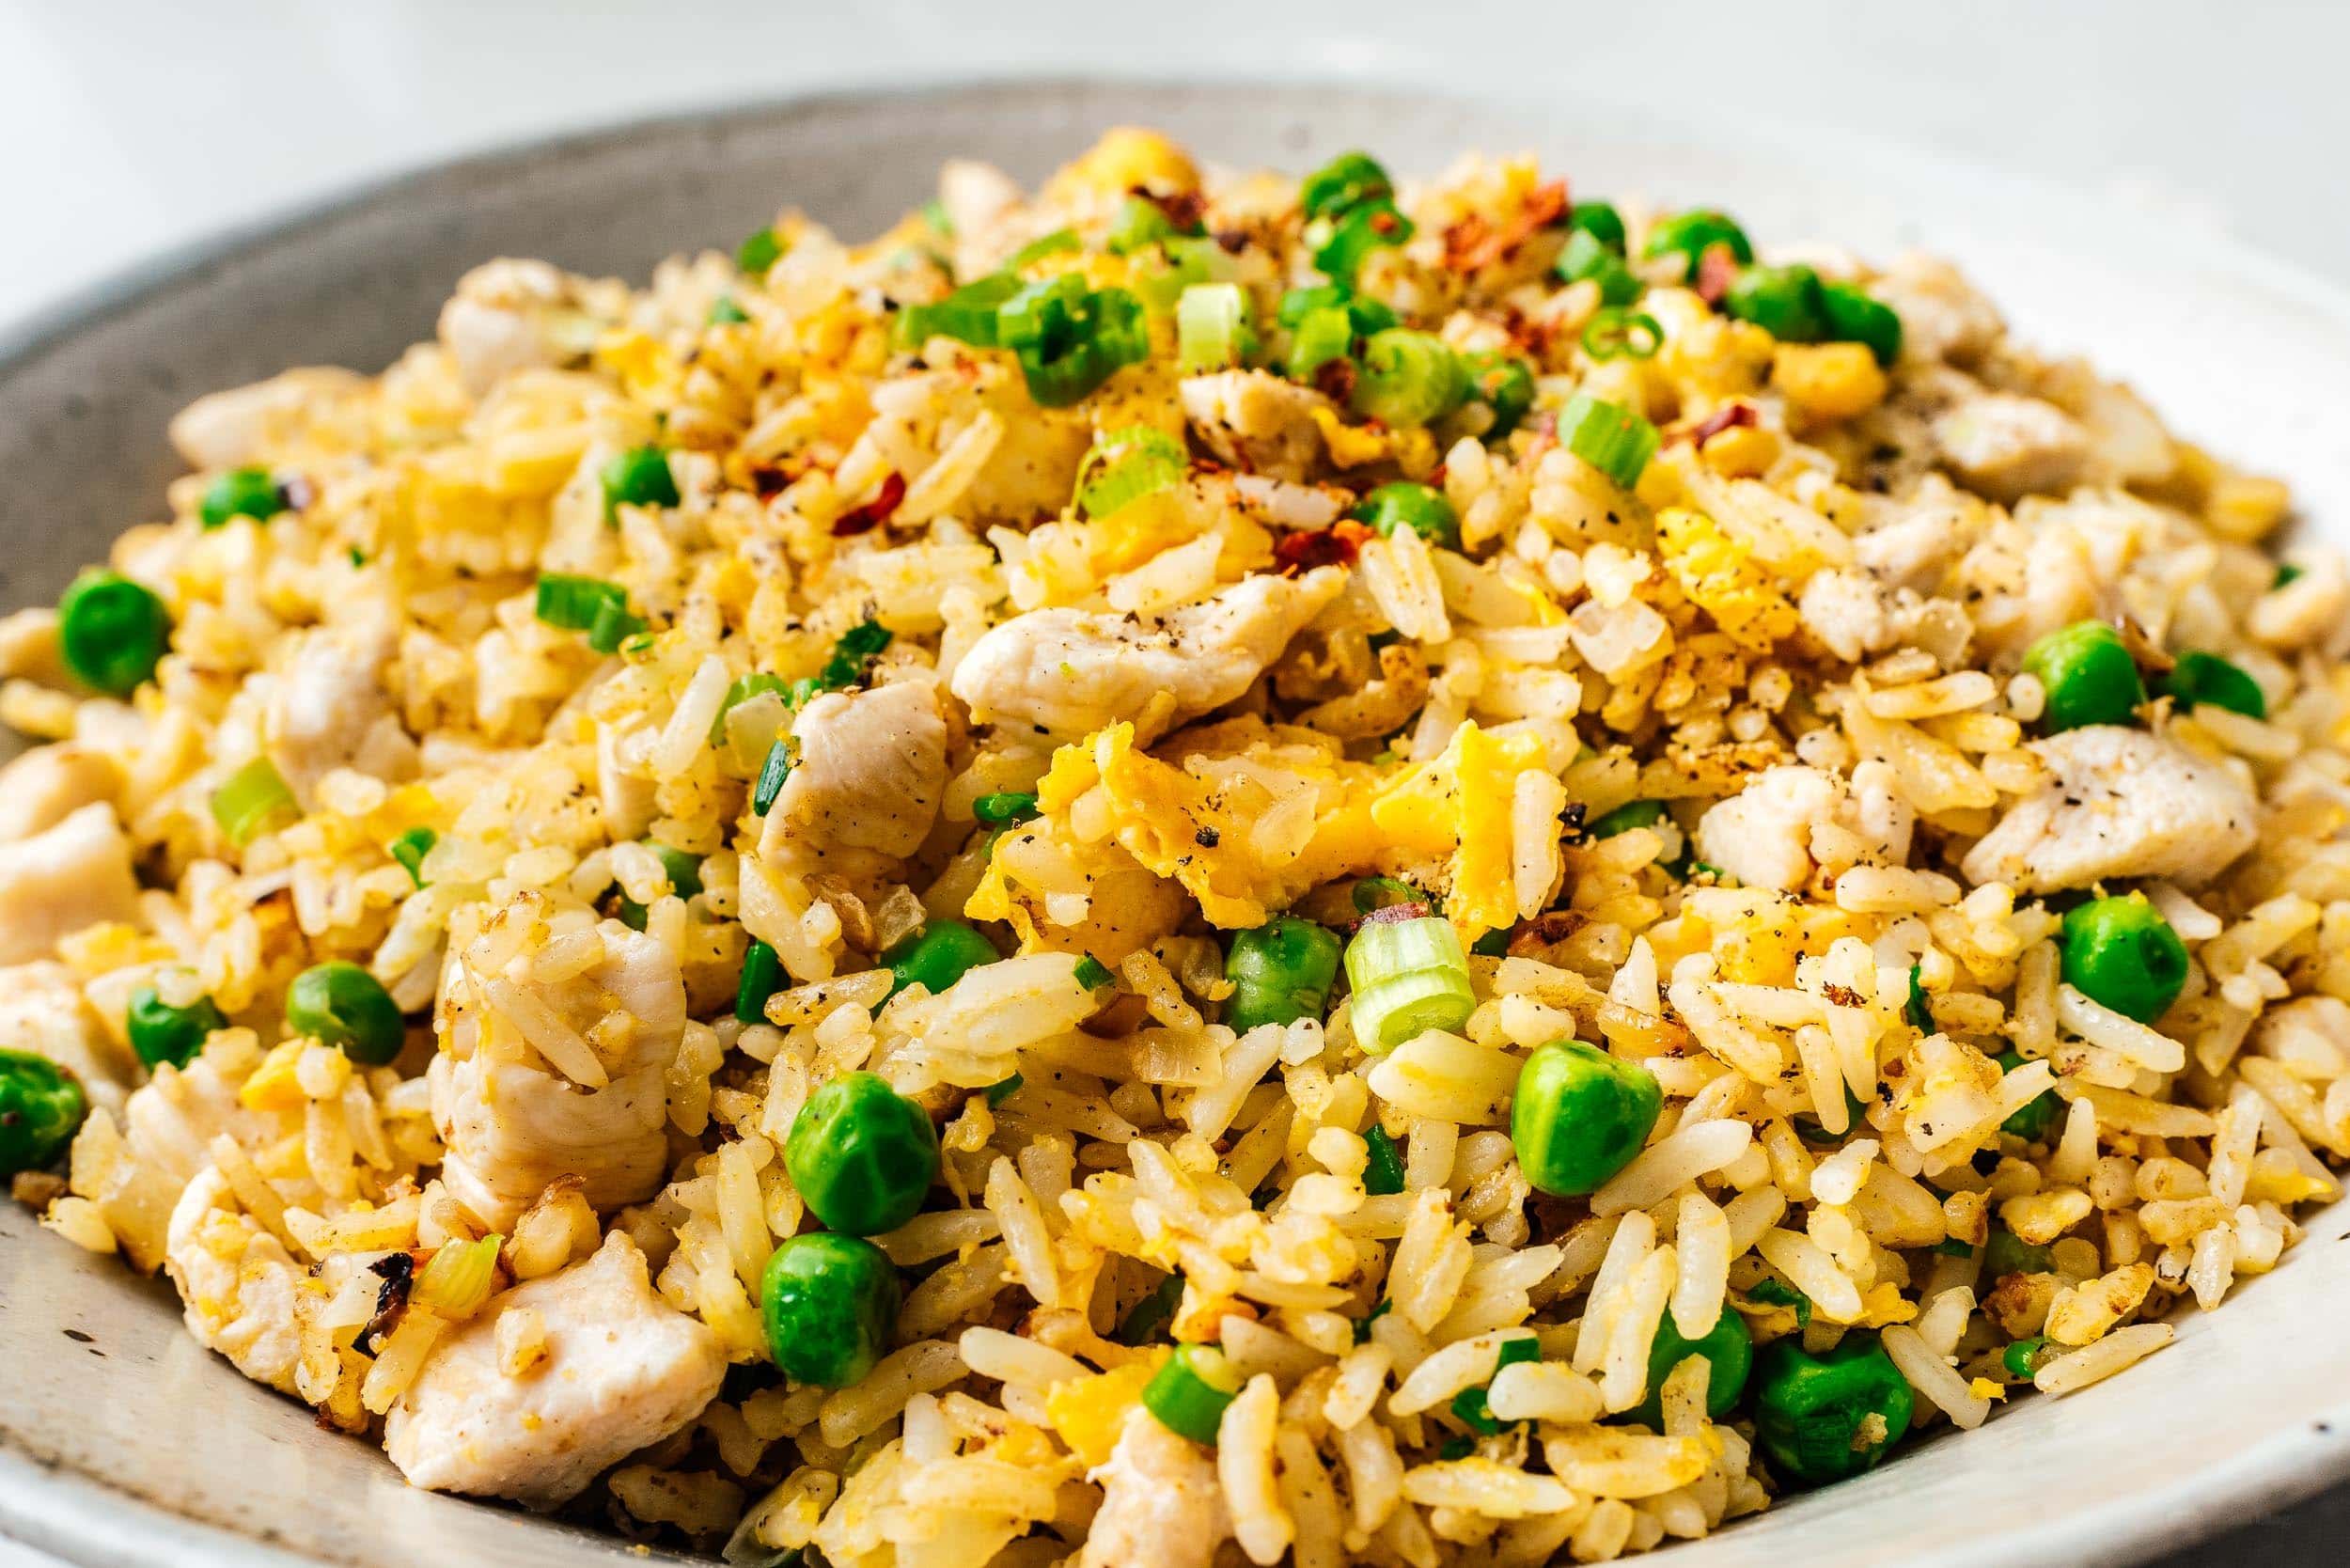
I Am... Authentic Chicken Fried Rice
Chicken fried rice is one of those iconic dishes and something I crave almost all the time: in the morning, as an afternoon pick me up, for dinner, or a midnight snack. Chicken and rice just go together. They are one of the classic pairings in food. It’s no surprise because the very essence of chicken perfectly compliments rice. Digging into a bowl of chicken fried rice is digging into a bowl of heaven. Juicy chicken, crispy rice, fluffy scrambled eggs, sautéed onions for a touch of sweetness, green peas to remind you of spring, and salty, bombastic flavors bursting with hints of ginger, garlic, and white pepper. SO FREAKING GOOD.
How to make chicken fried rice
- Prep. Make sure all your ingredients are ready to go. The chicken should be chopped up and seasoned, the onion should be diced, the rice should be ready, all your mix-ins should be good to go. Fried rice cooks fast and having everything prepped makes it a lot easier.
- Scramble the eggs. Scramble the eggs in a hot wok until they’re barely set, then remove them from the wok before they’re overcooked.
- Cook the chicken. Add the chicken to the hot wok, cook, then remove. Fry the rice. Add some onions to the wok, cook briefly, then add the rice, tossing occasionally and searing until it is heated through and slightly crispy.
- Mix and serve! Add the eggs and chicken back into the wok, along with some frozen peas and green onions. Toss everything until it’s piping hot, season with salt or soy sauce, and you’re done!
The difference between good and great fried rice
All fried rice is good, but great fried rice is life changing. Each grain of rice should be fluffy and distinct and each spoonful should have a bit of everything in it for the perfect bite. It should be hot and have a little bit of crisp on the rice and all the ingredients should be perfectly cooked. Good fried rice can stand on its own and needs no accompaniments - it should be so satisfying that you’ll crave another bowl before you’ve finished the one in front of you. This chicken fried rice pairs super succulent juicy pieces of chicken that are bursting with chicken flavor thanks to a quick soy sauce and shaoxing wine marinade. The chicken-y-ness compliments the fresh little green sweet pops provided by the peas, and the ginger and garlic add a hint of warmth. Finishing with scallions is a must, they add a mellow sharp bite that ties everything together.Tips for the best fried rice
- Prep - Ideally, cooking fried rice is super fast. Everything should be prepped before hand so that all you’re doing is adding prepared ingredients into your wok. Because everything’s prepared, the wok will stay hot.
- Heat - You want high heat for fried rice and for that a wok is going to be the best cooking vessel - it has the ability to heat up quickly and reheats quickly.
- Small batches - This fried rice recipe only serves 2 and the reason why is because household stoves don’t get hot enough to fry large batches of rice. If you want a truly authentic wok hei flavor, the way to get it is by cooking a small batch, which keeps the wok hot.
- Moisture control - Try to keep all the ingredients on the drier side and don’t add any unnecessary moisture, which will make your fried rice soggy.
Do you need a wok to make fried rice?
I say yes. If you have a wok, use it! It heats up quickly, is naturally non-stick, and essential to a good fried rice. A wok, with its different heat zones, is made for frying and tossing. By using a wok, you’re going to get some wok hei: that essential smokey essence you get when you get when you use a wok over very high heat. A good carbon steel wok is usually not too expensive and will last you a lifetime. If you have a gas stove, you'll want a wok that is perfectly round on the bottom. If you are on electric or induction, you unfortunately need to get a flat-bottomed wok, which is not as good but still totally functional. In either case, it's best to get a pre-seasoned one so you don't need to remove the handle and season it yourself. Chinese people are crazy about wok hei, which means “wok breath” and if you want that authentic fried rice flavor, a wok is how you’re going to get it. If you don’t have a wok, using a cast iron or non-stick pan is okay too, but make sure it it’s big enough and remember that with non-stick not to crank the heat up as much.What if you don’t have a wok?
If you don’t have a wok, a cast iron pan or a large non-stick sauté pan is your best bet. Of the two, I recommend cast iron for obvious reasons. Non-stick is great if you’re nervous about the rice sticking. You can’t heat up non-stick as much, so you won’t get that essential wok hei flavor. But, if you’re trying to be health conscious, you can get away with using less oil, so there’s that. Of the multiple kinds of non-stick pans out there, a ceramic/non-teflon coating is probably your best bet. That's a green chile cheeseburger fried rice in the photo by the way.Chicken Fried rice ingredients
Oil
Don’t be stingy, if you want restaurant quality fried rice, things are going to have to get a little oily. Hot oil helps everything not stick, distributes heat, and helps with distributing flavor. Any high heat neutral oil will work - we typically use grapeseed oil.Eggs
One of the defining features of fried rice are the eggs. Doesn’t matter how you crack it, a fried rice with eggs is superior than eggless. This fried rice is a combo of both the scrambled and golden rice technique. More on this in the next section.Proteins
We’re using chicken, because this is a chicken fried rice, but you can swap this out for any type of protein you prefer as long as you cut it up so it’s nice and bite sized. To add an extra layer of flavor (the I am a Food Blog catch phrase) marinate the chicken in a bit of soy sauce and shaoxing wine.Aromatics
This is what adds an extra layer of flavor to your fried rice. Things like garlic, ginger, onions, leeks, and shallots. In this case, we’re going with diced onions. Cook the onions briefly, being sure to move them around, concentrating on bringing out their flavor and not burning.Rice
Use day old rice. Using freshly cooked rice is a rookie mistake and a guaranteed way to a sad pile of mush - there’s just too much water content in it. Instead, make some extra rice the night before and let it hang out in the fridge, which will dry it out. If you absolutely need to use fresh rice, spread it out, and pop it in the fridge for as long as possible. The dehydrating cold of the fridge will help draw out the water.Vegetables
For fried rice to cook up fluffy and dry, without the rice sticking to the wok, it’s best to think about how much moisture there is in your ingredients. Leafy greens will release a lot of liquid, which will reduce the crispiness of your fried rice and make the rice stick to the pan. Sticking to vegetables will less water content will give you greater success. Try peas, corn, carrots, broccoli, or beans. Once you’re a fried rice pro, you can move on to any vegetable you like! We’re sticking to peas in this fried rice.Seasoning
There’s soy sauce seasoned fried rice, salt seasoned fried rice, or both. This chicken fried rice is seasoned with salt, to taste. Seasoning is the last step: taste your fried rice and season accordingly.How to cook eggs for fried rice
There are three distinct ways of incorporating eggs:- Sunny side up - where you fry up a sunny-side egg, put it on top and call it a day;
- Scrambled - scrambled curds that are distinctly visible as delicious pieces of yellow fluff;
- Golden Rice - and finally, there’s golden fried rice, where lightly beaten eggs (or just egg yolks) are tossed in with the rice before it’s fried so that each kernel of rice is coated in egg, which gives the rice an extra golden hue.
The best rice to use
The best kind of rice for fried rice is jasmine. It’s the kind of rice that’s served in Chinese restaurants and what they use to make fried rice. Jasmine rice is a medium grain rice that is fluffy and sturdy. It holds it shape and separates when you fry it. If you don’t have jasmine, a medium grain white rice is the next best bet.What to eat with chicken fried rice
We often eat fried rice on its own as a main, but we also regularly eat it with proteins and sides too. Here are some of our favorite things with fried rice: xoxo StephChicken Fried Rice
Digging into a bowl of chicken fried rice is digging into a bowl of heaven.
- 1/2 lb chicken breast (diced)
- 1 tsp Shaoxing wine
- 1 tsp soy sauce
- 2 cups cooked rice (jasmine preferred)
- 2 large eggs
- 1/2 tsp ground ginger
- 1/2 tsp garlic powder
- 1/8 tsp white pepper (optional)
- 2 tbsp neutral oil (eg. grapeseed)
- 1/4 medium onion (diced)
- 2 green onions (thinly sliced)
- 1/2 cup frozen peas
In a small bowl, marinate the chicken with the shaoxing wine and soy sauce. Set aside. Then, in a separate bowl, mix together the cooked rice with 1 egg, the ginger powder, garlic, powder, white pepper, and 1 teaspoon of oil. Set aside.
Lightly beat the remaining egg and season with salt. In a large skillet or wok, heat up a bit of oil over high heat and scramble the eggs until mostly set, but still slightly runny. The eggs will cook a bit more when you fry everything together at the end. Remove and set aside in a bowl.
Add some more oil to the pan and cook the chicken breast over medium high heat, until cooked through and lightly browned. Remove the chicken from the pan and add it to the bowl with the eggs.
Sauté the onions, stirring occasionally, for 1-2 minutes, adding more oil if needed. Add the rice and cook, breaking up and stirring occasionally, until the rice is crispy and heated through.
Add the eggs, chicken, peas, and green onions and toss everything together so that everything is evenly distributed. Season with salt or soy sauce and enjoy hot!
