I Am... San Bei Ji: 15 Minute Easy Taiwanese 3 Cup Chicken Recipe
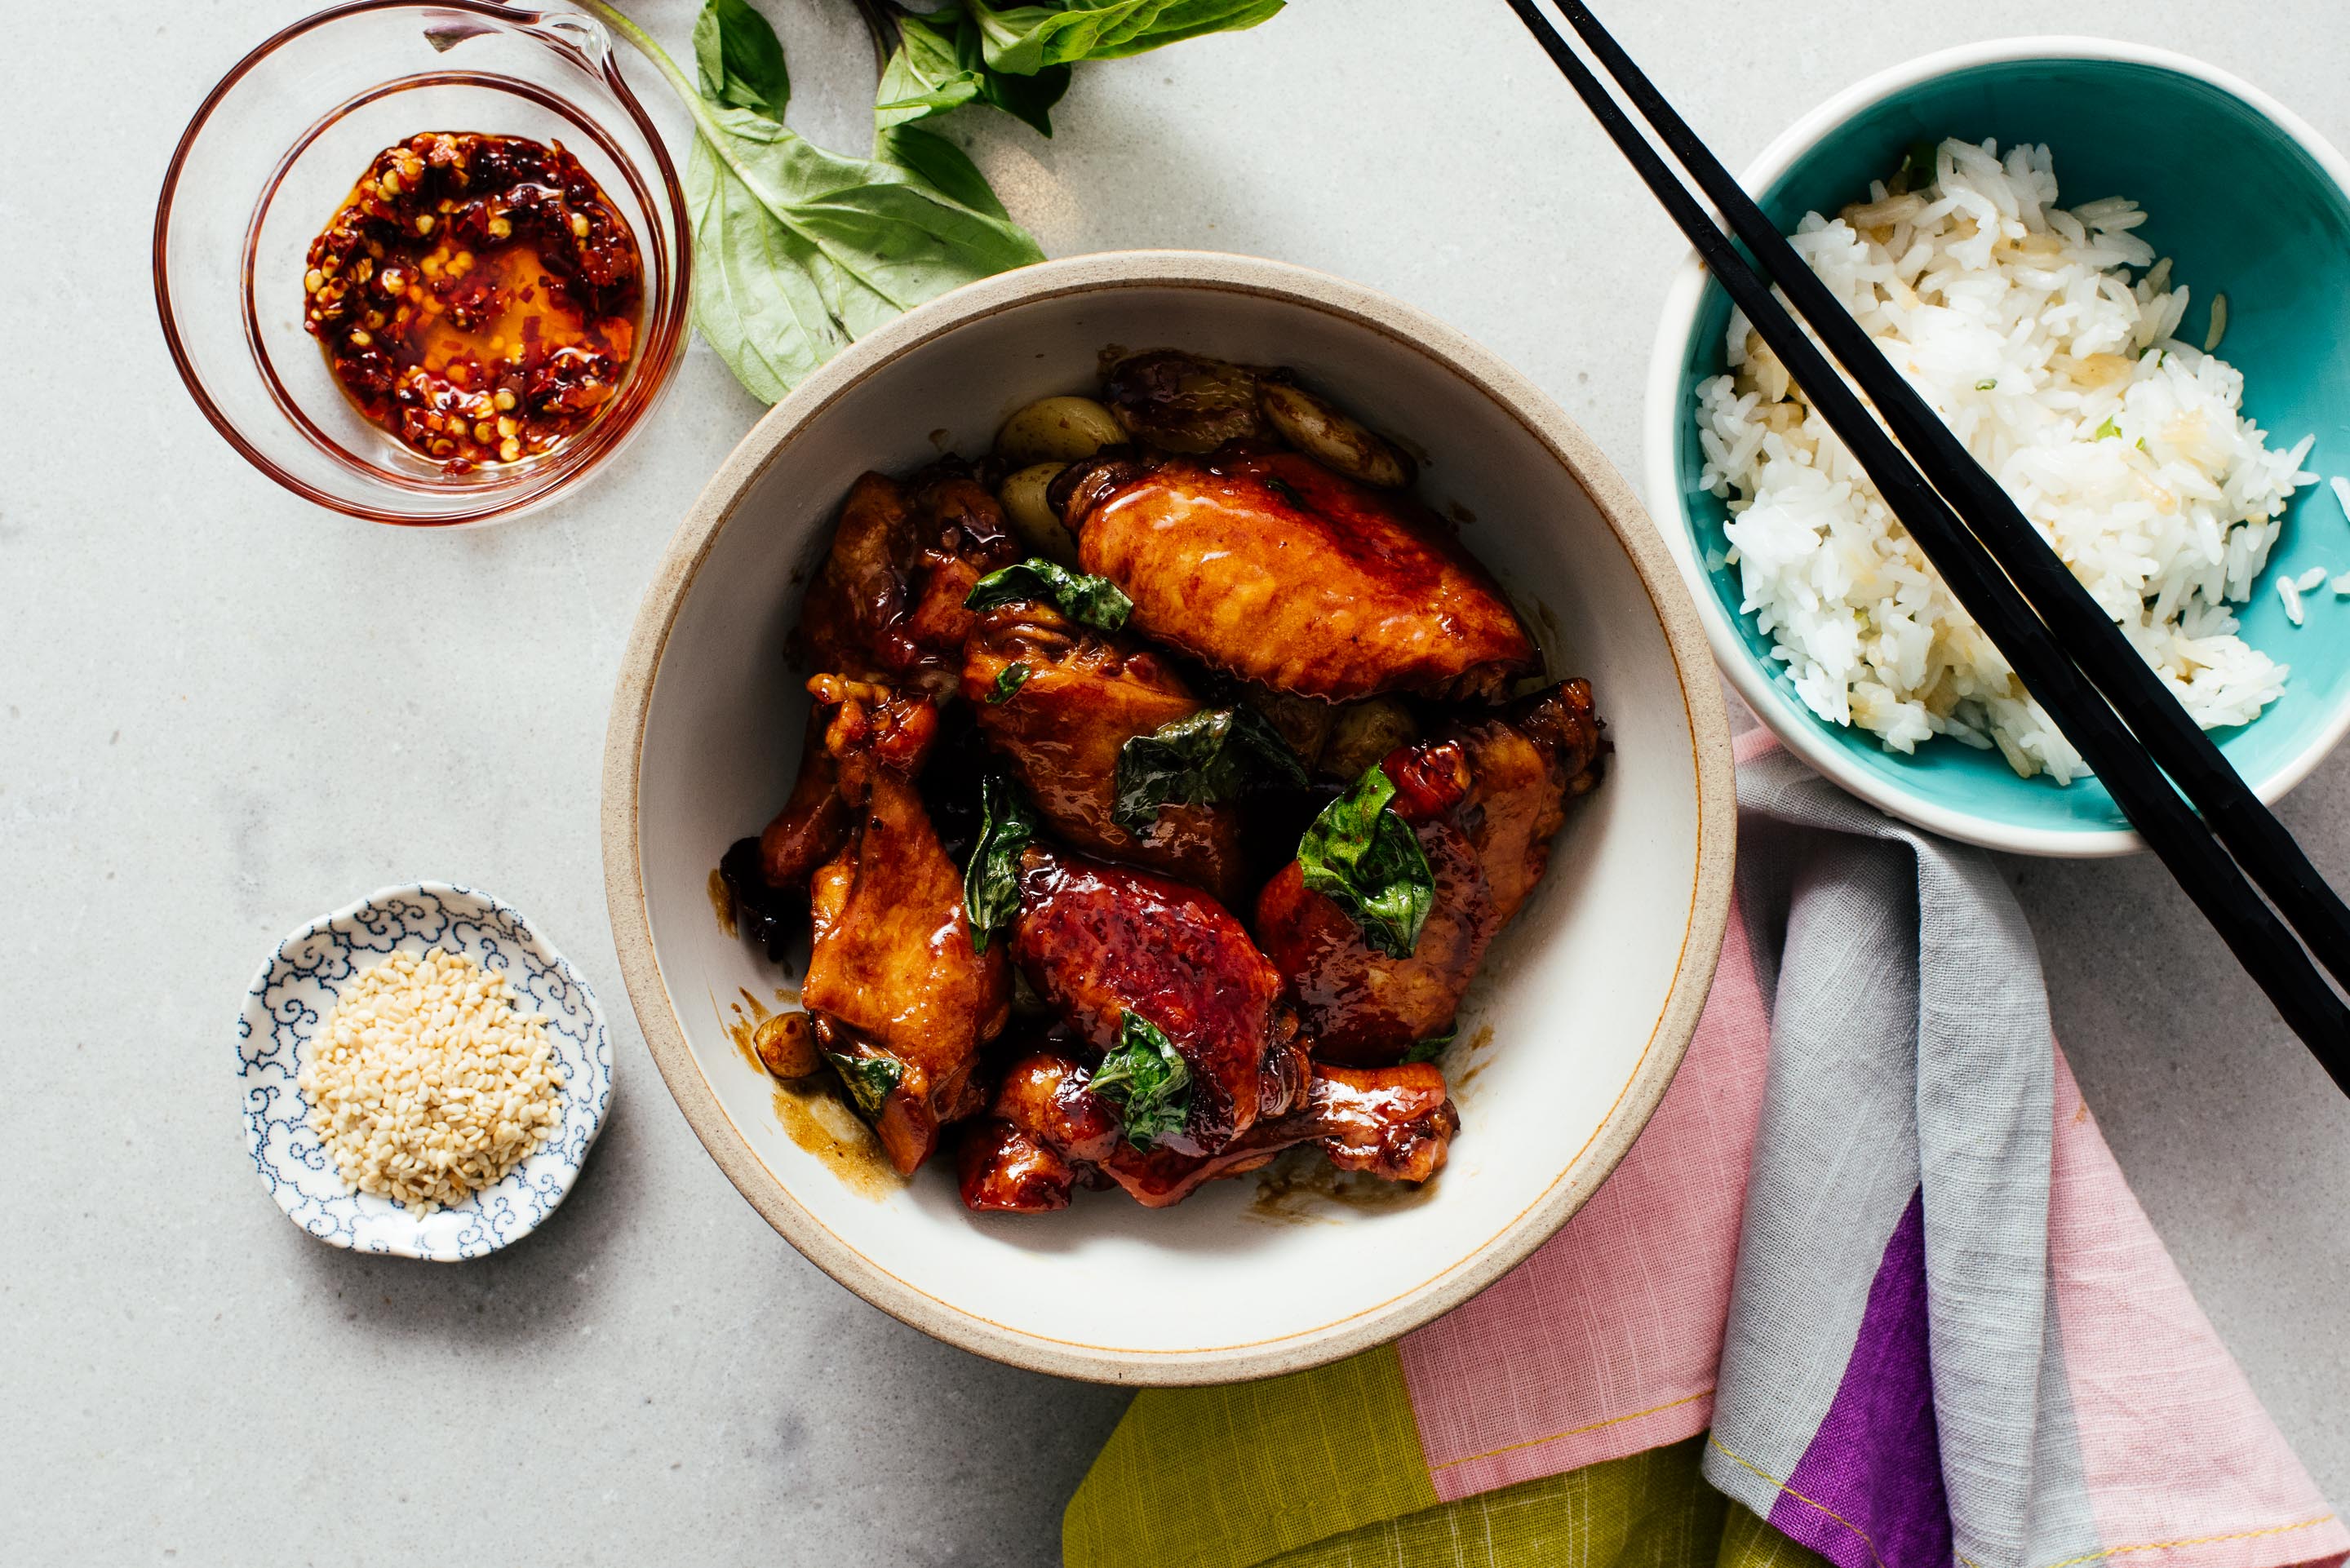
Taiwanese food is coming in hot in a big way. From boba, to beef noodles, to braised pork with rice, Taiwanese food is starting to get its day in the sun. Suddenly the Shilin Night Market in Taipei is on every food obsessed person’s to visit list and giant crispy chicken cutlets shops are popping up on the coasts. I happen to love all Taiwanese food, but homestyle Taiwanese holds a special place in my heart. Perhaps one of the most classic and well known Taiwanese dishes is san bei ji, or three cup chicken. The three cups refers to equal parts soy sauce, sesame oil, and rice wine, but there must be a million variations. Everyone’s family makes it differently and it’s served in plenty of restaurants too, so there’s a three cup chicken out there for everyone. If you’re looking for a new weeknight chicken recipe, this is it. Savory and addictive with a sauce that begs to be eaten with rice, three cup chicken is fast, easy, and absolutely delicious. Most recipes use cut up bone in chicken pieces but for east, I went with chicken wings. There’s nothing better than chicken braised in a sticky, savory, balanced dark sauce that’s sweet, savory, and comforting. Cooking Notes: It takes a lot of commitment to peel a whole head of garlic, but it’s worth it! Keep it simple by using the flat side of a heavy knife to crushing the garlic cloves. The skins will come right off. For the ginger, technically you don’t need to peel it if you’re in a hurry, just give it a good wash. If you’re going to peel it, use a small spoon to scrape off the thin skin. It’s way easier than using a knife. The chili isn’t totally necessary if you don’t have one on hand – you can add a whole dried chili in, some chili pepper flakes, or even keep it chili free. Shaoxing wine will add that signature taste and mouthfeel but if you don’t have any, use sake! The dark soy sauce is what give the dish that beautiful burnished brown caramel color – if you don’t have any, it’s totally optional, but it adds a hint of depth and of course makes everything pretty. It’s worthwhile to invest in a bottle of dark soy, it’s cheap and you can use it a lot in Chinese cooking. What do you need: Keep it simple and use a non-stick skillet, preferably the biggest one you have that has a lid. If you have a wok, you can use that too. How do you serve it? Serve it with fluffy white rice and a simple green vegetable.
San Bei Ji: 15 Minute Easy Taiwanese 3 Cup Chicken Recipe serves 2Read More →In a large skillet or wok, heat up the sesame oil, garlic, ginger, and chili over low heat, infusing the oil with the aromatics. Stir in the shaoxing, soy sauce, sugar, chicken wings, and 1/4 cup water. Bring to boil, then partially cover with a lid, and simmer on low for 15 minutes or until cooked through. Stir in the basil leaves, if using, and serve hot with fluffy white rice.
- 2 tablespoons toasted sesame oil
- 1 head garlic, peeled
- 1 inch piece of ginger, peeled and sliced
- 1 Thai chili, seeds removed if preferred
- 2 tablespoons shaoxing wine
- 2 tablespoons soy sauce
- 2 teaspoons of sugar
- 1 teaspoon dark soy sauce, optional
- 1 pound chicken wings
- Thai basil, optional
I Am... Japanese Fruit Sandwich: Strawberry Sando Recipe
If you love sandwiches, you should go to Japan – I love Japanese sandwiches! Those uniquely Japanese sandwiches really get my heart racing. Sandwiches like katsu sando: crispy panko breaded pork with tonkotsu sauce and mustard tucked into fluffy slices of crustless bread. Or perfectly simple yet unmistakably good egg salad sandwiches. I even dig a good yakisoba pan: fried noodles stuffed inside a squishy sweet bun. But, if you had to ask, which sandwich is the one that I would fly to Japan for, it would be a strawberry sando. Yup, a strawberry sandwich. Once strawberry season begins in Japan, you’ll start to see strawberry sandos popping up everywhere: at the convenience store, at the grocery store, in the food halls at department stores, and in the ultra high end fruit parlors. It sounds weird, but really, is it any weirder than a jam sandwich? It’s essentially a fresh jam sandwich with some bonus softly whipped sweetened cream.
What is a fruit sandwich?
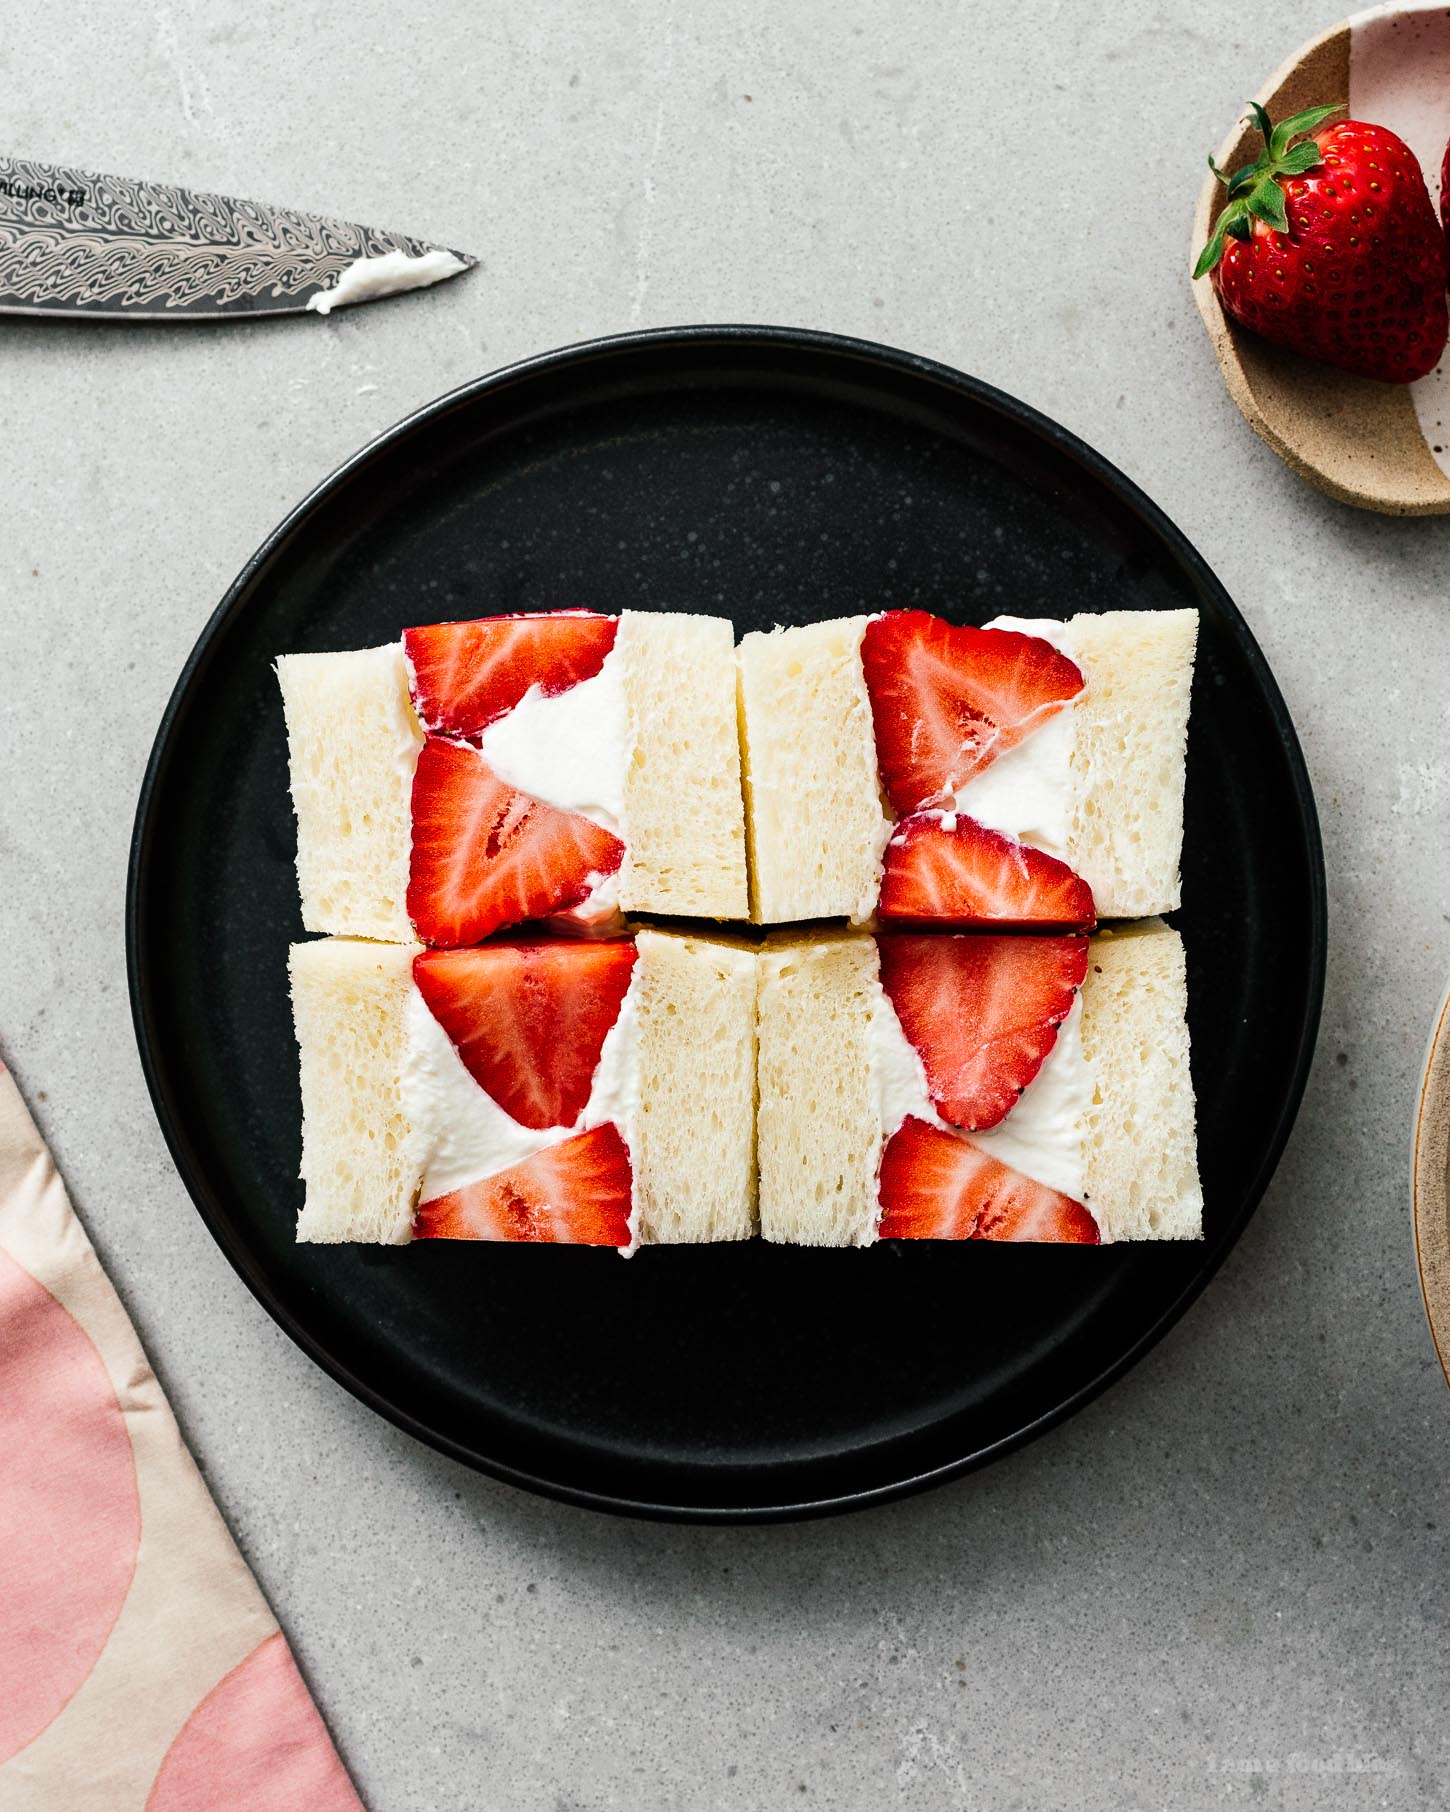
Am I getting ahead of myself? Have you guys ever heard of strawberry sandos before? Or fruit sandos? Think: perfectly ripe fruit suspended in barely sweetened whipped cream between two slices of squishy, luscious, almost cake-like milk bread. It’s a sandwich, it’s dessert, it’s both! I don’t know the history of fruit sandwiches – yes, they come in all fruits, not just strawberries – but I do know that they taste good. They are satisfyingly squishy and sweet and they remind me of all that is good in the world. Like all good things in Japan, you can get them cheap at 7-11 or Lawson’s, or you can get absurdly expensive (I’m talking $20 for a fruit sandwich). Or, if you happen to have a hand flown loaf of one of the most sought after loaves of bread in Japan, you can make your own!What is the best bread for fruit sandwiches?
Really though, you don’t have to have special bread from Japan, but it is best if you use shokupan or milk bread. Most Asian bakeries sell it, it’s the perfectly square loaf with the small crumb. The squareness makes it easy to cut the crusts off and the tight crumb means it’s just sturdy enough to support the cream and fruit. After you have your bread, find the best strawberries you can, whip up some cream with your preferred amount of sugar, and it’s time to sandwich!Japanese fruit sandwich tips and tricks
1. Try to picture your sandwich where you will cut it. You want the fruit to be showcased, so it’s best if you think about it a little bit before you start placing. I wanted the cross-sections of the strawberries to peek out and couldn’t quite figure out how to do that so I asked Mike (because he’s the genius visuals dude) to show me how to arrange the berries in such a way that would be aesthetically pleasing. Follow our sando if you like or go rogue – whatever you do, just be sure to picture how the sandwich will look cut. 2. Cut the crusts off first. It might seem like you’d want to cut the crusts off after you made the sandwich so that you get those nice clean lines, but cutting through a strawberry sando isn’t the easiest thing. The cream starts to squish out and you never know if you’ll tear the bread. Just trust me and cut the crusts off first. 3. Chill your sandwich a bit before cutting it. Technically you don’t need to do this but if you want really clean lines, it helps. 4. Use the sharpest, biggest knife you have so you’re slicing through once and not sawing through the sandwich. That’s it! Hopefully soon you’ll have a strawberry sando right out of your anime dreams.Japanese Fruit Sandwich
A classic Japanese fruit sandwich with fluffy bread, cream, and strawberries
- 2 slices white bread (preferably milk bread)
- 3/4 cup whipped cream (lightly sweetened )
- 6-9 strawberries (wash, dried, and trimmed)
Cut the crusts off of the bread and add a layer of whipped cream.
Top the slice with the strawberries, being sure to align.
Top with more cream and place the second slice of bread, cream side down, over the strawberries. Smooth the outside edges, adding extra whipped cream into the spaces, if necessary. Wrap in plastic wrap and chill for 15 minutes.
Unwrap and use a very sharp knife to cut into quarters. Enjoy!

I Am... The Ultimate Easy 3 Ingredient Slow Cooker Pork Carnitas
I’m kind of new to the Mexican food world. I mean, I’ve been eating and enjoying Mexican food for a while now, but I definitely did not grow up eating Mexican food, other than the rare hard shell taco night. I LIVED for crunchy taco night. I thought it was the most delicious thing ever and I really loved the ritual of everyone assembling their own tacos right at the table. Now I know, real Mexicans don’t do the hard shell taco thing, and I have a lot to learn about Mexican food. Case in point: I’ve never ever made carnitas. I feel like I’ve eaten a million carnitas tacos, in the streets of Mexico – Mike and I spent a very long time in Playa del Carmen a million years ago – but I’ve never attempted to make my own. I don’t know why though, because it’s really one of the easiest things to make. It’s low effort and huge reward. Because I’m no expert on Mexican food, I did a deep, deep dive into the world of carnitas. I learned that like almost any popular recipe, there are a million ways to make it. Some people insist on a bottle of coke. Some say bay leaves are the secret. And, some people keep it simple. But wait! Am I getting ahead of myself? Do you know what are carnitas are? According to wiki, carnitas means “little meats.” The little meats are made by simmering/braising pork in lard. Essentially, it’s pork confit! The meat is combination of incredibly tender and crisp due to the cooking process. Slow cooking over low heat means that the meat breaks down, making it easy to shred and crisp up at the very end, where it’s essentially fried in it’s own fat. I kept it super simple with just 3 ingredients: pork, fat, and salt. No spices, no seasonings, and certainly no coke. Since it was my first time I figured I’d go clean and classic. This recipe is based on a Rick Bayless recipe. I figured, if it’s good enough for him, it must be good. Even though there are only 3 ingredients, one of the ingredients is something that you probably don’t buy a lot of – the pork fat. Just ask your butcher if they have any pork fat, they’ll usually have some in the back! It’s a lot easier than finding lard, plus the lard that they usually sell in blocks isn’t usually great. After you’ve got your pork fat and pork butt, you’re ready to carnitas! The pork fat gets cut up small and the pork gets cut up into 2-3 inch pieces. Everything goes in a slow cooker with some salt and gets cooked on high for 4 hours. At the end, the pork will be lusciously tender. Pull out the pieces, roughly shred them, then crisp them up with the help of some of the pork fat. Seriously so good. We had the carnitas in tacos, so many delicious tacos! We still have a bit left over and I’m excited to do something fun with them. PS - Do you have a favorite carnitas recipe? I’m excited to hear about how you guys carnitas! PPS - How cute are the baby tacos?!??! :D
The Ultimate Easy 3 Ingredient Slow Cooker Pork Carnitas
Juicy crispy pork carnitas, just like your favorite taco truck - it’s easier than you think!
- 1 lb pork fat
- 3 lb pork shoulder/butt (cubed)
- salt
Cut the pork fat into small cubes and place inside a slow cooker on high mode.
Cut the pork into 3-inch pieces and sprinkle generously with salt. Add the pork in with the fat. Cover and cook until thoroughly tender, for 4 hours.
Remove the pork to a cutting board, leaving behind as much fat as possible. Refrigerate the lard for other uses, or discard. Shred the carnitas into very large, coarse pieces. Heat a skillet (I prefer nonstick) over medium heat. When the pan is very hot, spoon in enough carnitas-cooking fat to fill the bottom generously. Scoop in the pork, spreading it out in an even layer. Cook undisturbed for a couple of minutes, until brown and releases easily. Gently turn the pieces to brown the other side. Enjoy in tacos, with rice, nachos, burritos, or however you like carnitas!
adapted from Rick Bayless
Nutrition facts estimated based on 1/4lb of meat per serving.
I Am... Crispy Air Fryer Kale Chips
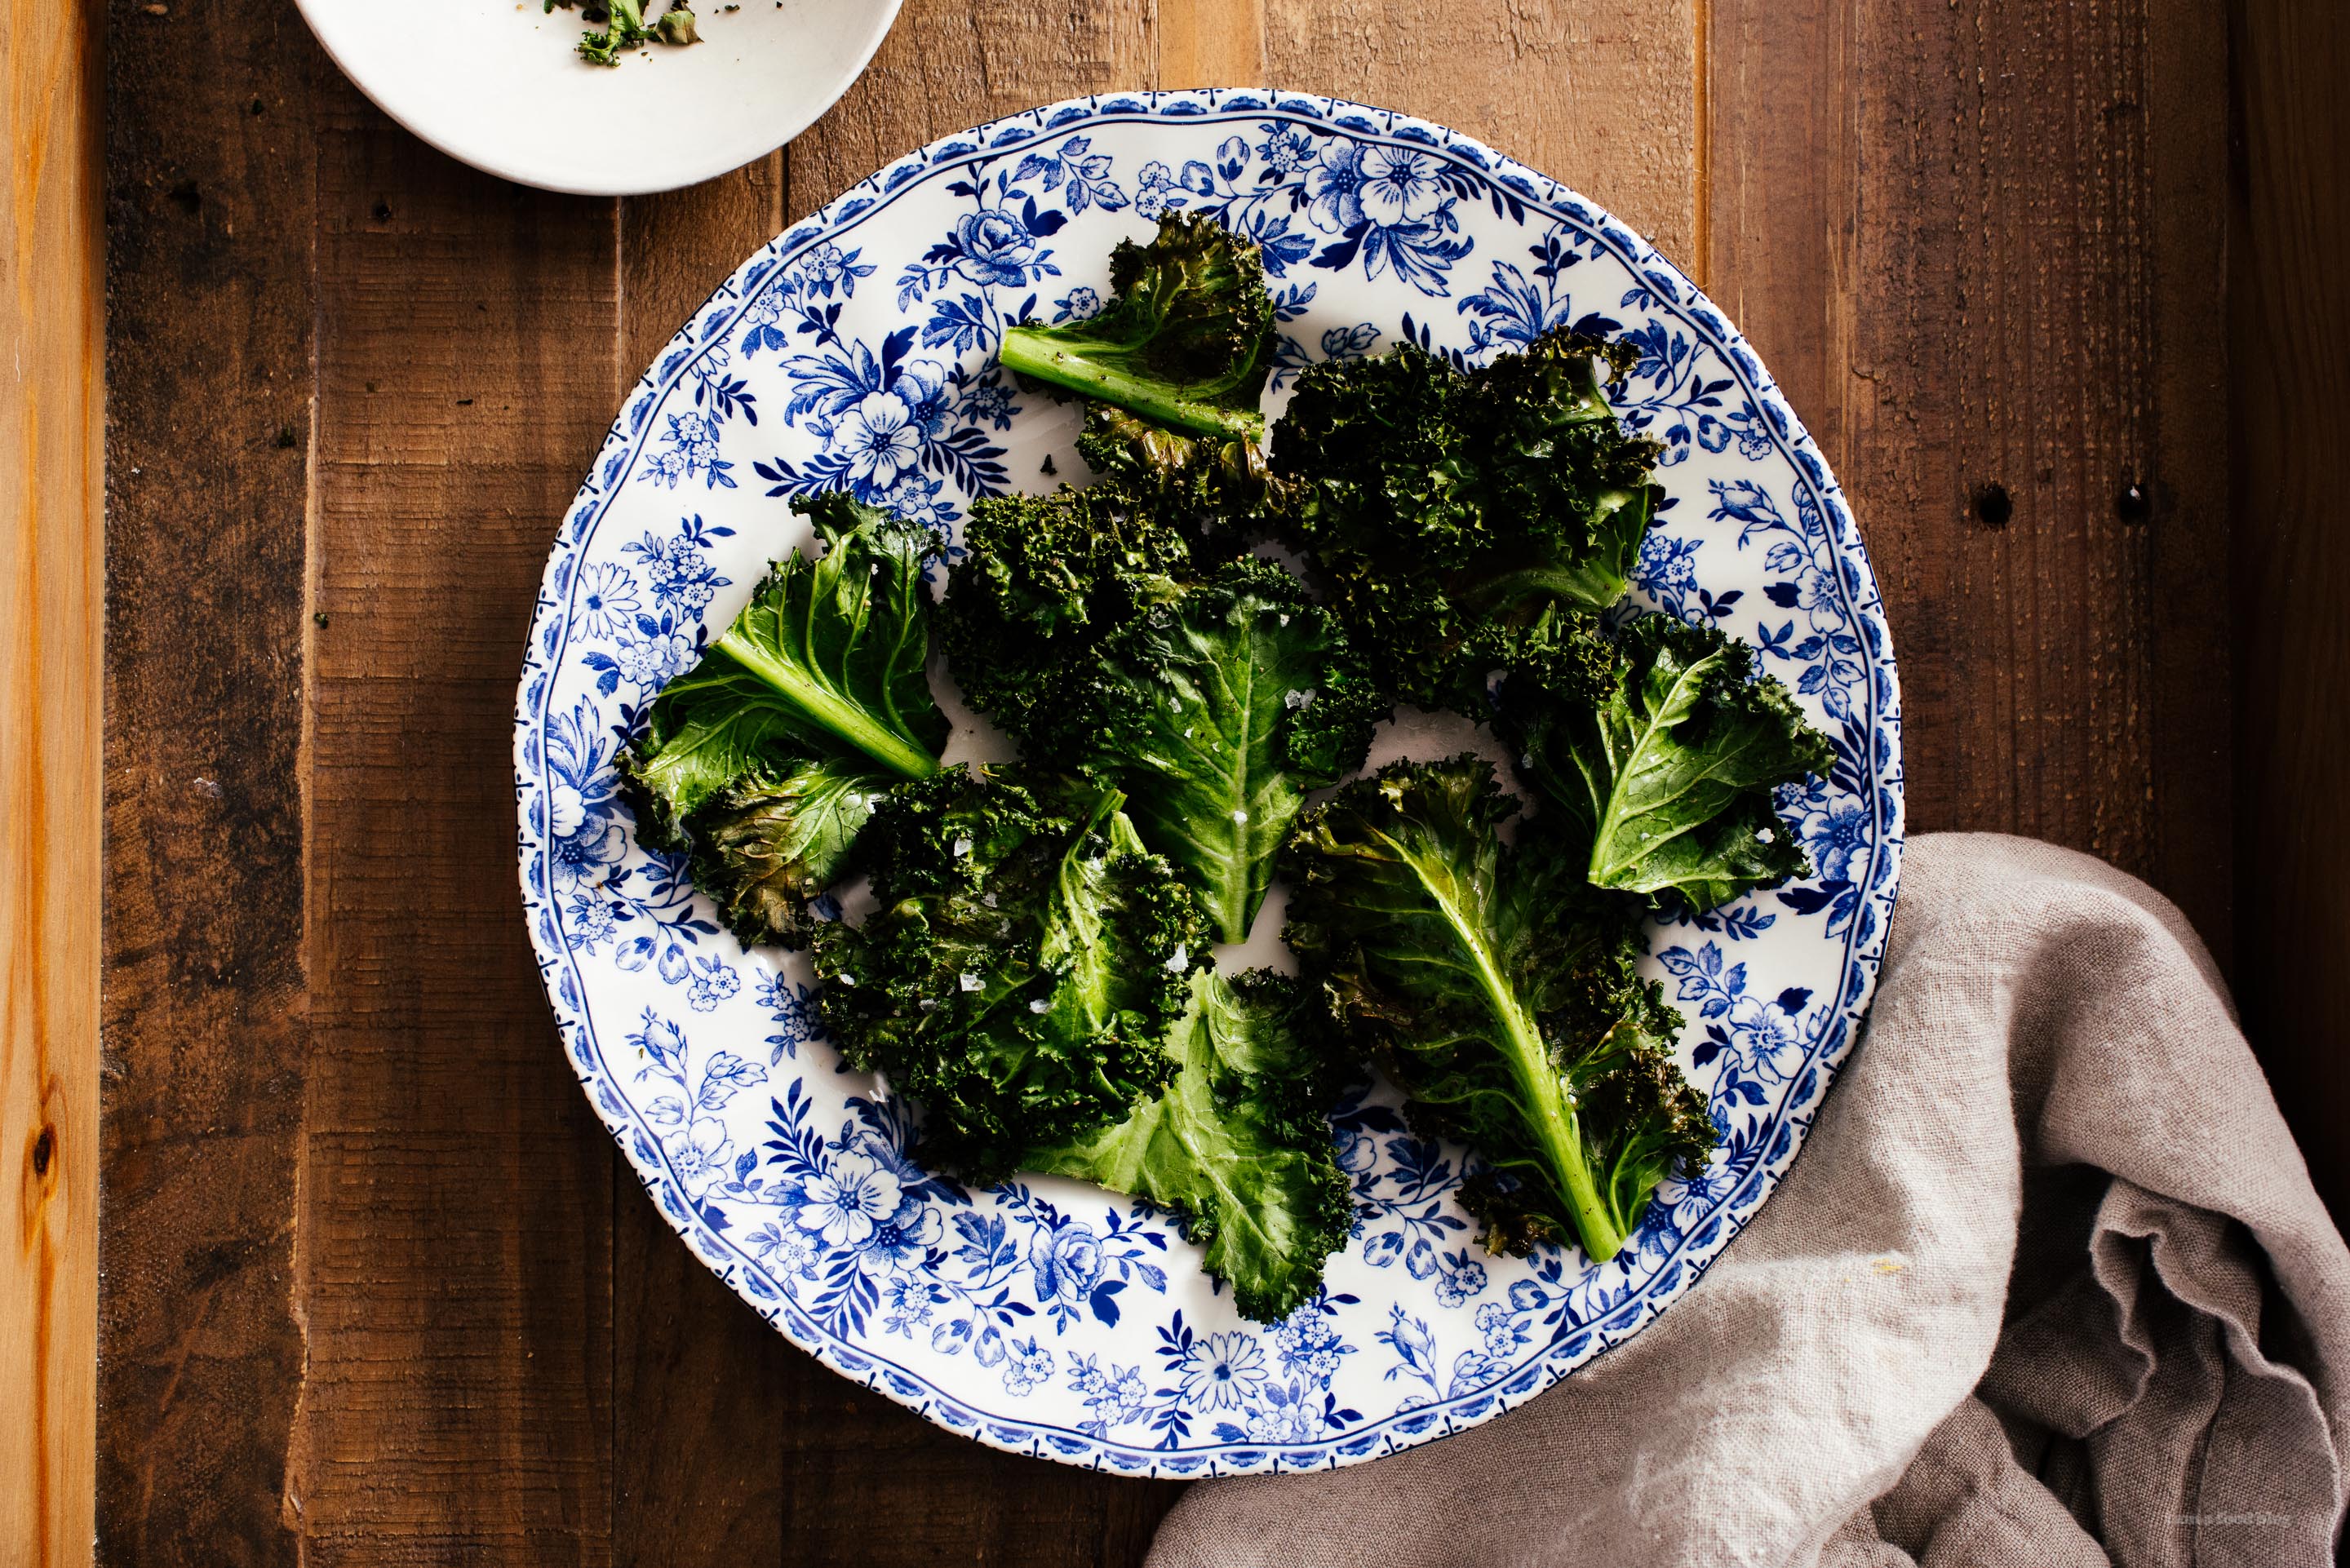
I’m on the air fryer train and I won’t stop, can’t stop! It seems a little funny because technically you can do exactly the same thing in the oven, but for some reason the air fryer seems faster and more convenient. Maybe it’s because you don’t need to put things on a pan? Anyway, these kale chips were made in the air fryer and they were SO GOOD. I mean, kale chips are good no matter what, but these were so much faster than preheating the oven then baking. We made two kinds of kale, curly and dinosaur because I’m an equal opportunity kale eater. They were both crispy and delicious and so much healthier than my usual bag of chips >_<
Crispy Air Fryer Kale Chips Serves 1Read More →In a bowl, toss the kale with the oil, or spray with cooking oil. Season generously with salt and pepper. Place the kale in the air fryer basket and cook at 400°F for about five minutes, shaking the basket halfway through. Enjoy warm or at room temperature.
- 1 bunch kale, stems and ribs removed
- 1/2 tablespoon oil or cooking spray
- salt and freshly ground pepper
I Am... Japan’s Famous Nogami Shokupan Bread: People are Lining Up for Hours for this Fluffy White Bread
On our last day in Tokyo, Mike asked me what I wanted to do. I said, “I’m good with anything!” And it was true, I really was. Our trip to Japan was amazing – we saw sakura, we went to an onsen with a view of Mount Fuji, and we ate some crazy delicious food. I was happy for the last day to be super casual wandering around Tokyo vibes. But then, Mike said to me, “Really?! I thought you wanted to hit up Nogami?”
At that point, all bets were off. I mean, YES OF COURSE I wanted to hit up Nogami. Nogami has been on my list for a while because I am obsessedwith fluffy white Japanese bread. I often go into a little IG black hole where I literally look at loaves of shokupan. Mike and I even hit up several cafes on this trip just so I could have heavenly slices of bread, toasted.
If you haven’t had shokupan and are curious, it’s basically white bread that’s been baked in a pullman loaf so that the sides are completely squared off. The insides are fluffy and soft and biting into a slice is like biting into the most delicious cloud. Japanese people have perfected what they think is a perfect blank canvas for bread toppings and shokupan is fast becoming one of those small luxury food items that people line up for and wax poetic about.
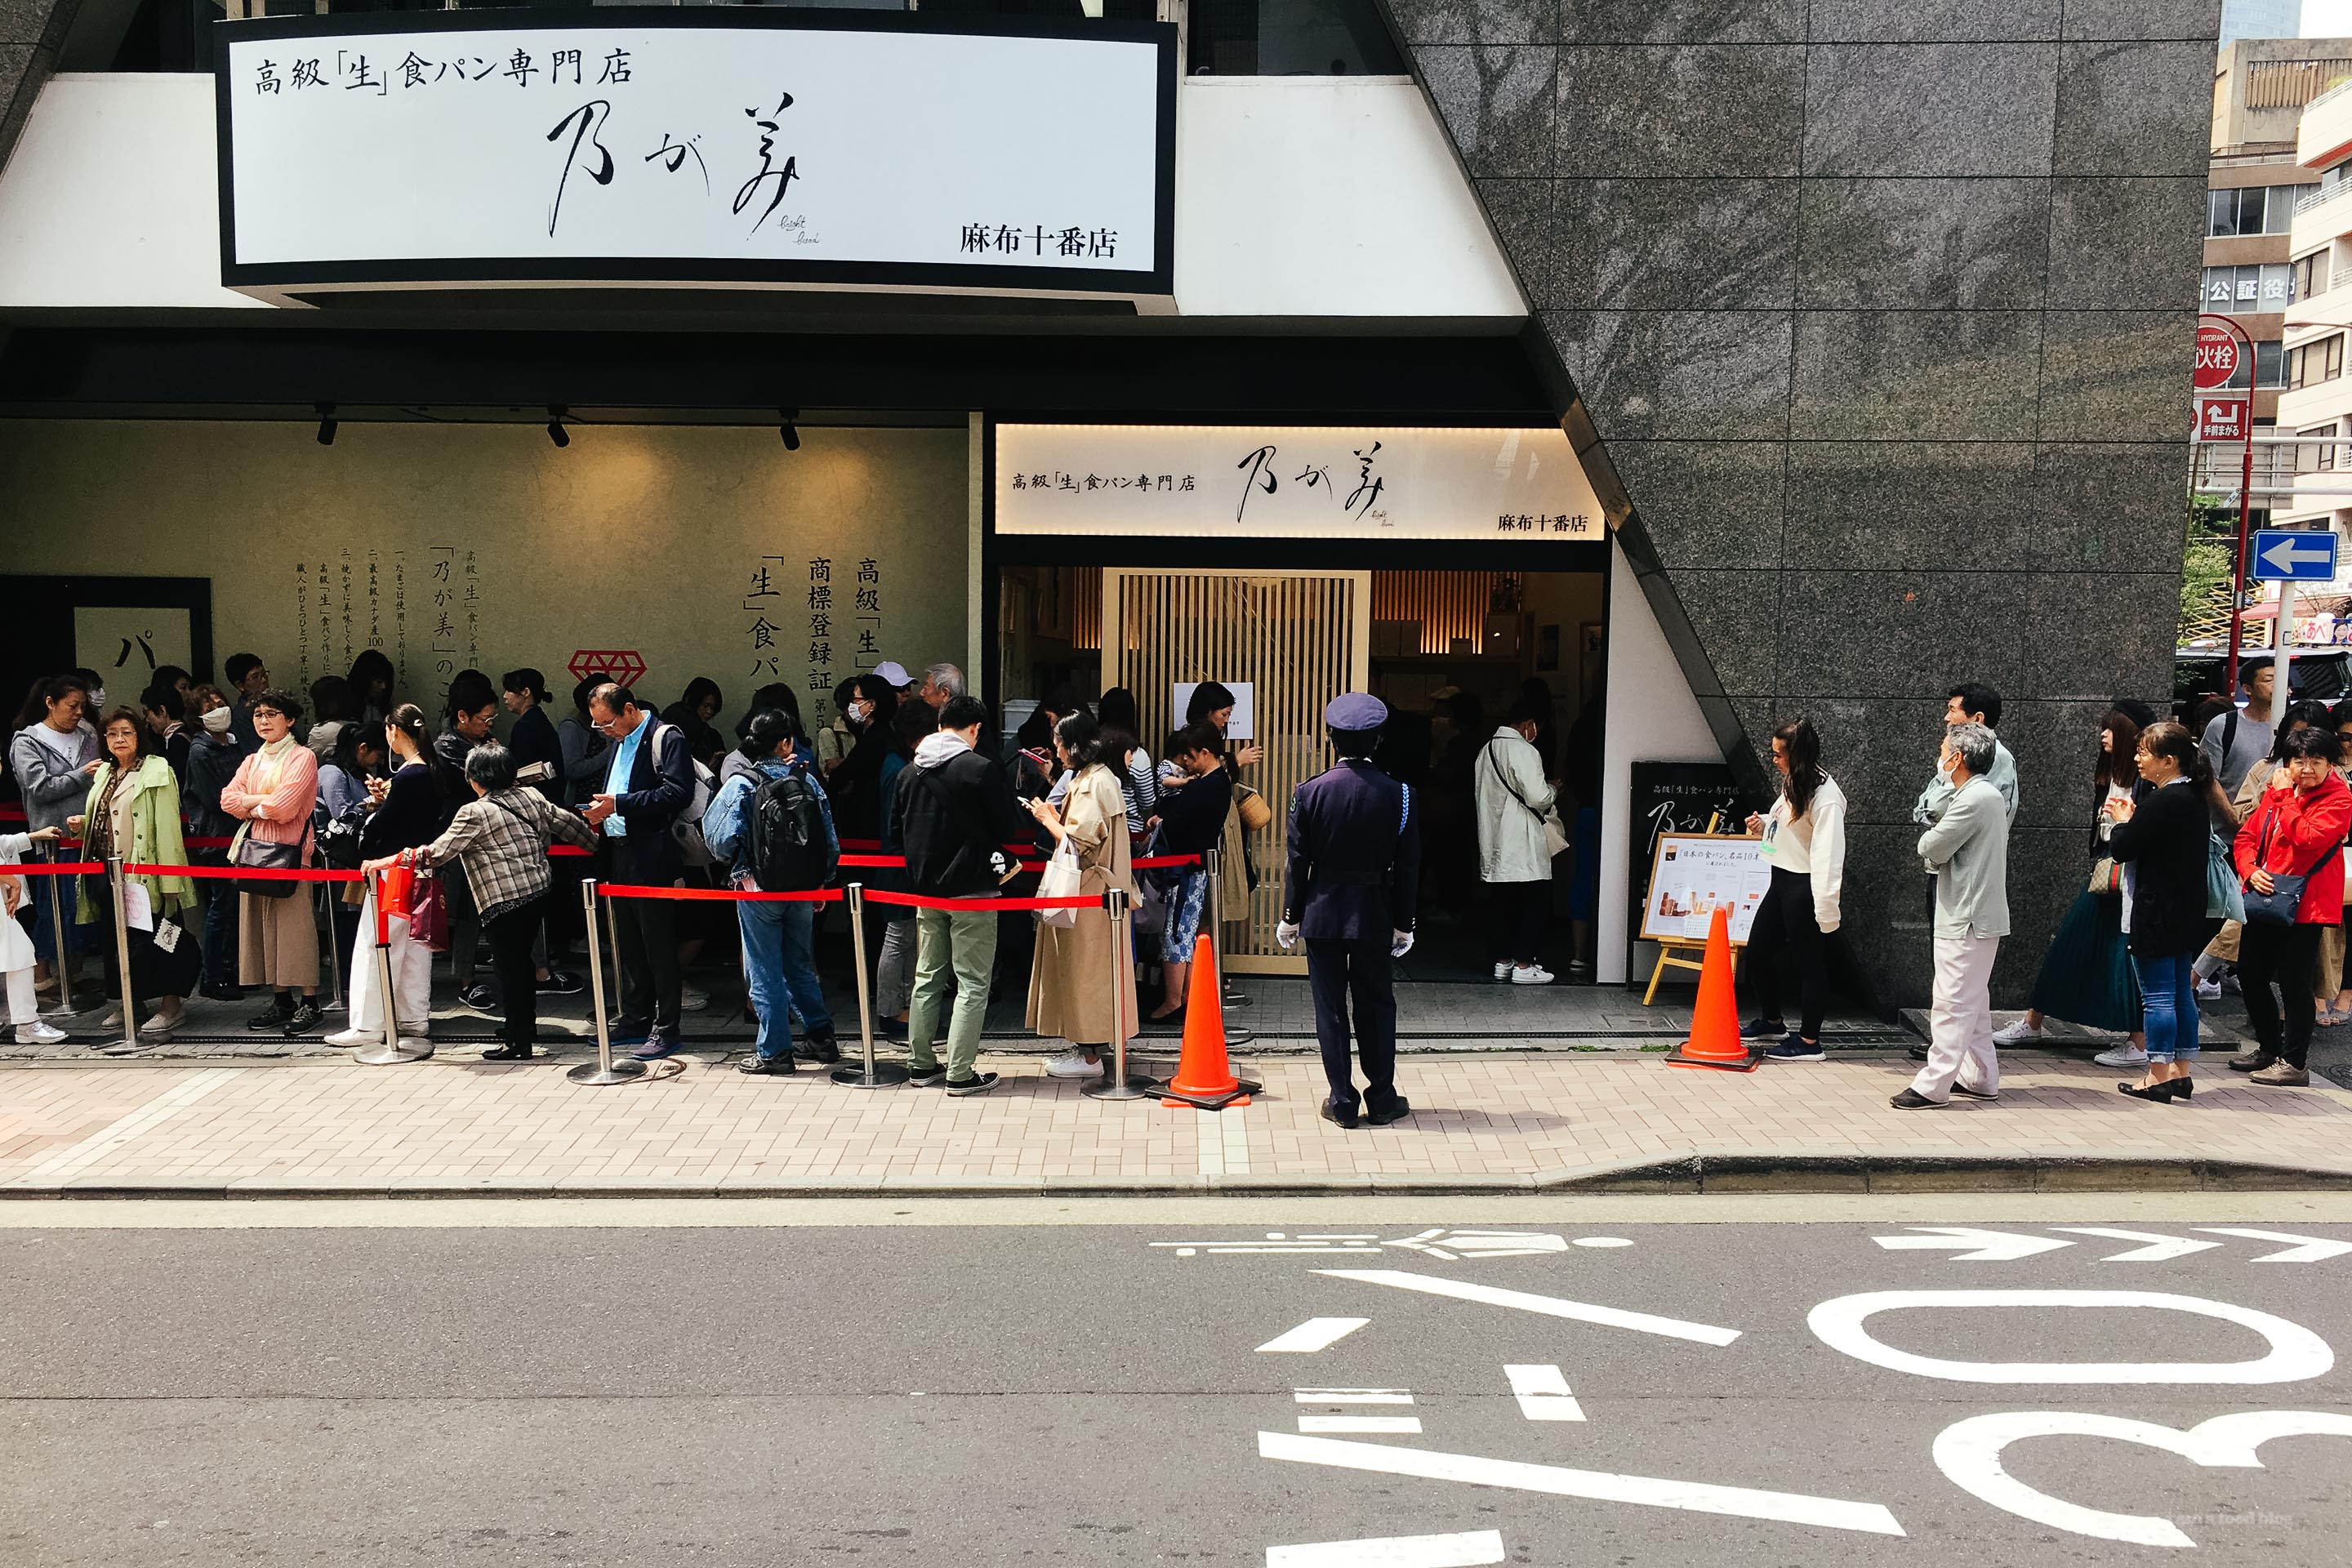
One of the loaves that has been super popular is Nogami, from Osaka. The baker behind the extra soft and fluffy loaf is a 50 year old baker who wanted to change bread as Japan knows it. His aim was to create a loaf that was soft throughout, with a thin and pliable crust. In 2013, after years of research, he revealed his extra soft and fluffy loaf. He called it “nama shokupan” or fresh bread, which is kind of funny because, of course it’s fresh. But saying something is “nama” in Japan implies it’s fresh, natural, raw, and essentially good.
It turned out insanely popular, partially because it’s so good and partially because the man knows how to market. Each loaf goes for over ¥800 which makes it one of the more expensive loaves of bread for sale in Japan. Expensive price tag aside, everyone is eating it up and Nogami went from one store to 127 all across Japan. They sell over 55,000 loaves a day, which is astonishing.
Anyway, Nogami bread was definitely something I wanted to try. Would it live up to it’s hype? Would it indeed be the best bread I ever ate?
When we got to their main branch in Tokyo, the line already went past the front of their bakery on to the side. Mike had wanted to get there before they opened but somehow (okay, it was me!) we didn’t make it until after 12. The line was around the side and was mostly older ladies, younger ladies, and a couple of dudes with their ladies. I got the feeling that bread wasn’t something that dudes wanted to line up for. But then, two older construction worker type men lined up behind us, so I guess Nogami appeals to a wide range of people. Anyway, the line seemed to move both quickly and slowly. It took about 45 minutes to get into the shop, which is insane, I know. I was super grateful that Mike was down with waiting.
After we got in, we bought two whole loaves – one got a gift box because we were going to drop it off for a friend. The other loaf I carried around all dayuntil we got to the airport, where I continued to carry it. I put it on the arm rest next to me on the plane and was very, very careful not to squish it while I was sleeping.
When we got home, some 28 hours or so later after buying the loaf, I finally cut into it and we both had a slice, without toasting. Was it good? Hells yes! Was it the best loaf of shokupan I’ve ever had? Maybe not. It’s definitely one of the best, but the thing is, there are a lot of good loaves of shokupan in Japan. There’s even another bakery that has also won the same “Pan of the Year” (that’s bread of the year) award that Nogami has and doesn’t have a line. And heck, that loaf is just as good. So, if you’re wondering if Nogami is worth it, the answer is yes and no.
Mike will straight up tell you the answer is no though, if you want more of a solid straight shooting answer.
Still, I was insanely excited to have my very own loaf of Nogami right at home. We made strawberry sandwiches and katsu sandwiches and I enjoyed many slices of cheese toast and just plain fresh slices. It was truly bread heaven.
More info here!
Read More →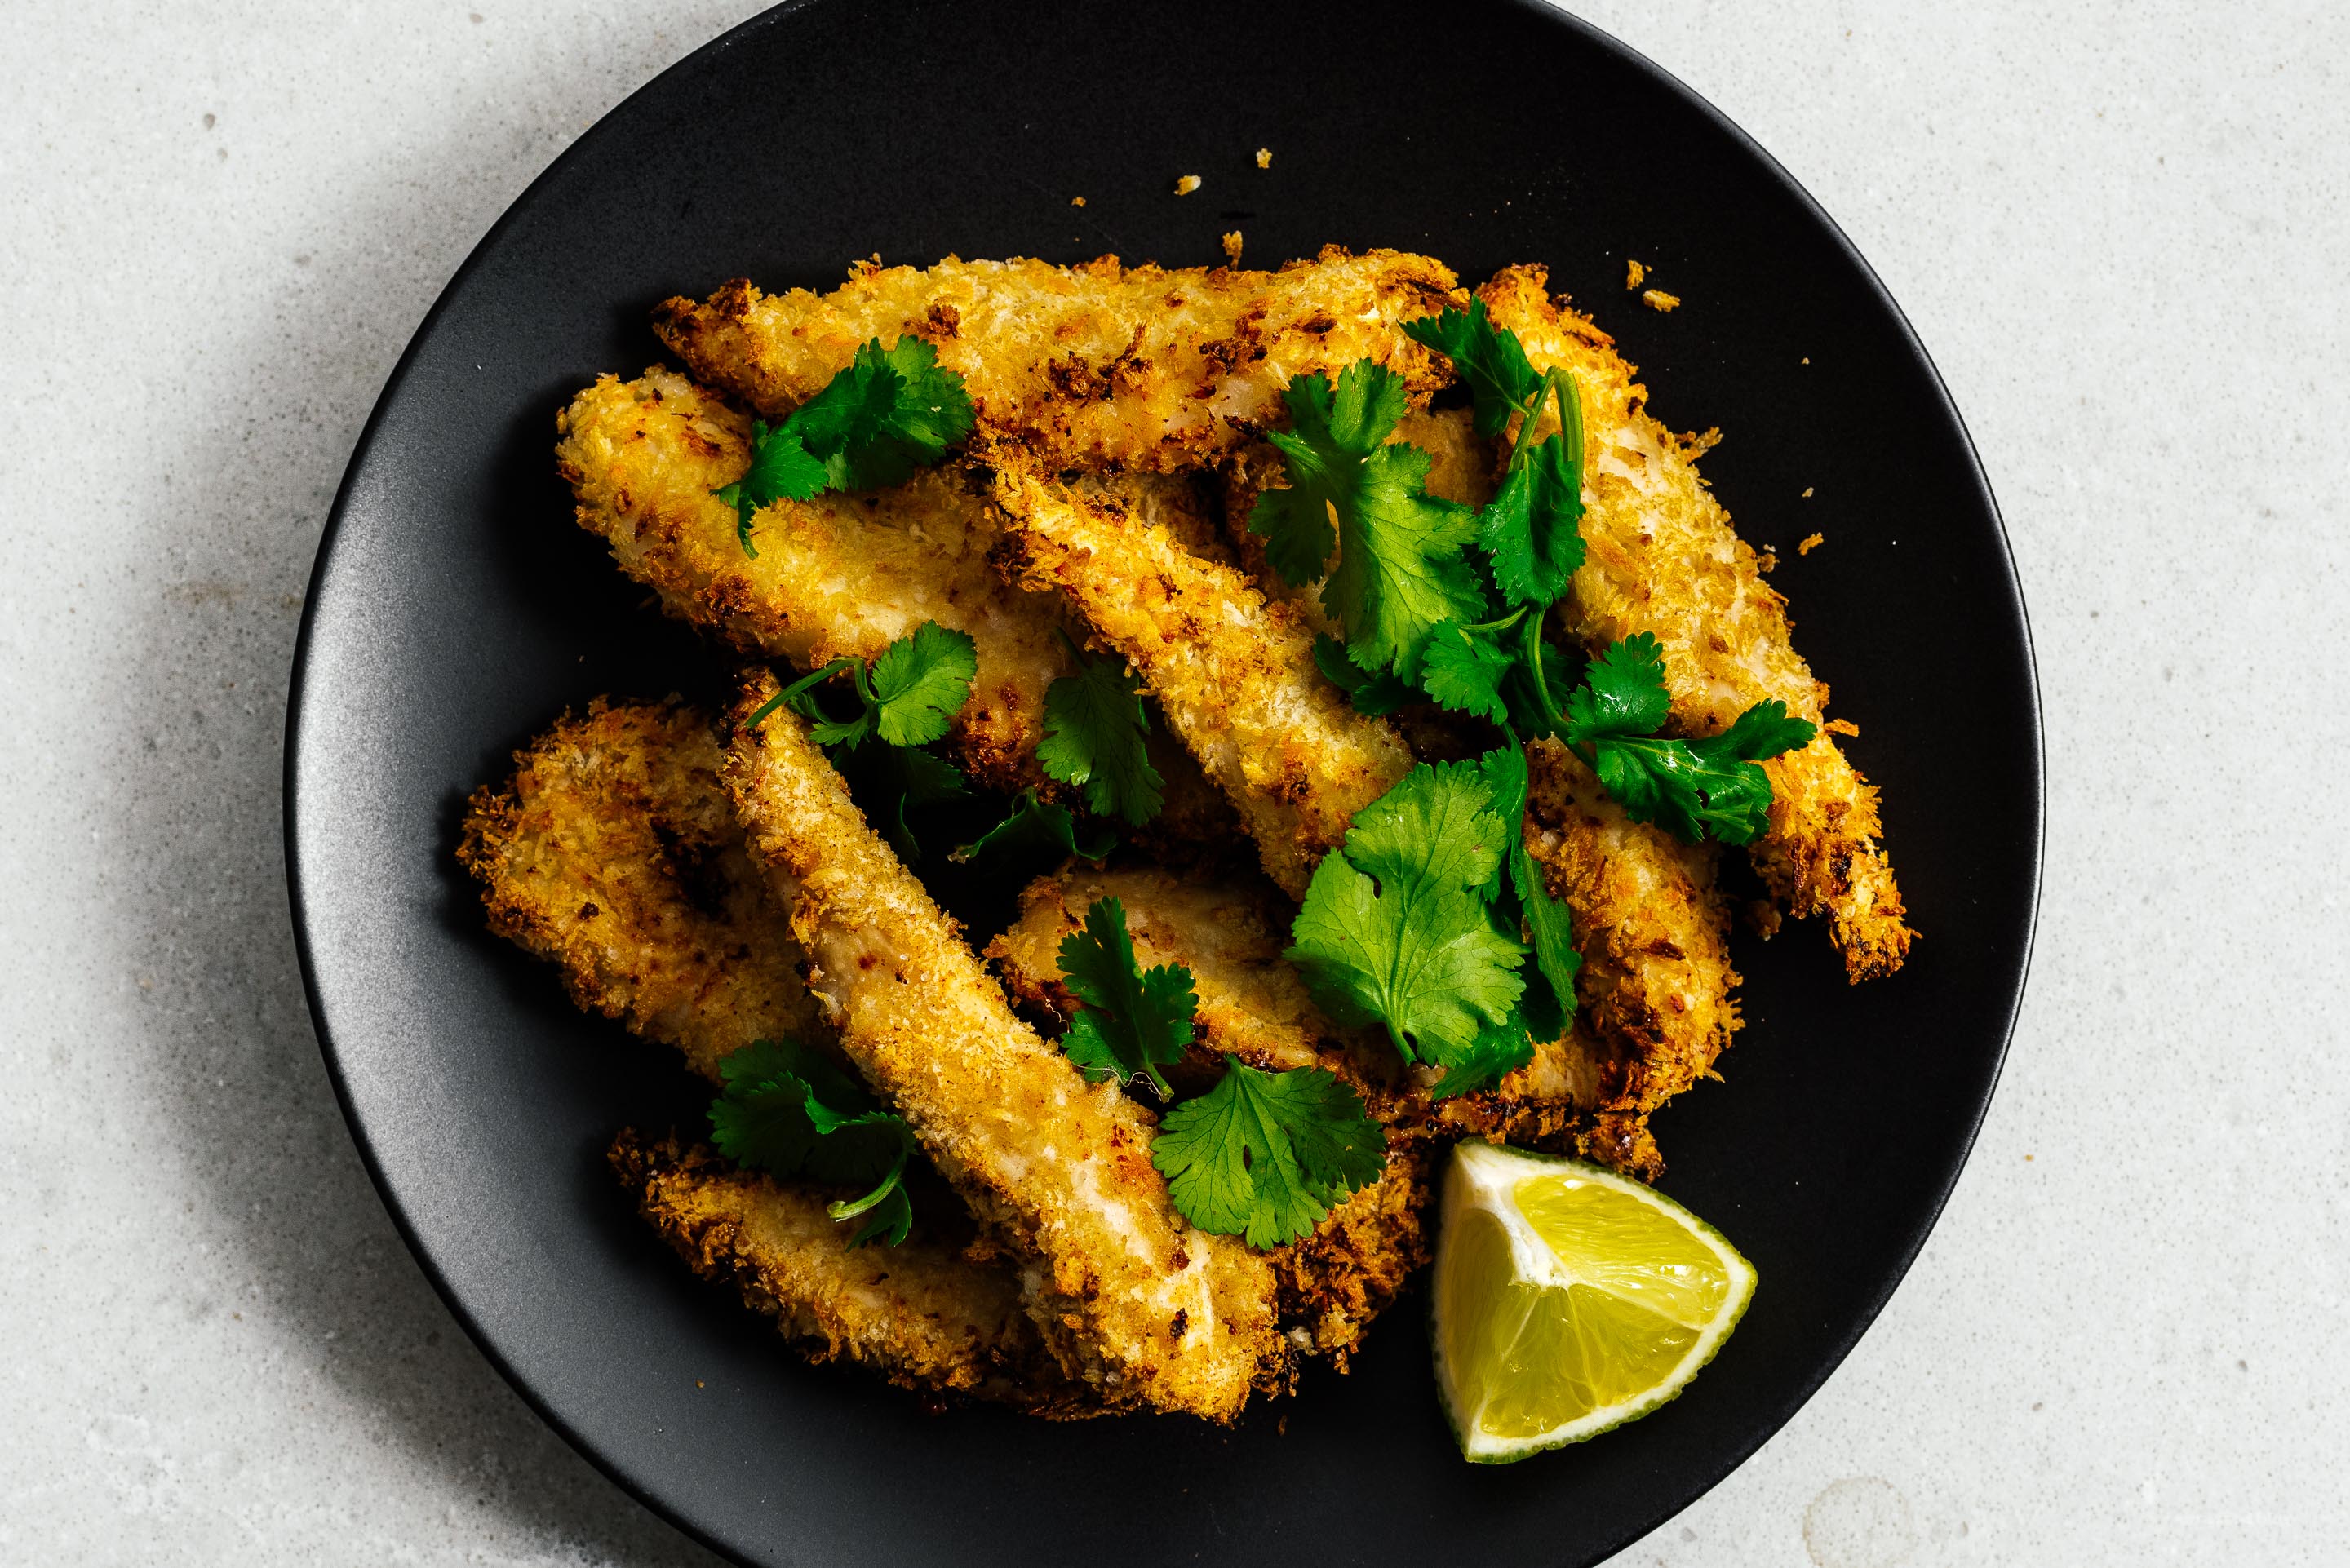
I Am... Crispy Air Fryer Chicken Strips
Chicken strips and chicken strips and chicken strips and chicken strips. They are and forever will be one of my favorite things to eat, no matter how many people look down on them. They’re always on the kids menu and sometimes, I just ask if I can order them because when you have a chicken strip craving, it needs to be filled. I don’t even really understand why people look down on chicken strips. They’re essentially mini chicken schnitzels and people love schnitzel! Anyway, the next time your chicken strip craving hits and you don’t want to do the fast food or deep fry thing, try these air fryer strips! They’re not deep fried so already they’re on the side of health! Plus, if you use chicken breasts which are lean and full of protein, you’ve got even more reason to eat them. These strips get a blast of flavor from a quick soak in buttermilk, as well as onion and garlic powder. We served them up with some lime and cilantro for a bit of brightness. I could eat these every day, for real. PS - If you want your strips to look a little more golden, try toasting the panko in a dry pan for a little while. It’ll give the breadcrumbs that signature golden look.
Crispy Air Fryer Chicken Strips serves 2-4Read More →Soak the chicken strips in the buttermilk along with the salt and freshly ground pepper for 30 minutes to 1 hour. In a shallow container, whisk together the panko, garlic powder, white pepper, onion powder, and salt. Take a strip of chicken out of the buttermilk, shake gently, then coat in panko, pressing to ensure all sides are covered. Place in the fry basket of the air fryer, being careful not to crowd. Continue to coat all of the chicken. Lightly spray the chicken with cooking oil. Cook at 400°F for 5 minutes, then flip and continue to cook for another five minutes, or until cooked through and crispy, up to 10 minutes more. Enjoy hot!
- 2 boneless skinless chicken breasts, cut into strips
- 1 teaspoon coarse kosher salt
- 1 teaspoon freshly ground pepper
- 1 cup buttermilk
- 1 1/2 cups panko
- 1/2 tablespoon garlic powder
- 1/2 tablespoon onion powder
- 1 teaspoon salt
- 1/2 teaspoon pepper, preferably white pepper
- canola oil spray
- lime and cilantro to serve
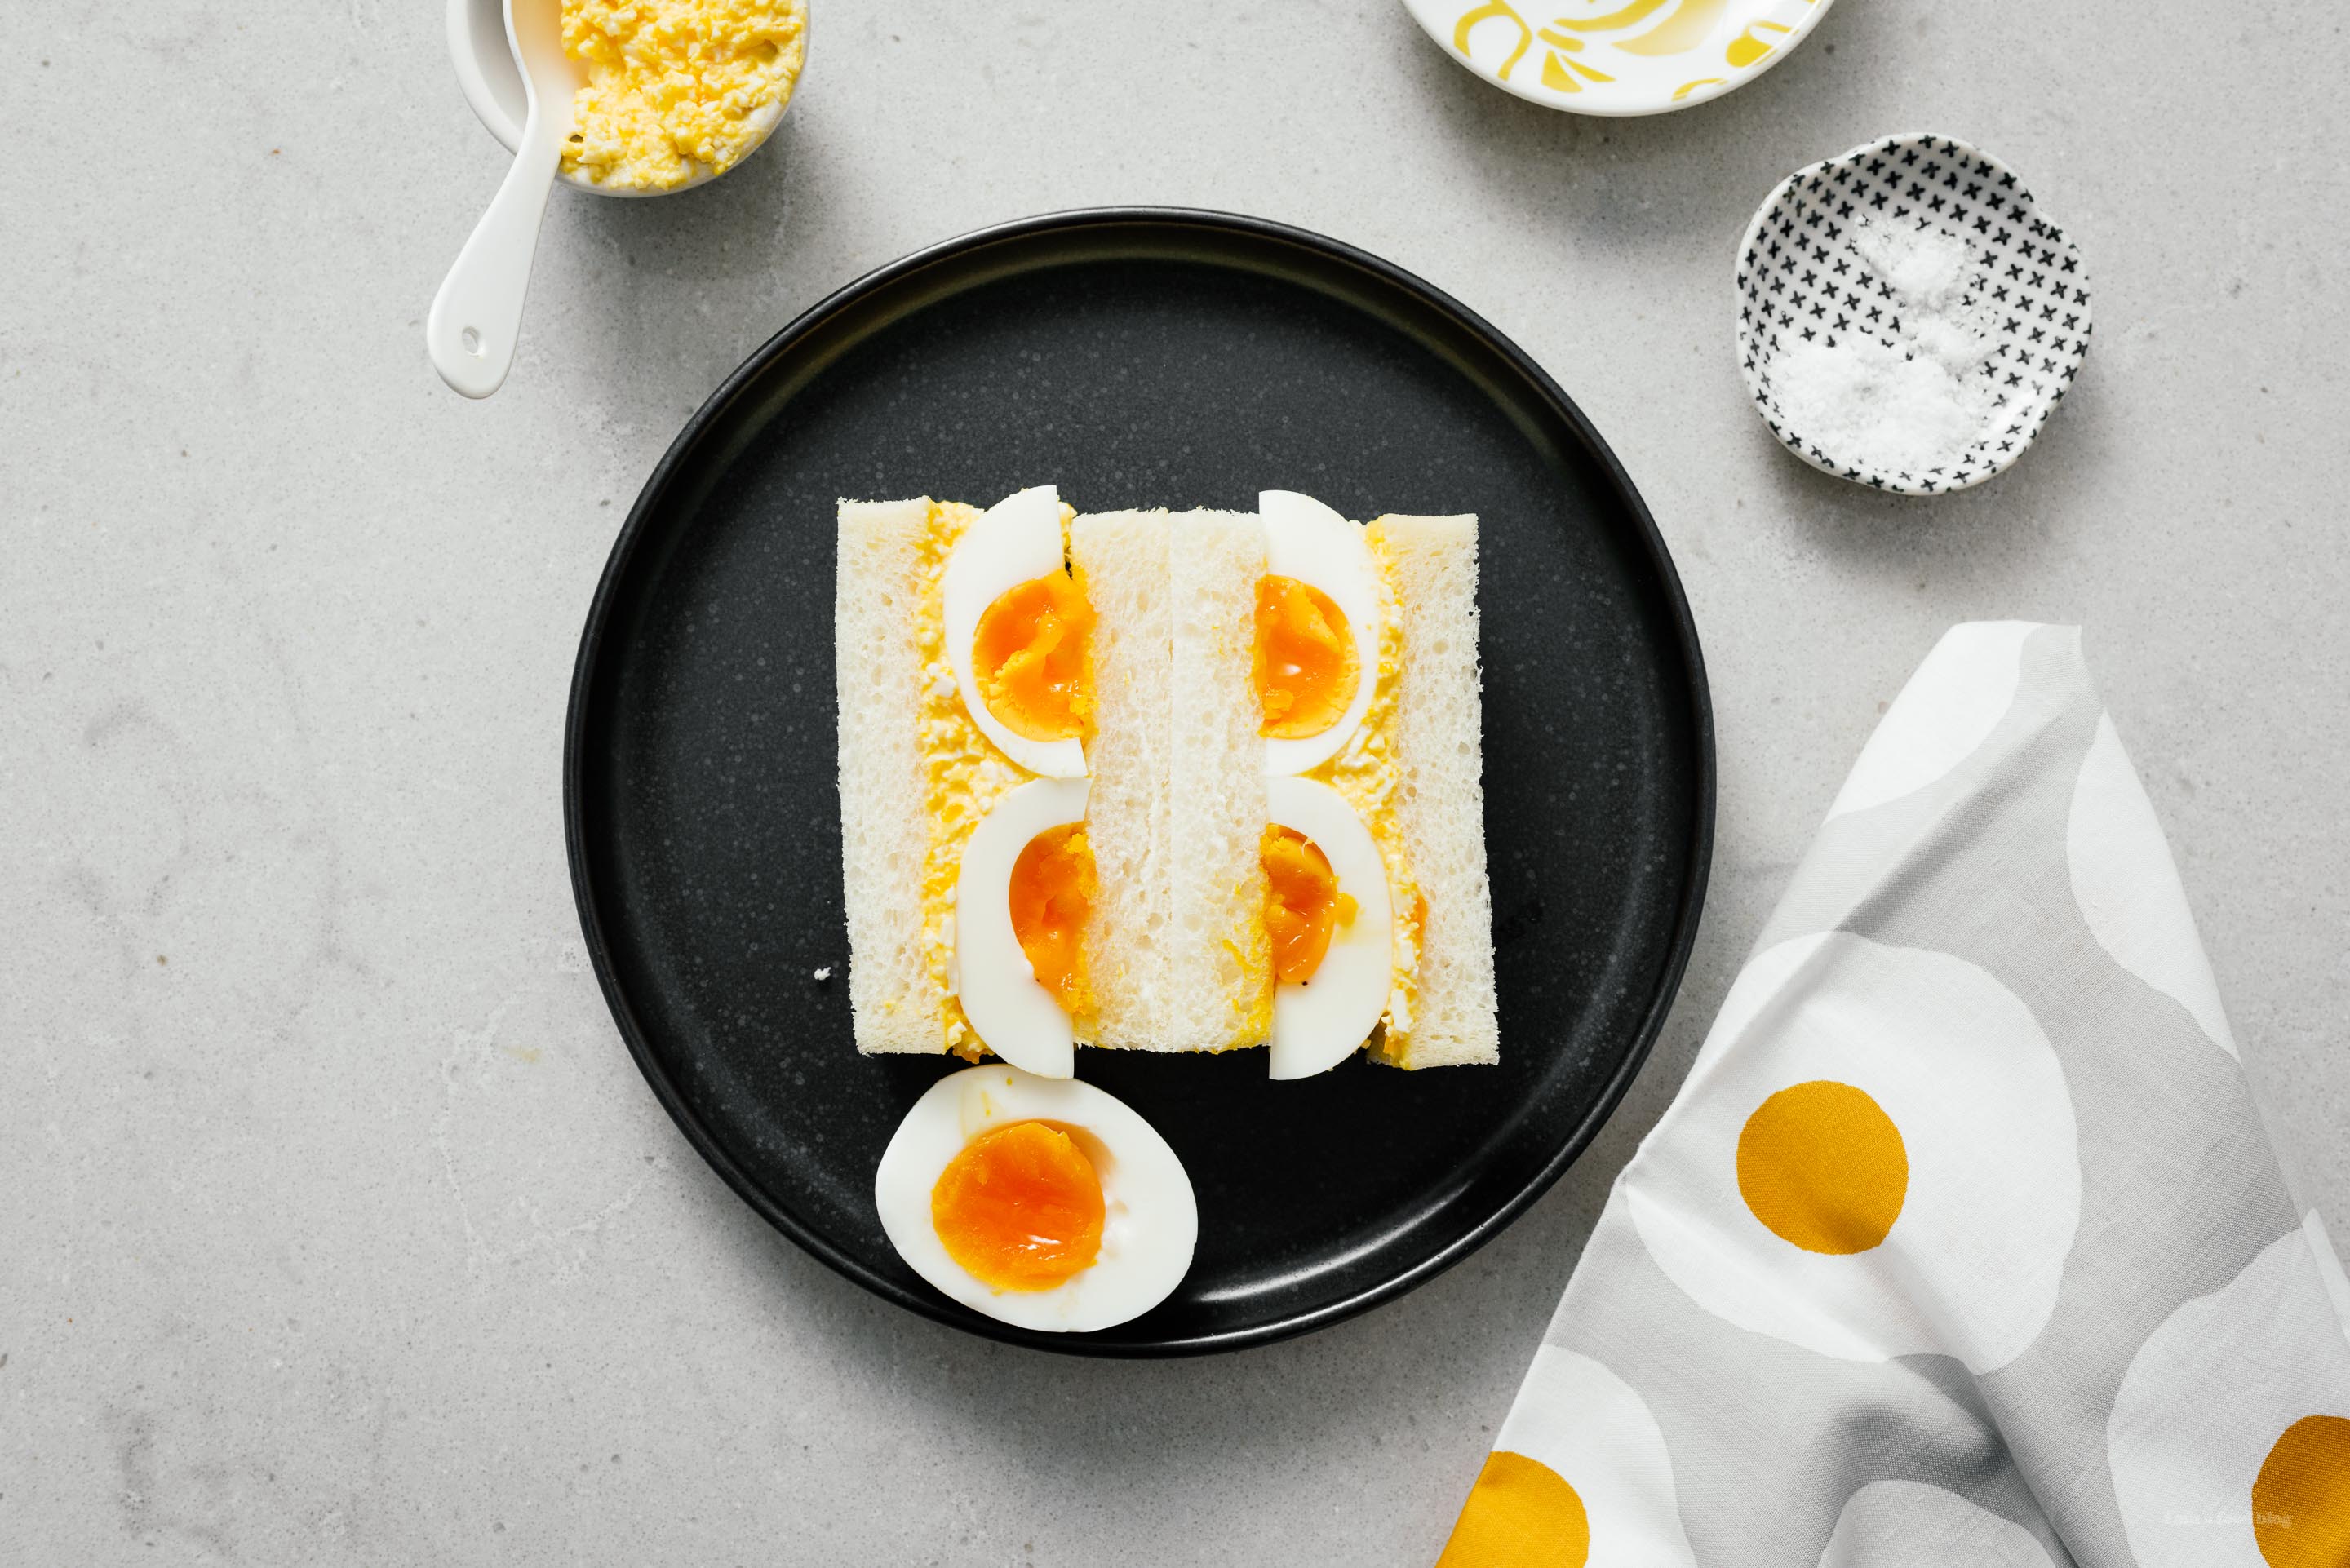
I Am... Konbi’s Japanese Egg Salad Sandwich: Tamago Sando Recipe
Tamago sando, or egg salad sandwiches, are extremely popular in Japan – they even had a short run of tamago sando flavored potato chips! All of the combini (convenience stores) carry them, and as of late, there have been fancier tamago sando popping up too. But, if you want to keep it classic, just head towards the cooler in 7-11 or Lawson’s and pick up one of those ubiquitous soft and squishy triangles filled with a simple egg and kewpie filling. The bread is cloud like, the filling the perfect balance of savory and salty, and together, the parts create a whole that is extremely nostalgic. People who know, just know, egg salad sandos are where it’s at. David Chang knows. Anthony Bourdain knew. Egg salad is a thing and it’s here to stay. I always eat a tamago sando (or 8) when in Japan and this time, since we came home with a whole loaf of shokupan, I decided that we were gonna make our own. I went with a simple classic filling of medium-hard boiled eggs, kewpie mayo – absolutely essential – and a generous sprinkle of salt. Added in a couple of jammy eggs for a bit of visual contrast and boom, instant egg salad sandwich heaven. So nice to have a little taste of Japan, right here at home :) PS - I based this guy off of Konbi’s famous egg salad sandwich. Still haven’t had one, but soon!
Japanese Egg Salad Sandwich: Tamago Sando Recipe makes 1 sandwichRead More →Remove the eggs from the fridge as your bringing your water to a boil. Prepare an ice bath with a large bowl of cold water and ice. Bring a pot of water to rolling boil, then turn the heat down and gently add eggs in, with a slotted spoon. Turn the heat back up to medium high and maintain a simmer for 7 minutes. Remove 2 of the eggs, and leave the remaining 2 eggs in for another minute and a half. Plunge the eggs into an ice bath to cool down. Peel the eggs: Gently tap the wide end of the egg on the countertop, then flip around and tap the pointed end. Gently roll the egg and peel, under running water, if it helps. Cut the 7 minute eggs in half and set aside. Place the remaining two eggs in a bowl and use a fork to crush with the mayonnaise and a sprinkle of salt until a rough paste forms. Taste and adjust the kewpie mayo and salt. Spread an even layer of egg salad on one slice of bread then arrange the cut eggs on the salad, nestling in gently. Top with the remaining slice of bread, then cut into three, being sure to cut perpendicular to the yolks, so when you turn the sandwich, you see the yolks.
- 4 large eggs
- salt, to taste
- 1-2 tablespoons kewpie mayo, or to taste
- 2 slices fluffy white bread, crusts trimmed

I Am... Friday Finds: 4.26.19
Hai! Remember when I said that I don’t have jet lag at all? Yeah, I lied. I have crazy jet lag. I’ve been sleeping at 3 in the morning – sometimes even 4 – and it’s a good day if I get up before noon. I feel like a major slob but at the same time, I kind of don’t really mind? I’m going to try to get to bed early tonight though so hopefully I wake up at a reasonable hour. Being awake in the middle of the night gives me plenty of time to surf the internet and read ridiculous articles. I’ve also been spending my time getting hyped for The Advengers Endgame. We’ve got tickets to see it and I’m hyped! I will not be drinking anything or having caffeine that morning so I will be able to make it through the entire 3 hours without a bathroom break. Anyway, weekend plans?! If you’re bored, here are some fun reads! Webstuff:
- Do you have a favorite grocery store?
- The blackest black.
- Burritos as we know them.
- Instagram as we know it is over?!
- Rose all day, every day. Rose is never going to be off trend, it seems.
- New KitKat flavor!!
- I don’t know about you, but I’d say in this giant potato airbnb!
- Two ingredient chocolate pot de creme.
- I could eat this pasta all the time and be happy.
- I love pavlovas and this one looks perfect!
- I know it’s spring, but I kinda want a weighted blanket? Weird I know, but I like burrito-ing myself in blankets.
- These liquid measuring cups look interesting to me – sometimes I find the glass ones too cumbersome and they take up a huge amount of space, but these ones stack and would be usable with an immersion blender.
- General Tso’s chicken, with a healthy baked twist.
- I’m obsessed with Japanese shokupan: fluffy white bread.
- Hello UDON!!! And a bonus recipe if you’re feeling the udon urges.
- Do you guys wanna follow the white rabbit? He’s got cookies!

I Am... Easy General Tso’s Chicken: Healthy Baked Edition
An easy general tso's chicken that's so hands off you’ll want to make it every night. General Tso's chicken might be the most popular dish in America when it comes to Chinese food. It's easy to see why with its sweet, sticky, and umami forward deep fried chicken nuggets. Like all things though, making it yourself at home is even better. This version is simultaneously tastier than takeout while being super easy and healthy because it's oven baked with no finicky oil to deal with, just delicious crispy chicken. 2025 Update: the air fryer is even better, read below.
Healthy and protein forward
Unlike traditional General Tso's chicken, this version is baked in an oven or air fryer. That means a lower fat content, lower cholesterol, and more protein in your diet.Dark soy sauce
If you'd like extra color in your dish, a bottle of dark soy sauce is highly recommended. In addition to color it also adds an extra layer of rich flavor. You can buy it online, at most larger grocery stores in the Asian aisle, and of course, at any Asian grocery store. Read More about dark soy sauce here.Next level but still easy General Tso's Chicken
If you are so inclined, cutting the pieces into smaller than usual 1/2" cubes make for a crispier chicken that's actually more true to its Hunan origins. Properly speaking all parts of an authentic Chinese dish should be cut down into a uniformly small chopstick friendly size. The whole dried peppers add an incredible kick if you eat them or a delicate hint of smoke if you don't, but you can just leave them out entirely if you don't like spicy food or can't find them, this is dinner & chill after all. The green onion whites comes very highly recommended.What do you need?
A non stick skillet and a baking sheet with a rack that fits. Cooking spray is highly recommended. It puts less oil on the rack than brushing (and you need the oil or you'll tear your chicken).Air fryer General Tso's
If you have an air fryer this is even faster. Just follow the recipe but arrange your chicken in the air fryer and fry at 390ºF for 15 minutes instead of the oven, then continue on with the recipe. In my opinion this is even better.How do you serve it?
Serve with rice, fried noodles, and some traditional chinese vegetables.Easy Baked General Tso's Chicken
An easy general tso's chicken that's so hands off you’ll want to make it every night.
- 1 lb boneless skinless chicken thighs (cubed into 1/2” pieces)
- 3 tbsp corn starch
- 2 tbsp soy sauce
- 2 tbsp vinegar (rice vinegar preferred)
- 2 tbsp sugar
- 1 tsp hoisin sauce
- 4 cloves garlic
Optional but highly recommended
- 1 tsp dark soy sauce (optional for color)
- 4-6 whole dried chinese chilies (optional if you'd like authentic spiciness)
- 4-6 green onion whites (optional but highly recommended)
- sesame seeds (for garnish)
Heat your oven to 450ºF and season your chicken with salt and pepper.
Transfer your chicken to a ziplock/plastic bag along with 2 tablespoons of corn starch and shake well. Arrange the chicken onto an oiled tray on a foil lined baking sheet.
Bake your chicken for 30 minutes at 450ºF, flipping once after 20 minutes.
While the chicken is baking, add the remaining 1 tablespoon of cornstarch to 1/2 cup of water in a cup and stir into a smooth slurry.
Make your sauce by combining soy sauce, vinegar, sugar, hoisin, and garlic. If you are going all out and using the optional dark soy, dried chilies, and green onion whites, add them now as well. Add the corn starch slurry and bring everything to a boil, then take off the heat and stir until a smooth and glossy sauce forms. Set aside and make your rice or relax with a glass of wine until the chicken is done.
When your chicken is crispy and brown, toss it in the sauce until everything is evenly coated. Top with sesame seeds and chopped green onions with a side of rice, and enjoy!
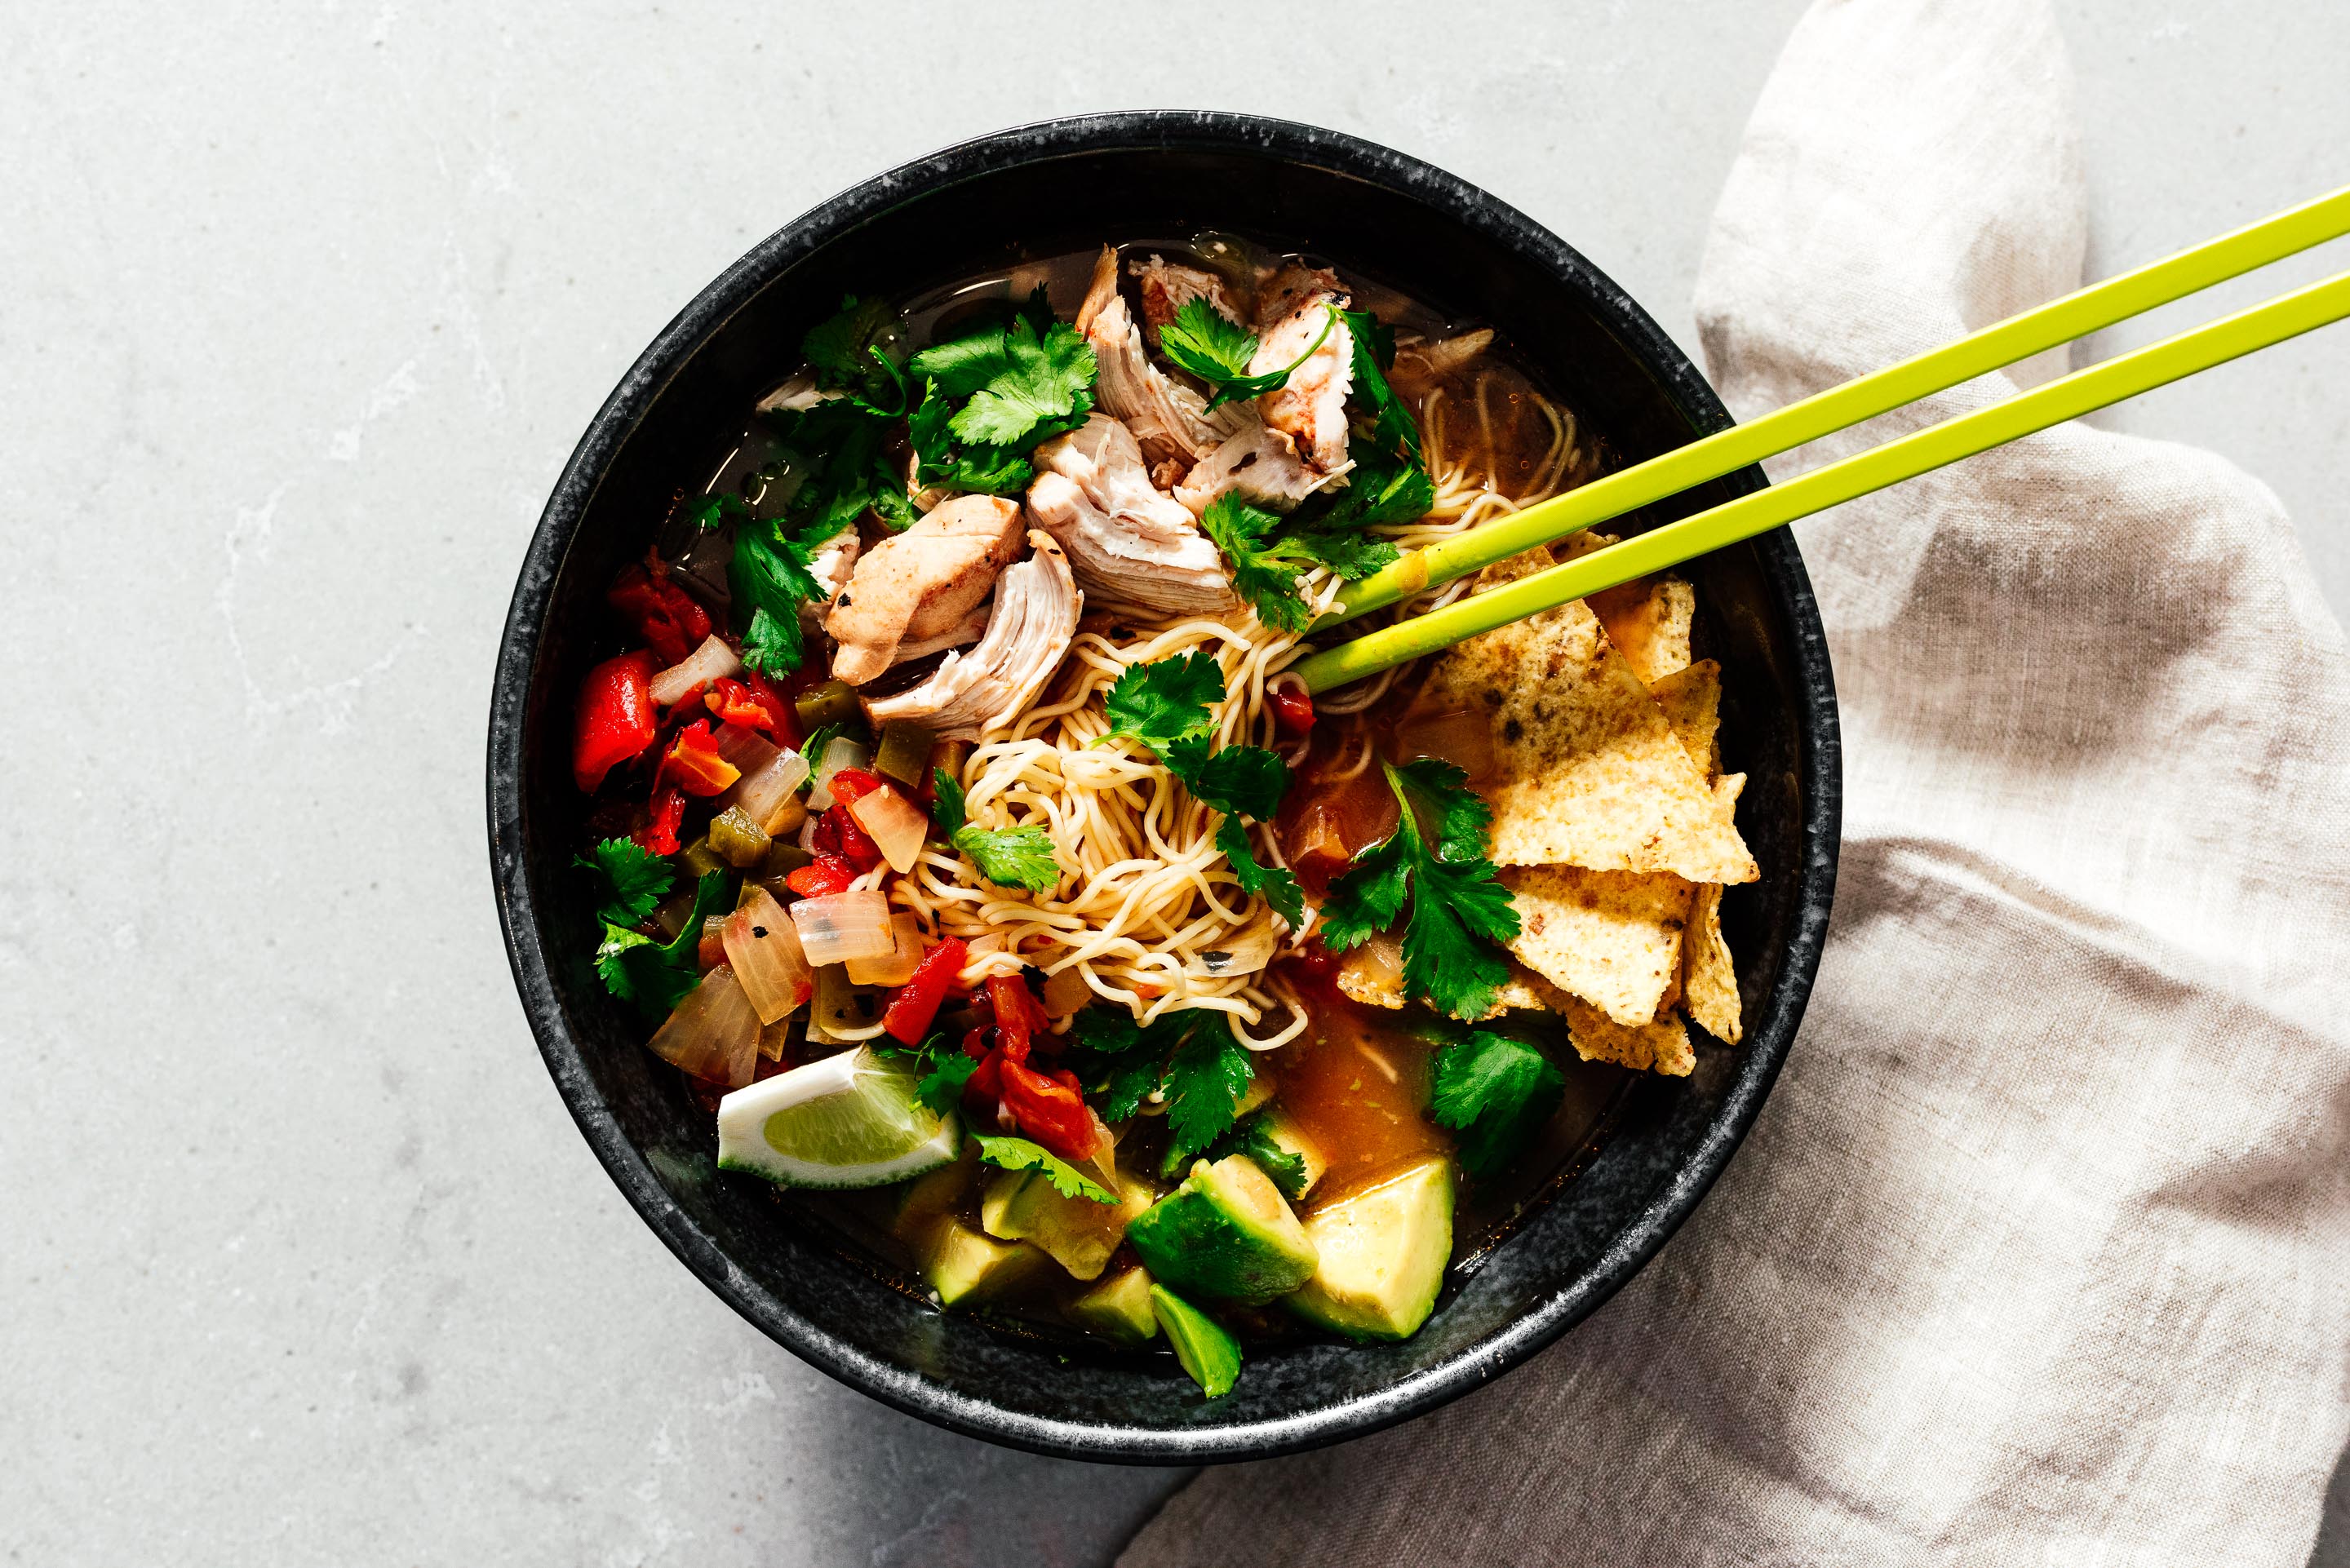
I Am... Instant Pot Chicken Tortilla Ramen Soup
There are some types of foods that people are happy to mess around and be creative with and then there are some types of foods that seem to be sacrosanct. I love a good classic, but I also am constantly blown away by creativity in food. Walking down the busy streets of Tokyo, I must exclaim every single minute to Mike about the food and how awesome it is. There are a ton of creative shops doing their own thing here and everything looks so good. The latest ramen craze seems to be spicy ramen. All the ramen shops are doing it. It’s not like they haven’t had spicy ramen before now, but all of a sudden it’s the hot new bowl in town and it seems like everyone is either making a spicy bowl or eating one. I can’t wait until we get back home so we can make our own spicy ramen. But in the meantime, back while we were still at home, one of the last bowls or ramen we made and ate was this chicken tortilla soup ramen. Sounds like it would be kinda weird and at first Mike was a little skeptical, but after the first few bites, we both agreed, it was a keeper. There’s no cute story about how I came up with the idea – essentially one day, at Taco Wednesdays (our favorite taco joints version of Taco Tuesday), I was having tortilla soup and I thought to myself, this is missing something. That something was noodles. 15 minutes of Instant Potting later and boom: chicken tortilla ramen. It’s a double soup ramen with super savory fire-roasted tomatoes and chicken broth, tender chunks of chicken (go for thighs, so much more flavor!), some peppers for spice, a tangle of toothsome ramen noodles, then ALL THE TOPPINGS. Spicy jalapeños, cilantro for freshness, avocados for the creaminess, cheddar for a bit of cheese pull, sour cream just because, and crunchy tortillas, because everyone knows that the crunchy tortillas are the best part of tortilla soup. Squeeze on some lime and you’re golden. Do this for dinner – it’s a dump everything in the instant pot and eat sort of situation. Noodles for the win!
Instant Pot Chicken Tortilla Ramen Soup serves 2-4Read More →In the Instant Pot insert, add onion, garlic, ancho chile, jalapeño, chicken broth, tomatoes, and chicken. Cook on high pressure for 5 minutes. While the Instant Pot is doing it’s thing, prepare the toppings. Slice the jalapeños, chop up the cilantro, slice the avocado, and cut the limes. Cook and drain the noodles and divide between two deep bowls. When the Instant Pot is done, quick release the pressure. Remove the ancho chile and discard. Carefully remove the chicken and shred. Add the chicken to the bowls with the noodles. Taste the soup and adjust the seasoning with salt and pepper, then divide evenly between the two bowls. Finish with jalapeños, cilantro, avocado, cheddar, sour cream, tortilla strips, and lime. Enjoy hot! Note: If you don’t have an Instant Pot, you can make it in a regular pot on the stove. Add the onion, chili powder, jalapeño, chicken broth, tomatoes, and chicken to a pot and bring to a simmer over medium heat. Continue to simmer until the chicken is cooked through, about 10-15 minutes, depending on the size of the chicken. Continue with the remaining steps.
- 1 onion, diced
- 3 garlic cloves, minced
- 1 dried ancho chile
- 1 jalapeno, chopped
- 4 cups no sodium chicken broth
- 14.5 oz can diced fire roasted tomatoes
- 1 large boneless skinless chicken breast or 4 boneless skinless chicken thighs
- salt and freshly ground pepper to taste
- 2 portions ramen noodles
- sliced jalapeños
- cilantro, roughly chopped
- avocado, sliced
- shredded cheddar
- sour cream
- crunchy tortilla strips or chips
- lime wedges
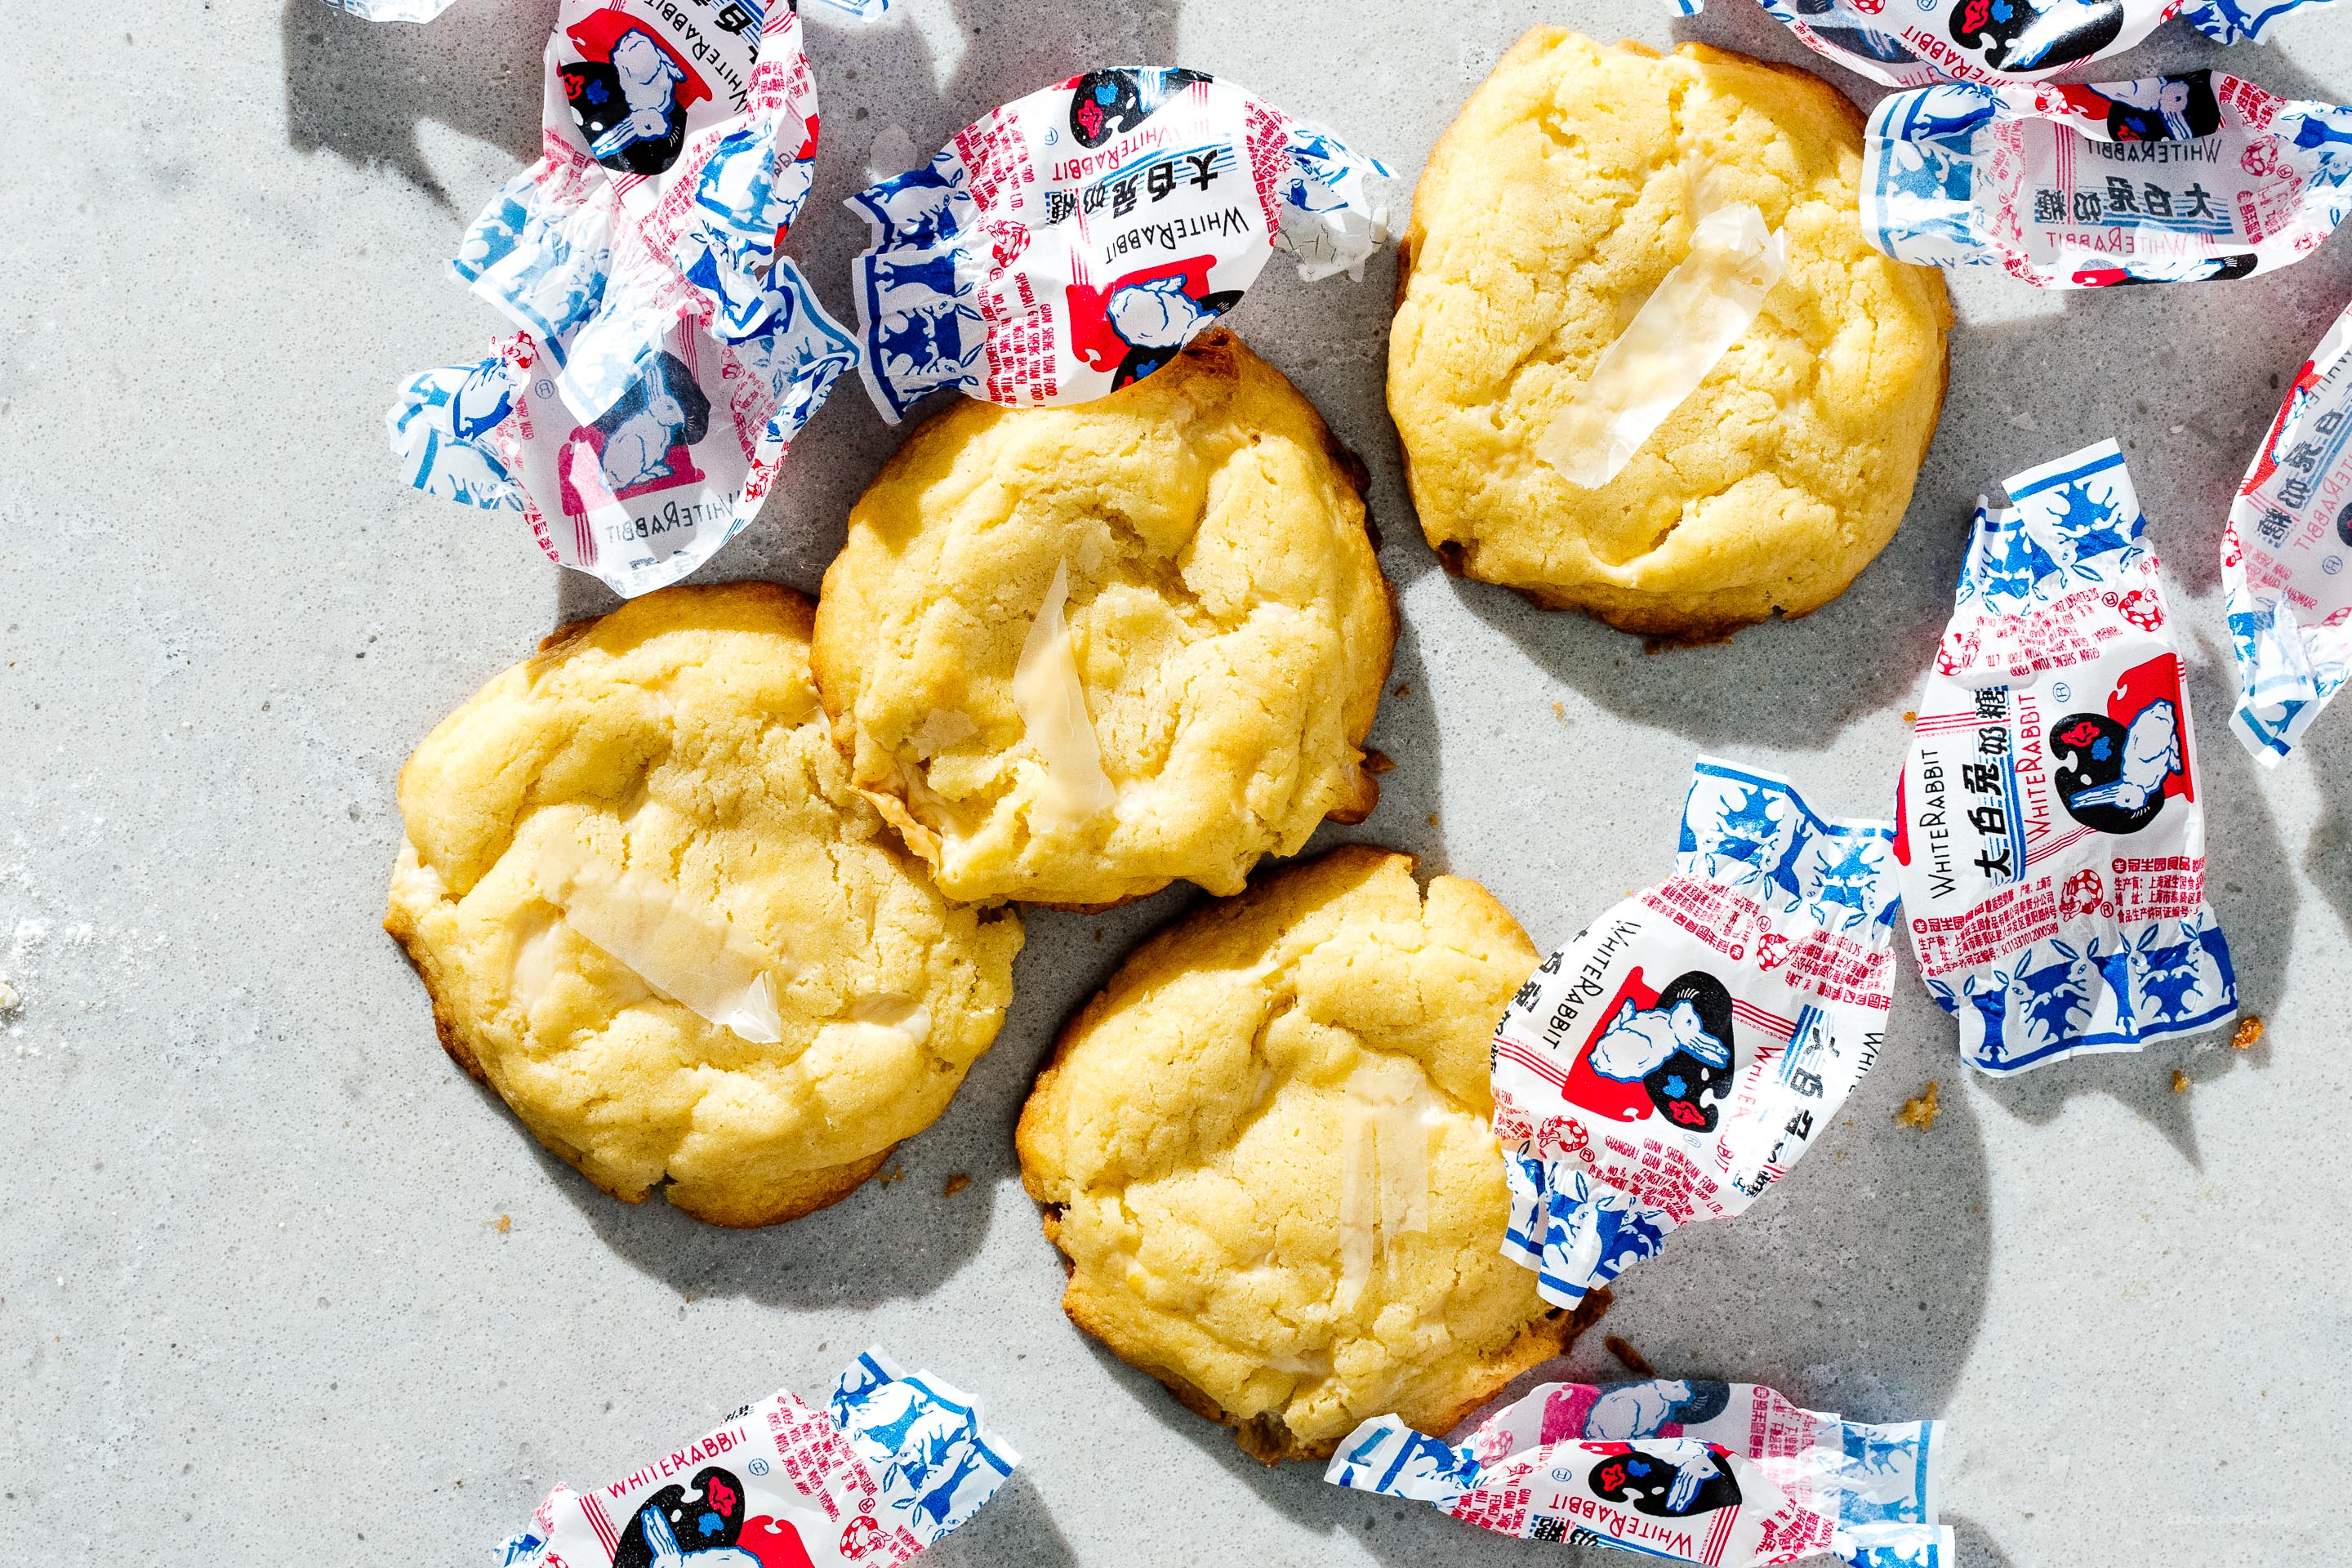
I Am... Small Batch White Rabbit Snickerdoodle Cookies
We are back from Japan and I’m not even jet lagged! Must have something to do with the fact that I spent most of the day and night yesterday sleeping, aside for a quick 3 am (dinner time-ish in Tokyo) snack of cheese toast made on straight-from-Tokyo hand carried on the plane shokupan.
Read More →
I Am... The Best Places in Tokyo for Fluffy Japanese Shokupan Bread
When you think of Japan, do you think of noodles or rice? There’s no doubt that there are a ton of delicious rice and noodle dishes, but maybe what you didn’t know is: Japan really excels at bread. Usually found in perfectly 90° square sided loaves, shokupan, as Japanese white bread is known as, is unbelievably fluffy, soft, and delicious. Milky cloud white with a tender crumb, it’s a loaf that will take you right back to childhood, conjuring up the images of the ultimate crustless white bread sandwiches you dreamed of your mom making. Of course, that’s a completely subjective view point – maybe I’m the only one who dreamed of crustless sandwiches made from the softest, whitest bread filled with salty smooth peanut butter and sweet strawberry jam. The truth is, Japan is as obsessed about bread as it is about noodles or rice. While shokupan is plain and unassuming, with none of the texture or intense flavors of sourdough, it makes the perfect neutral canvas, much like a plain bowl of rice. Just like how rice can have nuances, so can shokupan. Bakeries pride themselves on both ingredients and history. Much like how you can judge a French bakery by its baguettes, you can also do the same with a Japanese bakery and its shokupan. Here are Here arethree of my favorite places in Tokyo to get the fluffy white stuff! Just a heads up though, much like anything that’s popular in Tokyo, there maybe a line, don’t be surprised if there is, and be absurd be excited if there isn’t. Centre the Bakery Center the bakery has a delightful café where you can choose your own toaster. Choose your own toaster! I feel like that sentence is enough to make you want to go there but if you need more convincing, it also happens to be one of the best shokupan bakeries in Tokyo. They consistently have lines and often sell out of their whole loaves, especially their “European” and “American” style shokupan. If you’re not looking to buy a whole loaf, you can skip the long line on the right hand side of the bakery and line up on the left for the café. Try the toast set which will give you one slice of each type of shokupan, as well as different butters and jams. 365 Days 365 Days is literally open every day of the year, except for leap year days. The original bakery is near Yoyogi Park, on a side street in a somewhat quiet area. That doesn’t stop them from having long lines of bread fans lining up for their famous crunchy croquant chocolat, a bun filled with crunchy little chocolate bits. They do excellent mini shokupan that are made with Hokkaido milk – perfect fresh and even better when toasted and slathered with butter. They’ve opened a new store in the more central location of Shinbashi, so there’s no excuse to not go! Pelican Bakery Pelican Bakery has been around for about 76 years and is still going strong. They only make two items: shokupan and dinner rolls. When you visit their little shop in Asakusa, which is more of a mini store front for their baking facility, you’ll see rows and rows of bread lined up, but they’re not for sale – those are preorders that people have called in so that they aren’t disappointed when Pelican Bakery inevitably sells out of bread. They do have some loaves for sale though, so don’t be afraid to pop your head in and ask. And, if you’re not looking for a whole loaf, Pelican supplies bread to many cafes around town and also has their own, just down the street. Get the toast set, which comes with coffee or tea and a thick slab of freshly baked Pelican bread toasted over an open fire. Serious bread goodness. Anyway, I hope this has inspired you to seek out some Japanese bread. It’s truly one of my favorite things in the world to eat. I love it when it’s fresh and fluffy and chewy, just like what you’d imagine a cloud to taste like; I love it when it’s toasted, with a crisp and crunchy layer giving into soft insides; I just love it.
Read More →