
I Am... Mini Beef Wellington
These little mini beef wellington guys are just like the real deal, but mini. Do you ever find yourself obsessed with TV shows? It happens to me a lot, especially if I have the self-restraint to wait until a show is completed so I can binge watch. There's something so satisfying about clicking next episode over and over again until you've reached the conclusion.
Read More →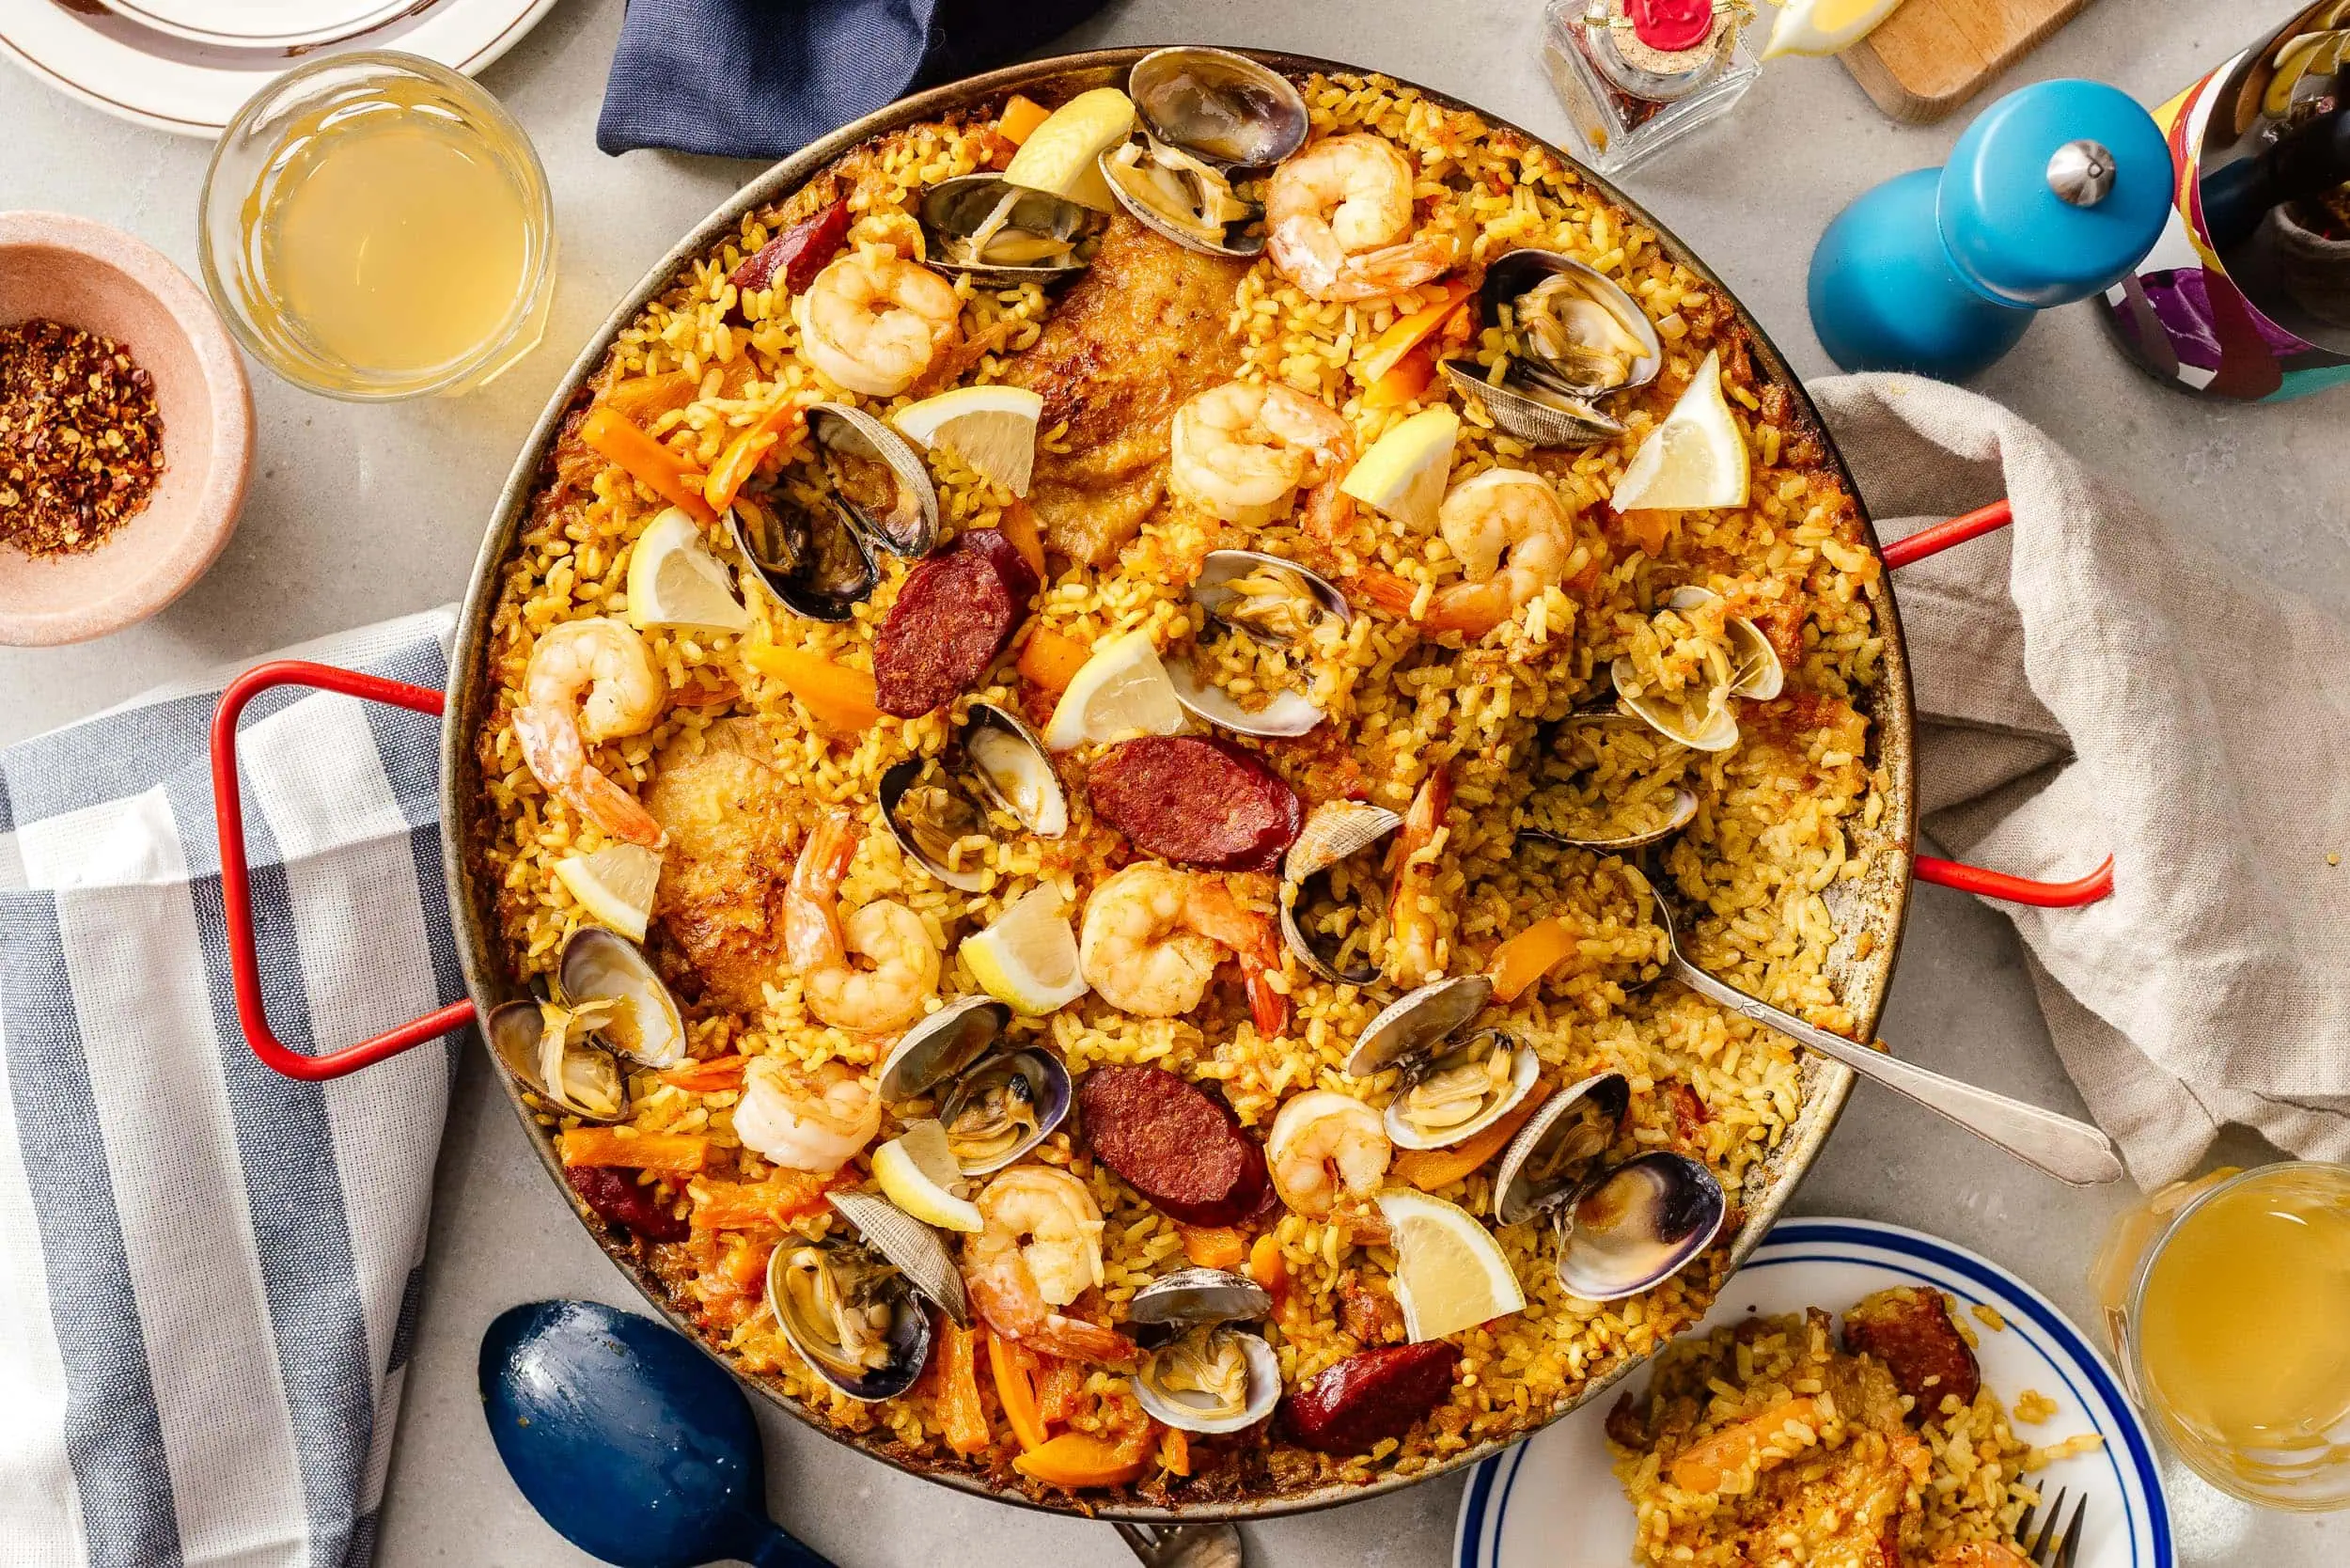
I Am... Paella Recipe
Paella has bits of everything I love: rice, seafood, and most importantly socarrat: crispy crunchy toasted rice bits. Have you ever been obsessed with a dish even though you’ve never eaten it? For me, that dish was paella. It was one of those food bucket list items – I don’t remember how or why I became so obsessed with having paella from its birthplace of Valencia, but I’m pretty sure it has something to do with the fact that paella is so pretty and such an iconic dish. It’s so iconic that people around the world think of it as the quintessential Spanish dish, even though it’s actually more Valencian. I mean, Valencia is ultimately in Spain, so it’s all good to me. Many years ago, Mike and I went to Valencia and the first thing we ate was paella. We literally got off the train and went to a paella restaurant. On the way there, there were a bunch of Valencian orange trees that had some pretty tempting looking oranges but apparently the orange trees that line the streets of Valencia are not the same sweet ones that they use for juice. Anyway, the paella in Spain was as good as I imagined. So good that all of our meals in Valencia were either paella or Spanish churros dipped in chocolate. We actually ate 3 different paellas that day. The paella was all things good: juicy seasoned meats, tender-crisp beans, and the best part, saffron scented rice with crispy toasty rice bits. It was a dream come true.
What is paella?
Paella, pronounced pay-EH-yah! is a rice dish made in a shallow, wide pan over an open fire. Paella means “frying pan” in Valencian. Traditionally, paella includes short grain rice, beans, rabbit, chicken, and saffron, but nowadays there are a huge number of variations, from seafood to vegetarian. I made a mixta paella here, which is essentially a mixed paella that has meat, seafood, and vegetables.How to make paella
- Soak the saffron. This will release both color and aroma. Pop some saffron into a small bowl with hot water and set aside.
- Sear the proteins. Heat up some olive oil in your paella pan over medium high heat and give your proteins a quick sear: the chicken goes in skin side down and the chorizo gets browned. Shrimp gets a quick toss in before being removed so it doesn’t over cook.
- Sweat the aromatics. Add the onions, garlic, tomatoes, and paprika and cook, stirring, until soft and fragrant.
- Add the liquids. Carefully add chicken stock and the saffron water and bring everything to a boil. Flip the chicken skin side up so it’s pretty.
- Add the rice. Time to sprinkle in the rice! Try to add it in a thin, even layer and use a spoon to spread it out if you need to. Let everything come to a simmer and cook, uncovered until the rice absorbs almost all the liquid.
- Add the seafood. Nestle in the clams and add the shrimp back on top.
- Cook on low until the clams open up and the rice is al denote.
- Socarrat time! Turn the heat up to high for 1-2 minutes to create a crispy toasty crunchy rice crust.
- Rest and enjoy. Cover the paella with some foil and let rest for 5 minutes before enjoying.
Paella Ingredients
Rice
Because paella is truly all about the rice, the rice is the most important ingredient. Bomba rice, from Spain, is the best choice. It absorbs 3 times as much liquid than regular rice giving it 3 times as much flavor when all the liquid is absorbed. Plus cooked right, it stays firm and al dente. You can usually find bomba rice at Whole Foods or online.Smoked Spanish Paprika
Smoked paprika comes in sweet and bittersweet, go for sweet smoked Spanish paprika. It adds smokiness, aroma, and color.Protein
There’s a lot of controversy about what kind of protein goes into paella. If you’re not super concerned about authenticity you can customize your paella and put anything you want it. If you’re going with chorizo try to get a Spanish chorizo, which is dried and cured. But if you only have Mexican chorizo available, I think that’s okay too. Purists say that chorizo will overwhelm the other flavors, but we’ve had multiple paella in Valencia with (and without) chorizo, so it’s a personal choice. Other proteins you can use include chicken, pork, seafood, or really, anything you can dream of.Vegetables
Most paella has vegetables in it, especially the paella we had while we were in Valencia. Usually it’s some sort of green bean, a variety that isn’t so common here in North America. You can sub in other green beans, add peppers, asparagus, artichokes, peas, olives, beans, chickpeas, really, it’s like the proteins, go wild!Stock
A nicely seasoned stock as this is what’s going to add flavor to the insides of your bomba rice. That being said, if you’re salt adverse, I would do low sodium stock and then season afterwards. If you have the time, make a homemade seafood/shellfish or chicken stock, which makes it even easier to control the seasoning and flavor.Saffron
Saffron is what gives paella its gorgeous golden hue. The orange-red threads are earthy, floral, and add a distinct flavor. Saffron is one of the most expensive spices in the world. You only need about 1/2 teaspoon but it definitely adds to the overall flavor, so don’t skip out on it. Look for saffron threads that are deep red-orange and evenly colored. Saffron is sold in most large grocery stores and specialty food stores and of course, online.Paella pan
If you want the all important toasty rice bits, or socarrat, you’re going to need a paella pan. The width of a paella pan helps with rice distribution, ensuring that the rice cooks in a thin layer. A pan that feeds two is generally about 10-12 inches and a pan that serves eight is about 18 inches. The most popular pan sizes are 14 and 16 inches, which feed 4-6. Which size pan you get depends on how many people you plan to feed. The wider the pan, the more people it feeds. They even have pans that are 4 feet wide! Years ago, around Christmas, Mike and I were in London and we saw two giant paella pans at Covent Garden. The saffron deliciousness wafting through the chilly air was so tempting so we decided to join the huge queue for a taste. I’m sure Hola Paella (now closed forever) wasn't the most authentic paella in London, but it attracted a lot of attention and was a perfect snack to warm us up on a cold day.What if I don’t have a paella pan?
If you’re wondering, can I use a cast iron skillet to make paella, the answer is yes! As long as you’re using the right rice, you can definitely use a cast iron skillet. Cast iron skillets are somewhat wide and conduct heat well, making them great for making paella. Use the biggest and widest cast iron pan you have so you can spread your rice out.Paella in a frying pan
If you have a craving for paella and you don’t have a paella pan or a cast iron pan you can make it in a frying pan. Spanish people might look down on you, but hey, you do you! I’ve definitely made paella in a frying pan in a pinch and it tastes good. You can use a non-stick or regular frying pan but if you’re using non-stick, make sure you don’t go too high on the heat. It really shouldn’t be a problem, especially with paella since you don’t use a huge amount of high heat anyway - keep it to medium high. If you’re looking for socarrat in a regular frying pan, my tip is keep it on low heat for a long time, until the moisture cooks out and you get crispy bottoms. If you are going to try this in a frying pan, I recommend halving it because the recipe as per below will not fit in your standard 12 inch frying pan.What rice should I use?
Paella should be made with Bomba or Calasparra rice, medium grain rices grown in Spain. Spanish rice is chubby and round, ideal for absorbing large amounts of liquid while still staying somewhat firm. You want your rice kernels stay separate and not creamy or mushy. The rice really is the best part of a paella. I can eat loads and loads of that smoky, saffron flavoured rice and I have. I made a giant pan for Mike, myself and a good friend thinking there would definitely be leftovers (I used a pan that serves 6-8), but the three of us polished it off in one sitting. We totally fell into simultaneous food comas afterwards, but it was worth it. The best part was that there was more than enough socarrat to go around.What is socarrat?
Socarrat is the essential layer of crispy crunchy toasted rice at the bottom of the pan when you cook your paella just right. Most people consider it the best parts. It’s caramelized and toasty and nutty and has all the flavors of paella concentrated.Paella FAQ
What are the different kinds of paella?
- Valencian: The classic Valencia version with rabbit, chicken, lima beans, long beans, snails, and rosemary.
- Seafood/paella de marisco: A seafood version with no meat. It tends to be a bit more liquidy because seafood releases a lot of delicious juices. It usually has prawns, mussels, calamari, and clams.
- Mixed/mixta paella: A mix between Valencian and marisco with meat and seafood. It’s the most popular of all.
- Paella negra: Immediately recognizable with it’s inky black rice. It’s made with squid ink and is a Spanish favorite.
- Vegetarian/paella vegetariana: Loads of vegetables like artichokes, lima beans, and red and greens peppers. Sometimes you’ll find chickpeas and potatoes too.
Should you presoak the rice?
There’s no reason to soak the rice. Soaking the rice will make it more likely to be overcooked and mushy.Do you stir while cooking?
Nope, no stirring required. Paella is not risotto and stirring will give your rice a creamy texture instead of the crispy socarrat you’re looking for.Do you cover the pan when cooking?
Unlike other rice dishes, you don't need to cover the pan. The rice can only reach its signature al dente texture if the moisture can escape. This also makes the best the crispy socarrat.What is paella sauce?
In Valencia, no paella is complete without a side of paella sauce or garlic aioli. The creamy, garlicky sauce is reminiscent of mayo and goes perfectly with the smoky, flavorful rice. To make garlic aioli, place 1 cup neutral oil, 1 egg yolk, 1 tbsp dijon, 2 tsp lemon juice, and 1 clove garlic into an immersion blender cup. Use an immersion blender and blend until combined and thick. Season with salt to taste.How to reheat
The best way to reheat paella is in a pan on the stove top. Take the leftovers out of the fridge and let it come to room temp for about 30 minutes before you reheat. Heat a bit of oil in a frying pan over medium heat, then spread out the paella. Let it crisp, stirring occasionally until it is heated through. You can also heat it up in the microwave, stirring and heating as needed, about 1-2 minute on high.What else can I use a paella pan for?
You can use it for cooking anything that will do well with a wide, flat cooking surface. It’s perfect for searing meats, using as a roasting pan, or even stir-fry. I hope you guys give this recipe a try. smoky saffron rice and crispy bits forever, xoxo stephPaella Recipe
Paella even has its own emoji!
- medium-sized paella pan
- 30 threads saffron (lightly crushed, about 1/2 tsp)
- 1/4 cup neutral oil (high heat such as grapeseed preferred)
- 2 links Spanish chorizo (sliced)
- 4 bone in skin on chicken thighs
- 10-12 large shrimp (peeled and deveined)
- 1 small onion (minced, about 1 cup)
- 3 cloves garlic (crushed)
- 3 medium tomatoes (diced or grated, about 2 cups, see notes)
- 1 tbsp smoked paprika
- 6 cups chicken broth (no sodium preferred)
- 2.5 cups bomba rice
- 1 red or orange pepper (sliced into 1" strips)
- 12 clams
Stir the saffron into 1⁄4 cup hot water in a small bowl and let bloom for 15 minutes.
In a 16″–18″ paella pan, heat the oil over medium-high heat. Add the chorizo and the chicken, skin side down. Add the the shrimp and cook, flipping occasionally, until browned, about 5 minutes, then transfer the shrimp to a plate, leaving the meats to sear in the pan.
Add the onions, garlic, tomatoes, and paprika and cook, stirring often, until the onions soften, about 6 minutes. Add the saffron and 4 cups of chicken stock. Flip the chicken so it’s skin side up and bring everything to a boil over high heat.
Sprinkle in the rice, distributing evenly, then add the peppers on top. Cook, uncovered, without stirring, until rice has absorbed most of the liquid, about 12-15 minutes. If the pan is larger than the burner, rotate it every two minutes to evenly distribute the heat. Once the stock is low enough, add the remaining 2 cups chicken stock.
Reduce heat to low, and top with the cooked shrimp. Nestle in the clams, hinge side down. Continue to cook, without covering or stirring, until the clams opened and the rice absorbs the liquid and is al dente, 5–10 minutes more. Turn heat to high for 1-2 minutes to create the socarrat. Remove pan from heat, cover with aluminum foil, and let sit for 5 minutes before enjoying.
Paella is totally customizable so feel free to make this dish vegetarian, all seafood, or all meats.
You also can grate the tomatoes on the largest holes of a box grater. Be careful and discard the skin afterwards.

I Am... How to make Ebi Fry
Ebi fry (ebi furai in Japanese) aka panko shrimp is a beloved dish in Japan and in my opinion, is the cutest shrimp dish of them all. Ebi fry is often served in bento or with teishoku meal sets. It’s a favorite of children and adults alike. So much so that there is a character much like Hello Kitty but a deep fried shrimp called Ebi Fry no Shippo. Panko shrimp is delicious and cute! That extra crispy crunchy crust coating plump and juicy shrimp is sure to bring a smile to your face. Ebi fry might be my ultimate fried shrimp. I love the delicate flavor and texture of shrimp tempura but there’s something about that thick and crunchy bread coat that really does it for me. I guess I’m just the kind of person who loves deep fried foods like chicken strips and fries. Whenever I see ebi shrimp on the menu, I have to get it. It’s the perfect textural counter point to fluffy white rice and it’s AMAZING with Japanese curry rice. I love eating it on its own too, with kewpie mayo, Japanese tartar sauce or even Japanese egg salad.
What is Ebi Fry/Panko shrimp
Ebi fry (エビフライ) aka panko shrimp is shrimp that has been coated in flour, egg, then panko, and then deep fried. It’s a crispy breaded shrimp that is a super popular main dish served with rice or bento component. It’s similar to katsu, but shrimp.How to make ebi fry
- Clean. Peel the shells off the shrimp, devein, and clean the tails. More on that below.
- Straighten. Gently cut about a quarter of the way through the belly of the shrimp and push down to flatten it out so it fries up nice and straight.
- Bread. Dip the shrimp into flour, egg, panko, then again into the flour, egg, and panko so you get a double coating.
- Deep fry. Add the coated shrimp to hot oil and cook, flipping as needed until crispy and golden brown.
- Enjoy. Enjoy as is, dipped in sauce, or as part of a rice plate or bento!
How to clean shrimp
- Peel the shell off, leaving the tail attached.
- Devein the shrimp by carefully slicing through with a small sharp knife to the vein and removing.
- Cut the tail of the shrimp on a diagonal.
- Squish out any water left in the tail with the edge of the knife.
How to straighten shrimp
On the bottom side of the shrimp (it’s belly) lightly score three to four times, at even intervals. Turn the shrimp so it’s belly down and press the shrimp onto your cutting board, flattening it out into a long, straight line.Panko shrimp ingredients
- shrimp - I like to use large shrimp, at lease 16-20 size. The larger size shrimp stay juicer and are more impressive when you serve them.
- flour - a little bit of flour helps the egg stick to the shrimp so you can get a nice even coat.
- egg - it’s what allows the panko to stick to the shrimp and gives you an extra crispy coat.
- panko - Japanese breadcrumbs that deep fry up to a delicious crispy coat. More on them below.
- oil - choose a neutral high heat oil like rice bran, canola, or grapeseed.
What is panko?
Panko are Japanese breadcrumbs. They’re vastly different from regular breadcrumbs – fluffier, larger, and made from crustless white bread. The irregular flakes of panko are what make katsu so crunchy. They’re dryer, flakier, and absorb less oil. Panko is actually super interesting and a big deal in Japan. Dedicated panko factories bake bread to different panko specifications. You can get fresh panko, dried panko, and different sized flakes. They even have different ways of baking the bread, either oven baked or electrically baked using currents. A lot of restaurants get fresh panko delivered to them daily.Where to buy panko
Panko is sold in most grocery stores in the Asian aisle but it’s cheaper to buy it at an Asian grocery store. You can also get it online. I prefer Japanese brands of panko, sometimes you’ll see something labeled panko but it looks like regular breadcrumbs. Take a look at the package and buy panko with large, irregular, shards that are flat. You can even make your own!How to set up a panko breading station:
Just like how you bread chicken you need flour, egg, and panko.- Set up three shallow dishes that are able to fit the shrimp.
- Put flour in one dish, lightly beaten egg in the next dish, and panko in the last dish.
- Dip the shrimp in the flour, coating all sides. Shake off the excess flour and place it in the egg.
- Use your other hand to turn the shrimp in the egg, making sure it’s coated all over.
- Shake off any excess egg and place the shrimp in the panko. Repeat the steps to double coat the shrimp, being sure to gently adhere the panko all over. Shake off the excess panko and you’re ready to cook!
How to deep fry panko shrimp
Heat up at least 2 inches of high heat oil in a deep, heavy bottomed pan over medium high heat until it reaches 350°F or a pair of unchoated wooden chopsticks bubbles gently when you put them in the hot oil. Carefully add the panko shrimp to the hot oil and cook, flipping occasionally until golden brown and cooked through, about 2-3 minutes. Drain on a wire rack.How to air fry panko shrimp
Before coating the shrimp in the panko, be sure to toast it to give it some color. Add the panko to a dry pan and toast over medium heat, stirring often. Drizzle on 1 tbsp neutral oil and stir until golden and toasty then remove from the pan immediately. Coat the shrimp as per below then air fry in an oiled air fryer basket at 360°F until golden brown and cooked through, about 10 minutes, flipping half way.How to bake panko shrimp
Before coating the shrimp in the panko, be sure to toast it to give it some color. Add the panko to a dry pan and toast over medium heat, stirring often. Drizzle on 1 tbsp neutral oil and stir until golden and toasty then remove from the pan immediately. Coat the shrimp as per below then bake on a parchment paper lined baking sheet in a 425°F oven for 12 minutes.Japanese tartar sauce
Japanese tartar sauce is a little different from the regular tartar sauce you’ve had because it has eggs in it! It has all the same tartar sauce ingredients you love like mayonnaise, pickles, and herbs, but it is extra rich because of the diced egg. To make Japanese tartar sauce, mix together 1/4 cup kewpie mayo, 2 finely diced hard boiled eggs, 2 tbsp finely diced pickle, 2 tbsp finely diced onion, finely chopped parsley, and the juice of 1/2 a lemon. Taste and season with salt and pepper.How to make an ebi fry bento
Ebi fry teishoku or set meals are a super popular choice in Japan. You usually get 2 to giant plump shrimp, tartar sauce, rice, soup, salad, pickles, and some small side dishes. Think of it like a panko shrimp bento. They make me SO happy. I just love the crunchy of the shrimp and the creaminess of the tartare sauce and the rice and cabbage go so well with everything. Seriously so good. Do yourself a favor and make a panko shrimp bento! You’ll need:- rice: a bowl of fluffy Japanese rice is the perfect accompaniment for crunchy, juicy shrimp.
- cabbage: thinly sliced cabbage is a must for panko fried things like panko shrimp, chicken katsu, or tonkatsu.
- cucumbers: some slices of cucumber to add some crunch and greenness.
- tomatoes: just a couple of cherry tomatoes for cuteness and a bit of sweet freshness.
- tartar sauce: see above for a Japanese take on tartar sauce. Sometimes I like to serve panko shrimp with Japanese egg salad as a condiment too.
- optional: Japanese pickles or small side dishes like miso soup, tamagoyaki, a couple of gyoza, or edamame.
Panko Shrimp
This extra crispy plump and juicy shrimp is sure to bring a smile to your face.
- 12 prawns (extra large preferred, see notes)
- 1/2 cup all purpose flour
- 2 eggs (lightly beaten)
- 2 cups panko
- 3 cups neutral oil (high heat for deep frying, see notes)
To Serve
- 1 cabbage (shredded)
- 1 cucumber (sliced)
- 1 cup cherry tomatoes (halved)
- 1 cup tartar sauce (Japanese preferred, see notes)
Peel the shell off the prawns, leaving the tail on. Devein and make three shallow cuts on the bottom of the prawn to straighten it out. Pat dry with paper towels then season generously with salt and pepper.
Dredge the prawns in flour, then egg, then back into flour, egg, and finally panko, pressing to adhere. Repeat the breading process so the shrimp are double coated.
Heat the oil to 350°F and when hot, add the prawns, 2-3 at a time and deep fry, 2-3 minutes, or until golden brown, flipping as needed. Drain on a wire rack.
Enjoy with cabbage, cucumbers, tomatoes, and Japanese tartar sauce.
Buy the largest prawns you can find, look for a number like "16-20" or lower on the package.
High heat oils include refined peanut oil, canola oil, grapeseed oil, and sunflower/safflower oils.
To make Japanese tartar sauce: combine 1/4 cup kewpie mayo, 2 finely diced hard boiled eggs, 2 tbsp finely diced pickle, 2 tbsp finely diced onion, finely chopped parsley, and the juice of 1/2 a lemon. Taste and season with salt and pepper.

I Am... Hot Cross Buns
Making homemade hot cross buns is an accomplishment, one that you can do, easier than you think! These deliciously cinnamon spiced yeasted buns are buttery and plush, full of dried cherries and melty white chocolate. The perfect twist on an Easter treat.
Quick and Easy
Hot cross buns, hot cross buns, one a penny two a penny hot cross buns! I’m sure you know the song - it always always gets stuck in my head around Easter. There’s a local bakery chain in town that specializes in hot cross buns and back in the day when samples were a thing, I would always choose the hot cross bun sample when we were buying bread. Their buns are so popular that they sell them year round and I love them so much. Of course it’s super simple to head to the bakery to buy hot cross buns (or even order them online) but this year I thought I’d bake my own, based off of my favorite soft and fluffy dinner roll recipe. There’s something so satisfying about the smell of bread filling up the kitchen. The sweet sent of yeasted dough and cinnamon makes me feel super homey.What are hot cross buns?
Hot cross buns are an Easter classic. Little yeasted sweet buns with crosses on top date back to the 12th century and they were considered a treat marking the end of Lent, eaten on Good Friday. Nowadays, they are available year round, but are especially enjoyed around Easter.How to make hot cross buns
If you’ve made dinner rolls, you’re just one step away from making hot cross buns. Here’s how you do it:- Sprinkle yeast on to warm water and let foam.
- Mix together flour, sugar, cinnamon and salt in a bowl.
- Stir the yeast, along with egg, into the flour mix until everything comes together into a ball of dough.
- Add the butter to the dough and knead the dough until smooth.
- Add the dried cherries and chocolate then pop the dough into a lightly oiled bowl so it can proof for an hour.
- After the dough is puffy and proofed, tip it out onto a floured surface and divide into 9 balls, place in a pan, and let proof until doubled.
- Bake until golden then pipe on some chocolate crosses. Enjoy!
Hot cross buns ingredients
These buns have pretty standard pantry ingredients: yeast, bread flour, sugar, cinnamon, salt, egg, butter, dried cherries, and white chocolate chips.Bread flour
Bread flour is the key to fluffy, soft, and chewy buns. You might be tempted to just use all purpose, and well, you can do that, but if you use bread flour your rolls will be soft and fluffy with just the right amount of chew. Bread flour has a higher protein content than regular all purpose – the resulting dough has more gluten in it which helps the rolls stay soft and chewy.Yeast
This recipe uses active dry yeast which needs to be dissolved in a bit of liquid before using – in this case we’ll sprinkle it on to some warm water. If you have instant yeast, you can use it too, there won’t be much of a difference; your rolls might rise a bit faster, depending how warm your kitchen is.Dried cherries and white chocolate
Dried cherries add some sweet tartness that pairs exceptionally well with white chocolate and cinnamon. You can sub in your favorite dried fruits, more ideas below!How do hot cross buns taste?
Classically, hot cross buns are a soft, sweet, spiced yeasted bun usually made with dried fruit like raisins, sultanas, or currents. They’re soft, squishy, and not too sweet. Think of a slightly sweeter dinner roll studded with dried fruit. This particular bun is super soft and fluffy, scented with cinnamon and dotted with melty white chocolate and sweet dried cherries. The plush cinnamon buns remind me of cinnamon rolls, but not as sweet. They’re glazed with a bit of apricot jam for shine and finished with a melted white chocolate cross. If you like sweet dried cherries, caramelized white chocolate, soft and fluffy buttery buns, and cinnamon, you’ll love these hot cross buns!Variations
You can easily customize these buns with your favorite add-ins.- Classic: sultanas, raisins or currents
- Orange cranberry: dried cranberries and orange zest
- Blueberry dark chocolate: dried blueberries and dark chocolate
- Triple chocolate: a mix of white, dark, and milk chocolate
- Apple cinnamon: dried apples and extra cinnamon
- Strawberry matcha: dried strawberries, switch out the cinnamon for matcha
If you love soft and fluffy bread, try these recipes:
- the fluffiest cinnamon rolls, full of sweet brown sugar and cinnamon
- extra cheesy earthquake bread with a hidden cheesy center
- pull apart monkey bread with a sweet glaze
- cheesy garlic knots
- the best bread you could ever make
Hot Cross Buns
These hot cross buns studded with plump dried cherries and luscious melty chunks of white chocolate are incredibly soft, fluffy, and delicious.
- 8x8 inch pan
- 120 g water (warm, ~1/2 cup)
- 1 tsp active dry yeast
- 250 g bread flour (~1 3/4 cups)
- 30 g sugar (~2 tbsp)
- 5 g cinnamon (~2 tsp)
- 1/4 tsp salt
- 1/2 large egg (lightly beaten, see notes)
- 25 g butter (room temp, ~2tbsp)
- 1/2 cup dried cherries
- 1/2 cup white chocolate (chopped, plus extra for crosses)
- 1 tbsp apricot jam
Sprinkle the yeast onto the warm water and let proof. Meanwhile, in the bowl of your mixer, stir together the flour, sugar, cinnamon, and salt.
Whisk the egg into the foamy yeast mixture, then add the mix to the dry ingredients. Use a wooden spoon to stir together until everything comes into a ball. Switch to a dough hook and knead on low until the dough pulls away cleanly from the sides.
Add the room temperature butter and continue to knead on medium-low, for about 10 minutes, until the dough reaches the windowpane stage – take a piece of dough about the size of a golf ball and stretch it out between your fingers and thumbs. If you can stretch it without the dough breaking and you can see through the stretched dough, you’re good to go. If the dough doesn’t windowpane, knead a bit longer. Knead in the cherries and white chocolate.
Transfer the dough to a clean bowl and cover with plastic wrap. Place in a warm spot and let rise until doubled, 1-2 hours; dough that has mix-ins takes longer to rise.
Take the dough and tip it out onto a lightly floured surface. Punch down lightly then divide into 9 equal portions. If you want to be precise, use your kitchen scale to see how much your dough weighs, then divide by 9. Shape the portions of dough by bring the edges towards the center and tucking into balls. Lightly grease a 8×8 baking pan and evenly space the buns. Cover and let rise in a warm spot for 1 hour.
Heat the oven to 350°F. Bake for 15 minutes, or until golden brown. Let cool slightly. Stir the apricot jam with 2 teaspoons of hot water and gently brush on top of the buns. Pipe on crosses with melted white chocolate and enjoy!
For 1/2 large egg, whisk a whole egg in a small bowl, then measure out half of the weight or just use 1 1/2 tablespoons of the whisked egg.

I Am... Corn Cheese
Corn cheese is the ultimate snack or side for your late summer BBQ. Here’s why you need to make corn cheese today:
A piping hot skillet served at the table with steam still wafting up is the best thing. I love how it can be a snack, side, or even a main dish.
If you’ve been to Korean BBQ or out for Korean food and drinks, I’m sure you’ve come across Korean corn cheese. That gloriously golden, cheesy, stringy, hot, and delicious mess of sweet corn and cheese served in a skillet or a little special dish around the grill. It’s sweet, salty, creamy, gooey, and SO delicious. And the best part is that it is the easiest side dish to put together.What is corn cheese 콘치즈?
Corn cheese is the best KBBQ side dish. I love melty cheese and I love corn and the combination is just out of this world. Essentially it’s a combination of canned corn, butter, mayo, sugar, and cheese baked up until golden and warm. It’s a classic Korean anju or drinking food. You just scoop it out with a spoon and pop the deliciousness into your mouth. It’s like fondue but with bits of sweet corn in it: sweet, savory, and cheesy.Why does Korean corn cheese taste so good?
The combination of sweet kernels of corn, the creaminess of mayo, and the meltiness of the cheese combines together into a sweet and savory dish that is out of this world. It has a balance of flavors, textural contrast, and it’s fun to make and eat. Don’t sleep on corn cheese, it’s amazing!
How to make corn cheese
- Gather your ingredients. Drain your corn, melt the butter, measure out the mayo and sugar.
- Stir everything together. In a bowl, mix everything together then taste and season with salt and pepper.
- Bake. Top with some extra cheese and bake until bubbly and golden.
- Enjoy!
Corn cheese ingredients
- Corn - I like to use canned corn. It’s super sweet and it’s what they use in restaurants. You can also use fresh or frozen corn, more on that below.
- Butter - Butter and corn just go together.
- Mayo - The best mayo to use is Kewpie mayo, it has so much flavor and deliciousness.
- Sugar - A little bit of sugar highlights the sweet and savory combination of corn and cheese.
- Cheese - Melty mozzarella is the best cheese to use but you can use any melty cheese, it’ll just change the flavor. Mozzarella is good because it’s super mild and highlights the flavor of the corn.
How to eat
This is usually served as a side dish or appetizer or alongside alcohol. If you’re doing a whole Korean BBQ party, you can serve it along with all the other banchan. Or, serve it on its own with some ice cold beer or soju as the best drinking snack.What kind of corn
Usually they use canned corn in Korea, but you can use fresh corn too. If you’re using fresh in season corn, simply cut it off the cob and sauté it for a bit longer in the butter. You can also use frozen corn as well.What kind of cheese
Mozzarella is the meltiest, stretchiest cheese and is what is usually used but you can go for any melty cheese: colby, harvarti, swiss, fontina, monterey jack, provolone, American. Imagine corn cheese with melty cheese hot from the oven and then burrata torn on top?! The creaminess!Variations
This is usually a pretty simple dish, but the beauty of it is that you can add in so many things! Try:- diced onions
- diced chilis
- crispy bacon
- bulgogi
- tteokbokki
- Korean fried chicken
Frequently Asked Questions
What kind of corn?
I like to use canned corn because it’s easy and it tastes good. Canned corn has all the nutrients of fresh, it’s picked at the height of ripeness, and it’s actually cheaper than fresh corn. Frozen corn works too, just be sure to defrost it and drain it well. After canned and frozen comes fresh, but you have to peel the husks and cut it off the cob. I feel like fresh corn is best enjoyed grilled or on the cob.
Do I need a skillet?
Nope, you can just any oven safe dish as long as it can withstand the heat. I like to use a skillet because it retains the heat longer and keeps the cheese hot and melty, but any casserole dish will work great.
Where do they serve corn cheese?
They serve corn cheese at most Korean BBQ places and also at drinking places and bars. It’s considered anju, which means food you eat with alcohol. Anju foods are usually delicious addictive foods that pair well with soju and beer.
I hope you have some soon. It’s truly comforting and will make you feel cozy and good inside! xoxo stephCorn Cheese
a gloriously golden, cheesy, hot, and delicious mess of sweet corn and cheese.
- 15 oz corn (drained well, 1 can )
- 1/4 cup mayo (Kewpie preferred)
- 1 tbsp butter (melted)
- 1 tsp sugar
- 1/2 cup mozzarella cheese (shredded)
Preheat the oven to 400°F. In a bowl, mix together the drained corn, mayo, melted butter, sugar, and half of the cheese. If desired, stir in 1/4 cup sliced green onions. Taste and season with salt and pepper.
Scoop the corn mix into an ovenproof dish or skillet and top with the remaining cheese.
Bake in the oven for 10 minutes or until the cheese is melty. Broil on high for 1-2 minutes until the top is toasty and brown. Remove and enjoy!

I Am... Taco Chili
Super warming, filling, and cozy: taco chili is one of the easiest, coziest dinner you can make. If you love the flavors of tacos and the cozy spoonability of chili, you are going to fall in love with taco chili. This taco chili recipe is incredibly easy to make and the flavor pay off is huge. Taco chili is perfect for a quick weeknight dinner, a weekend lunch, and is always a winner during game day party season (it's the playoffs soon!). Taco chili is what would happen if tortilla soup and chili had a baby. All the flavors of taco soup with the heartiness of chili. It’s truly one of our go-to meals.
How to make taco chili
- Sauté - Start off by cooking ground beef until it’s crumbled and browned. Add the onions, peppers, and garlic, then cook until aromatic. When everything smells amazing, stir in the taco and ranch seasoning.
- Simmer - Simmer everything together develop the flavors and thicken. You can simmer on the stovetop, in a slow cooker, or pressure cook in an Instant Pot.
- Top - Once everything comes together into a thick and hearty chili, it’s time to serve by finishing off with a dollop of sour cream, shredded cheese, and cilantro. Bonus points if you add some Fritos!
Taco chili ingredients
- ground beef - go for lean ground beef, ground chicken, or ground turkey. It’s up to you! We almost always use lean ground beef.
- aromatics - a diced onion, green bell pepper, and plenty of garlic add aroma and flavor.
- seasoning - taco chili gets its seasonings from taco and ranch seasoning. You can buy the packets at the store (if you do, go for low sodium so you can adjust the salt to taste) or you can go homemade. If you’re doing homemade, you’ll need 2 tbsp of each seasoning mix.
- beans - there are two cans of beans in this chili to bulk it up, add protein, and nutrients. A can of refried beans adds creamy thickness and rinsed and drained pinto beans add texture.
- diced green chilis - this little can of chilis adds a mild and smoky flavor to your chili. You can choose between mild and hot, so pick according to your spice preference.
- tomatoes - we’re going to use a mix of fire roasted tomatoes and crushed tomatoes to make up the bulk of this chili. The fire roasted tomatoes add a huge amount of smoky flavor and the crushed tomatoes cook down into a thick, hearty base. If you have tomato sauce or regular chopped tomatoes on hand, you can use those instead.
Why this taco chili
The reason I love (love love) this version because of the ranch seasoning (either homemade or store bought) and a can of refried beans. The ranch seasoning adds a tangy you-can’t-quite-figure-it-out-but-can’t-stop-eating-it flavor. The hint of tanginess from the buttermilk powder in ranch really makes this chili addictive. The refried beans, while not traditional in chili, adds a creamy thickness that is spoonable and comforting.Stovetop taco chili instructions
For stove top chili, sauté the beef, onions, bell pepper, and garlic in a large, heavy bottomed pot. Stir in the taco and ranch seasoning, beans, green chilis, and both cans of tomatoes. Partially cover, bring to a boil, then lower to a simmer. Simmer for 1-2 hours, stirring occasionally, until thickened to your liking. Stir in extra water or chicken stock if it gets too dry. Taste, season, and serve.Slow cooker taco chili instructions
Use a skillet to brown the beef, onions, bell pepper, and garlic, then add to the crock pot insert. Stir in the taco and ranch seasoning, beans, green chilis, and both cans of tomatoes. Cook for 6-8 hours on low or 3-4 hours on high, stirring in extra water or chicken stock if it gets too dry. Taste, season, and serve.Instant Pot taco chili instructions
Sauté the beef, onions, bell pepper, and garlic in the Instant Pot insert over high then stir in the taco and ranch seasoning. Add the beans, green chilis, and both cans of tomatoes. Stir well, put the lid on and set the pressure to high and cook time to 30 minutes. Quick release when the cooking time is complete. Stir, taste, and season.Chili toppings
This chili is delicious on its own, but when you add toppings it’s magical. Customize to your heart’s content with a topping bar. Try:- shredded cheese
- sour cream
- chopped cilantro
- thinly sliced green onions
- avocados
- diced onions
- tortilla chips or Fritos
If you love taco chili, you will also love
Happy cozy bowl food season! xoxo stephTaco Chili
If tortilla soup and chili had a baby
- 1 tbsp neutral oil
- 1 lb ground beef (lean preferred)
- 1 medium onion (diced)
- 1 bell pepper (green preferred, seeded and diced)
- 4 cloves garlic (minced)
- 1 package taco seasoning (or 2 tbsp homemade, see notes)
- 1 package ranch seasoning (or 2 tbsp homemade, see notes)
- 15 oz pinto beans (rinsed and drained, optional)
- 16 oz refried beans
- 4 oz chopped green chiles
- 14.5 oz fire roasted tomatoes
- 15 oz crushed tomatoes (or tomato sauce)
In a large, heavy bottomed pot, heat up the oil over medium high heat. Add the ground beef and cook, breaking up, until no longer pink. Season with salt and pepper to taste. Drain off any excess fat, if needed.
Stir in the onion, bell pepper, and garlic. Cook for 2-3 minutes, stirring. When the vegetables are aromatic and slightly soft, stir in the taco and ranch seasoning.
Add the drained and rinsed beans,green chilis (with the juice), both cans of tomatoes, and 1 cup water. Stir everything to mix evenly, and bring to a boil over medium high.
Turn the heat down to low and simmer, with the occasional bubble popping up, partially covered. Simmer for 1-2 hours, stirring occasionally, until thickened to your liking. Finally, stir in the refried beans. Taste, season with salt and freshly ground pepper and enjoy!
If you’re using home made ranch seasoning and homemade taco seasoning, you’ll need 2 tablespoons of each.

I Am... Strawberry Oatmeal Muffins
These oatmeal strawberry muffins are the perfect combination of healthy and sweet treat. A hearty, healthy(ish) oatmeal muffin studded with sweet strawberries. Spring is in the air. The cherry blossoms are starting to bloom and the sunshine is starting to give me serious serotonin. Whenever the weather turns warm, I think about long walks, picnics, and chill vibes hikes. And when I think about hikes, I think about hiking snacks, like these muffins! They’re topped with a sprinkle of crunchy sanding sugar and have a hefty amount of protein rich, keep-you-full, rolled oats. I love the combination of juicy, jammy strawberries with the nuttiness of oats.
Why make strawberry oatmeal muffins
Muffins are my favorite because they’re kind of like granola bars, but better. They’re portable, they fill you up, and they taste good too. What more could you want? This recipe is a riff off of my favorite blueberry muffin recipe but with strawberries instead of blueberries and the added whole grain nuttiness of rolled oats. It’s the perfect springtime muffin - reminding me of warmer days ahead filled with summer strawberries.How to make oatmeal muffins
- Soak. Soak the oats in a bit of milk to soften and thicken.
- Cream. Cream butter and sugar together until fluffy, then stir in an egg, vanilla, and the oat-milk mixture.
- Stir. Add flour, baking powder, and salt to the creamed mix, stirring until just combined.
- Mix. Mix in the strawberries and spoon out the batter into a muffin tin. Top with a sprinkle of rolled oats.
- Bake. Bake, let cool, and enjoy!
Oatmeal muffin ingredients
These oatmeal muffins have all your classic ingredients: butter, milk, sugar, eggs, vanilla, flour, baking powder and salt. Essentially the only thing we’re doing a bit differently is adding oats. Old fashioned rolled oats, sometimes just called rolled oats, are what we’re going to use in these muffins. We’re going to soak them in milk to activate their thickening power and give them a chance to rehydrate before adding to the muffin batter so the oats bake up lighter and fluffier.Oatmeal muffin variations
You can customize these muffins with any fruit you like! Substitute raspberries, blueberries, blackberries, cherries, even shredded carrots or zucchini. To add some chocolate goodness, stir in 1/2-3/4 cup chopped chocolate or chocolate chips when you add the fruit.If you love muffins, here are a couple of other muffin recipes to try:
- The best blueberry muffin recipe
- Crisp and chewy coconut mochi muffins
- Banana chocolate chip muffins
Strawberry Oatmeal Muffins
These oatmeal strawberry muffins are the perfect combination of healthy and sweet treat.
- muffin tins
- 1/2 cup milk (of choice)
- 1/2 cup rolled oats (plus extra to sprinkle)
- 1 cup strawberries (roughly chopped or sliced)
- 1/4 cup butter (at room temp)
- 10 tbsp sugar (1/2 cup + 2 tablespoons)
- 1 large egg
- 1/2 tsp vanilla extract
- 3/4 cup all purpose flour
- 1 tsp baking powder
- 1/4 tsp kosher salt
- 1 tsp coarse sanding sugar (or more, for tops)
Preheat the oven to 375°F. Combine the milk and oats together in a small bowl or liquid measuring cup and let soak. In another bowl, optionally toss the strawberries with 1 teaspoon sugar. Set aside.
Cream the butter and sugar until light. Add the egg, beating well. Stir in the vanilla and the soaked oats.
In a bowl, sift together the flour, baking powder, and salt. Gently stir the flour mix to the creamed oats mix.
Drain the strawberries then fold in gently.
Line a standard muffin tin with 6 liners, and fill equally with the batter. Sprinkle the sanding sugar and a couple of oats over the tops of the muffins, and bake at for 30-35 minutes, or until the tops are golden and toothpick comes out clean.
Let cool for 10-15 minutes before removing muffins from tins and enjoy!

I Am... Easy One Pot Lasagna Soup
Lasagna soup is the ultimate one pot weeknight meal. It’s perfect because... soup! Basically it’s a lasagna that you can scoop up with a spoon. I actually love making lasagna but sometimes you just have to have lasagna in under 30 minutes. For those times, this one pot weeknight lasagna soup is there for you.
What is lasagna soup?
Lasagna soup is exactly what it sounds like, lasagna in soup form. It’s all the amazing things about lasagna without the layering and time commitment. And best of all is the fact that you can eat it in a bowl with a spoon. It’s always lasagna soup season!How to make lasagna soup
- Sauté the onions. Start off by browning some onions, you don’t have to chop them fancy or anything, they’re cooked down in the soup anyway.
- Brown the meat. After the onions, brown your choice of ground meat – usually we go with a mix of beef and pork, but this time we went with all pork because it’s what we had in the fridge.
- Add the liquids. Once the meat is browned, you dump in the tomatoes, chicken stock.
- Noodle time. Once every thing is at a simmer you add the noodles. Simmer until your house fills up with amazing smells and everything until tender.
Lasagna soup ingredients
- onion and garlic - onions and garlic get cooked in olive oil until they turn into an aromatic mix that gives an amazing base layer of flavor to your soup.
- ground pork, beef, or sausage - feel free to use your favorite kind of ground meat here. You can even go with ground turkey, chicken, or crumbled tofu.
- crushed tomatoes - lasagna soup needs tomatoes and crushed is what I use, but truthfully, any canned tomatoes will work.
- chicken stock - chicken stock is going to give us the soup portion of lasagna soup. If you like your soup on the thicker side, just lower the amount of chicken stock.
- lasagna noodles - the star of the show: use mini lasagna noodles called malfada corta or break up regular lasagna noodles into smaller pieces.
- herbs - freshly chopped oregano and basil are amazing in this soup. You can also use dried if it’s all you have on hand.
- toppings - CHEESE! Mozzarella, parmesan, a dollop of ricotta, a scoop of mascarpone, cottage cheese, this bowl of soup really an excuse to pile on the cheese, so go for it!
What kind of noodles are best?
We make lasagna soup with either mini lasagna noodles called mafalda corta or broken up lasagna noodles. Either will work!Can I make it vegetarian/vegan?
Absolutely. Just skip out on the meat. You can add some crumbled up firm tofu if you want extra protein. Swap the chicken stock for veggie stock. And for vegans, use vegan cheese or sprinkle on some nutritional yeast for a bit of cheesy jazz.What kind of pasta is this
These tiny little mini lasagna noodles are actually called malfada corta and they're super easy to find at better stocked grocery stores, specialty Italian markets, and online, of course.The best way to serve lasagna soup
Serve this up in a bowl with all the cheese. We normally have a bunch of mozzarella in it – the cheese pulls you get are amazing – but this time around we only had parmesan, so it was just a teeny bit more sophisticated. Or at least as sophisticated as lasagna soup can get ;) Bonus points if you add a dollop of ricotta and some fresh basil!Tiktok lasagna soup
Lasagna soup is trending on Tiktok right now thanks to SZA and @dannylovespasta. SZA saw him making lasagna soup and asked him to drop the recipe. If you want to make his exact recipe, just like SZA did, here it is:- 1 onion, chopped
- 2 cloves garlic, minced
- 1/2 lb ground beef
- 1/2 lb Italian sausage
- 1/4 tsp chili pepper flakes
- 1/2 tsp dried oregano
- 2 tbsp tomato paste
- 2 cups marinara sauce
- 3 cups chicken broth
- 1/2 cup heavy cream
- 1/2 box lasagna noodles, broken
- 1 cup shredded mozzarella
- 1/2 cup shredded parmesan
- 1/4 cup fresh basil, chopped
- Sauté the onion and garlic in 2 tbsp olive oil over medium heat, until soft, about 2-3 minutes.
- Add the ground beef and Italian sausage and break up, cooking over medium high heat, until browned. Season with salt and pepper and stir in the oregano and chili flakes.
- Add the tomato paste and cook, over medium hight heat, stirring into the meat, until slightly caramelized, about 1-2 minutes. Add the marinara sauce, chicken broth, and heavy cream.
- Bring to a simmer and add the lasagna noodles. Cook until the lasagna noodles are al dente, according to the package directions.
- Stir in the cheeses and finish with fresh basil once the noodles are tender to your liking. Enjoy!
What to serve with lasagna soup
- Easy Parmesan Garlic Knots
- The Ultimate Kale Salad
- Roman Style Tripe in Tomato Sauce
- One Day No-Knead Focaccia
- Small Batch Sourdough Focaccia
Lasagna Soup
A simple dump and cook one pot stovetop weeknight lasagna.
- 1 tbsp olive oil
- 1 medium onion (roughly chopped)
- 2 cloves garlic (minced)
- 1 lb ground pork (or ground pork, or a 50/50 mix)
- 24 oz crushed tomatoes
- 2 qt chicken stock (no sodium preferred)
- 8 lasagna noodles (broken into small pieces, or 12oz malfalde)
- 1 tsp fresh oregano (finely chopped)
- fresh basil (chopped, and/or fresh leaf parsley)
- mozzarella cheese (to finish)
- Parmigiano Reggiano cheese (to finish)
In a large pot, heat up the oil over medium high heat. Add the onion and garlic and cook, stirring occasionally, until soft.
Add the meat, breaking into pieces.
Stir in the crushed tomatoes, chicken stock, pasta, and oregano. Bring to a boil over high heat, then reduce and simmer over medium until pasta is tender and cooked through, about 8 to 10 minutes.
Taste and season with salt and pepper. Scoop into bowls and finish with basil, mozzarella, and Parmesan. Enjoy hot!

I Am... Cereal Pancakes – Tiny Mini Pancakes!
I love all mini things, especially mini food like these cereal pancakes. I’ve had a thing for mini pancakes for a while (see these mini strawberry shortcake cuties), so when I started seeing a huge amount of pancake cereal TikToks, I knew I had to make some! Trust me when I say that pancakes taste better when they’re mini. 10/10 would recommend.
What are cereal pancakes?
Pancake cereal is just pancakes, but mini, so they’re cereal sized! Imagine tiny, tiny freshly cooked pancakes in a bowl and there you have it: pancake cereal!How to make pancake cereal
- Make your pancake batter. I like to use my favorite pancake recipe because it’s the perfect consistency for piping out into pancake cereal, not too thick and not too thin. My recipe makes enough for one big bowl of cereal or two smaller ones and is perfect because it doesn’t use up too much flour or butter. You can use my favorite recipe (see below), your go to pancake recipe, or boxed pancake mix. Whatever you end up doing, make sure the pancake batter is not too thick and not to thin or runny. If the batter is too thin all the pancakes will run into each other.If it’s too thick you won’t be able to pipe it out. Make sure it’s not too lumpy either or it won’t pipe out smoothly.
- Once your pancake batter is mixed up and the right consistency, put it into a squeeze bottle with a small opening OR put it in a ziplock bag. Don’t cut off the tip of the ziplock bag until you’re ready to cook. Also, it’s better to make the cut on the bag pretty tiny. If the hole is too big, your pancakes will also end up pretty big.
- When your batter is ready, heat up a non-stick pan over medium-low heat. Brush a thin layer of oil on your pan. Pipe out small pancakes or drop the batter by the 1/4 teaspoon and cook until small bubbles form on the surface and at the edges. Flip and continue cooking until golden brown, about 30 seconds more.
How do you eat pancake cereal?
To fork or not to fork...I’ve seen people use a fork to poke the pancakes essentially making mini stacks of pancakes and I’ve also seen people using a spoon. I think how you eat them is up to you. I’ve tried them both ways and I think it depends on how big you make your mini pancakes. Obviously if your pancake are really teeny you won’t be able to use a fork. Go with your gut and just do you.Milk or No Milk?
This one is up to you too! I like my pancake cereal with just butter and syrup, but if you’re a milk lover, by all means, pour some milk on there. Just don’t be all crazy and put the milk in the bowl first, mmmkay?What equipment do you need to make pancake cereal?
You just need a regular bowl, a non-stick frying pan (very important when making pancakes), a squeeze bottle or ziplock bag with the tip cut off, a spatula (or a pair of chopsticks) to flip, and a bowl to eat out of. Side note: I like using an electric crepe maker because it’s the absolute best at keeping the heat at the proper temperature – I use it whenever I make pancakes.Pancake cereal flavors to try?
Here’s where you can go crazy and have some fun. You can do chocolate pancakes for a cookies ‘n cream pancake cereal, add some strawberries or marshmallows, or cinnamon sugar, or nuts, add oreos for oreos pancake cereal, bananas, vanilla, sprinkles, the world is your pancake cereal canvas so go wild!Strawberry Shortcake Cereal Pancakes
These are the perfect summer cereal pancake: super mini vanilla cereal pancakes with juicy strawberries and soft whipped cream. Fork it or spoon it, either way these are the DREAM summer breakfast or brunch.How to make strawberry shortcake cereal pancakes
- Pick the smallest strawberries at the store or farmer’s market - the smaller the berry, the sweeter.
- Wash and hull the berries, then cut them in halves or quarters. Sprinkle them with a bit of sugar and a tiny pinch of salt so the berries macerate and get super juicy.
- Make some softly whipped cream by pouring 1/2 cup heavy whipping cream into a chilled bowl with 1 tablespoon sugar. Whisk until soft peaks form (use an electric whisk if you have it!) then keep cold in the fridge.
- While the berries are getting juicy, make the pancakes as per the recipe below.
- Place the pancakes on a plate or bowl and top with the whipped cream and strawberries spooned on top. Enjoy!
Pancake Cereal Tips and Tricks
- Use oil instead of butter for the pan. Butter has a low heat point so it’s better to use oil if you don’t want your pancakes to end up burnt-looking.
- Keep the pan on low heat to start and then turn up the heat once you’ve piped out all the pancakes. Or, if you’re really slow, you can heat the pan, then turn it off, pipe out the pancakes, then turn the stove on after you’re done to cook them.
- Pipe the pancakes out smaller than you think - they will spread a tiny bit. If you want extra mini pancakes, your pancake batter should just be smaller than the size of a dime.
- If you’re not particular, use a giant flipper to flip all your pancakes at once. Or, use a pair of chopsticks to flip over each pancake individually. You can even just shake and toss the pan.
- If you want your pancakes to be warm, keep them warm in the oven. Because they’re so tiny, they don’t stay warm for very long. If you want warm pancakes, keep them warm in a low oven.
Pancake Cereal Recipe
Pancakes, but make it MINI! Pop these super cute tiny cereal sized pancakes in a bowl for pancake cereal!
- 1/2 cup all purpose flour
- 1 tbsp sugar
- 1/2 tsp baking powder
- 1/2 tsp baking soda
- 1/2 cup buttermilk (sub milk or see notes)
- 1.5 tbsp whisked egg
- oil for the pan
In a bowl, whisk together the flour, baking powder, baking soda, and sugar. Add the whisked egg and buttermilk to the bowl, gently combine with a fork, being careful not to over mix, but mixing out all the large lumps
Pour the pancake batter into a squeeze bottle or ziplock bag with a tiny corner cut off. Or you can use a teaspoon to scoop it out.
Heat up a non-stick pan over over medium-low heat. Brush a thin layer of oil on your pan. Squeeze out mini pancake (or drop the batter by the teaspoon) and cook until the pancakes start to bubble. When you flip them, they should be golden brown. Continue cooking for another 30 seconds or 1 minute, or until golden brown. Scoop the pancakes out into a bowl.
Serve with a pat of butter and drizzle with syrup! Milk optional :)
If you don’t have buttermilk on hand, make an easy substitute by mixing together a scant 1/2 cup milk with 1.5 teaspoons vinegar or lemon juice. Do this at the beginning so it has time to thicken up.

I Am... How to Make the Best Japanese Shokupan Milk Bread
I love all bread but Japanese shokupan is my absolute favorite. So much so that back when traveling was a thing, Mike and I regularly went on shokupan hunts while in Tokyo. Bread and toast is on another level over there. Every time we flew home I would bring a loaf, tucked into a carry on bag that I would keep in my lap just so I could have shokupan at home. Those were the days! If you know me, even a little bit, you would know that I love carbs. I have a sweatshirt that proudly proclaims me a carb lover because it’s so very, very true. If I had my way and lived in a world where calories didn’t count, I would happily live on carbs only, all day, everyday. Give me ALL the carby foods: potatoes, noodles, rice, and oh yes, especially BREAD.
The easiest shokupan recipe
I’ve been baking this simple squishable loaf. It doesn’t have a yudane (a boiling water and flour roux) or a tangzhong (a cooked water and flour roux) the two most common additions to shokupan. Even without, it is still a very soft and fluffy loaf with the added the bonus of not having to think about making bread the day before. A lot of bread recipes (sourdough especially but even soft sandwich loaves) are a two day affair. I like this loaf because you can think to yourself in the morning, I would like some soft and fluffy bread and then make it and have it the same day.How to make shokupan
Making shokupan is easier than you think. It comes together very simply: you proof your yeast, mix up your dry ingredients, add the egg to the yeast, then mix the dough. Once the dough comes together, you slowly knead in the butter. The key to a soft and fluffy shokupan is in the kneading so make sure you take the time (a mixer with a dough hook is the right choice here) to reach the window pane stage. One your dough is soft and extensible, you can expect a soft and shreddable loaf. I really liked this loaf, simply toasted with butter or spread with some cream cheese and jam. But, it’s still not the level of bread I love from Japan so I’m going to be doing some more experimenting. Please let me know in the comments if you have any favorite Japanese shokupan recipes, I’m always up for trying new ones!A note on size and shaping
This was made in a 4.5 inch pullman cube which holds about 1 lb of dough. You can also make it in a regular sized loaf pan in which it will be rounded on top like a regular loaf of bread. If you are making it in a regular loaf pan, you’ll want to divide the dough into two equally sized balls before shaping. I’ve included the bakers’ percentages below as well so you can size according to your pan.- 120 grams water 48%
- 2 grams active dry yeast .8%
- 250 grams bread flour 100%
- 30 grams sugar 12 %
- 1.5 grams salt .6%
- 28 grams egg 11.2 %
- 25 grams butter 10%
Japanese Shokupan Bread Recipe
- 120 grams water (warm, see note)
- 1 tsp active dry yeast
- 250 grams bread flour
- 30 grams sugar
- 1/4 tsp salt
- 1/2 large egg (lightly beaten, about 1.5 tbsp (28 grams))
- 25 grams butter (room temp)
Sprinkle the yeast onto the warm water/milk. Let proof while you complete the next steps.
In the bowl of your mixer, stir together the flour, sugar and salt.
Whisk the egg into the yeast mixture, then add to the dry ingredients. Use a wooden spoon to mix until it comes into a ball and then switch to a dough hook and knead until the dough pulls away cleanly from the sides.
Add the room temperature butter and continue to knead, about 10-12 minutes, until very supple and the dough reaches the windowpane stage – take a piece of dough about the size of a golf ball and stretch it out between your fingers and thumbs. If you can stretch it without the dough breaking, you’re good to go. Transfer to a clean bowl and cover with plastic wrap.
Place in a warm spot and let rise until doubled, about 1 hour.
Take the dough and tip it out onto a lightly floured surface. Punch down lightly then roll out into a large oval.
Bring the two sides of the oval towards the middle.
Then roll up.
Place in a pullman loaf pan (I used a non-stick pan, lightly oil or butter your pan if it isn’t non-stick), cover and let proof until 1 inch below the top, about 40 minutes to 1 hour. Heat the oven to 355°F after the dough has been proofing for 30 minutes.
Slide the lid on the pan and bake for 40 minutes to 1 hour or until the bread is golden and cooked through. Remove from the pan immediately and cool on a wire rack. Slice and enjoy!
I wanted this to be a milk shokupan so I used 80 grams water + 40 grams milk, you can go ahead and use all water or a mix of water and milk depending on what you prefer.

I Am... Crispiest Smashed Potatoes
If you’re a potato lover this is about to become your new favorite potato recipe: crispy, crunchy, smashed potatoes! Fluffy, creamy, and tender on the inside and shatteringly crunchy on the outside. Seriously SO GOOD. I love potatoes like I love no other root vegetable. Potatoes are and will always be my favourite food from the underground world. I could live on potatoes alone. These potatoes in particular are delicious, golden crusty nuggets of smashed creamy potato goodness. They’re great on their own as a snack and also make an incredible side dish.
What are smashed potatoes
Smashed potatoes taste like fries, but if fries were rustic, lofi, chill vibes potatoes that aren’t concerned about fitting in. They all come out different because they all smash wonderfully uniquely. Just like fries, they’re crispy on the outside and fluffy and potatoey on the inside. Because they’re smashed, there is so much more potential surface area for crispy crunch. Smashed potatoes are super easy and not at all complicated. They’re as simple as: boiling, tossing, smashing, and baking. That’s it. No peeling, no special equipment, just good, solid, tender flavorful potatoes.How to make crispy smashed potatoes
The key to crispy potatoes is cooking them before they go in the oven. Just like British style potato roasties the secret is double cooking. Boiling the potatoes makes sure the potatoes are tender and creamy before crisping up in the oven. Smashing them gives them extra surface area and craggily bits for crunch.- Boil baby potatoes in salted water.
- Drain and let potatoes dry in a colander for about 5 minutes.
- Toss the potatoes in oil and season with salt.
- Place the potatoes on a baking sheet and smash with the bottom of a glass.
- Bake for 20-25 minutes at 450°F.
- Enjoy!
Crispy smashed potato ingredients
All you need for the BEST crispy smashed potatoes are:- baby potatoes - baby potatoes aka new potatoes are best! They’re extra creamy, sweet and tender. They sell them in little bags near the regular potatoes. It doesn’t matter which color you get :)
- high heat neutral oil - since these guys roast in the oven at 450°F it’s best to use a high heat oil like canola, grapeseed, sunflower seed, or safflower.
- sea salt - a good sprinkle of flaky salt adds a little bit of crunch and brings out the sweetness of the potato flavor
- herbs of choice - fresh herbs absolutely elevate potatoes. Roughly chop them, then sprinkle over the potatoes after they come out of the oven. Try dill, cilantro, green onions, fennel tops, basil, rosemary, sage, parsley, oregano, chives, or thyme.
How to serve
Have them as a snack as is right out of the oven, as finger food or an appetizer, or serve them as a side with some of the following: Oh, if you want to make smashed potatoes in the air fryer or on the stove top, I’ve got you:Air fryer smashed potatoes
Put lightly oiled smashed potatoes in a preheated air fryer at 400°F for 15-20 minutes or until crisp and golden.Stove top smashed potatoes
Smash the potatoes and then fry in oil in a cast iron skillet until crispy, flipping once, over medium heat. Happy potato smashing! xoxo stephSmashed Potatoes
The best smashed potatoes: fluffy, creamy, and tender on the inside and shatteringly crunchy on the outside.
- 1.5 lb potatoes (baby/nugget potatoes preferred)
- 4 tbsp neutral oil (divided)
Heat the oven to 450°F. Bring a large pot of water to a boil over high heat and salt generously. Add the baby potatoes and cook for 20 minutes, until soft.
Drain in a colander and let dry completely, about 5 minutes. Drizzle the potatoes in oil and season with salt.
Arrange the potatoes on a baking sheet, lightly brushed with oil and use a potato masher or the bottom of a heavy glass to press down on the potatoes until smashed to your desired potato preference, 1/2 - 1/4 inch thick. Thicker potatoes mean fluffier insides, thinner potatoes mean crispier potatoes.
Bake until golden and crispy, about 20-25 minutes.
Transfer to a platter and top with scallion oil, chili oil, and cilantro, if using, and enjoy!

I Am... Easy Taiwanese Popcorn Chicken (air fried or baked too)
Taiwanese popcorn chicken nuggets are probably my favorite kind of fried chicken. They're a super crunchy, deeply savory, absolutely addictive snack, and probably one of the best things to ever come out of Taiwan. The other best thing being boba tea, of course. I have many, many fond memories of late nights at boba tea places, munching on fried chicken, Taiwanese scallion pancake beef rolls and drinking boba tea. There was even that one summer after college when my friends and I would hangout every night, playing mahjong into the wee hours of the morning. We were fueled by takeout bubble tea, beef rolls, Taiwanese popcorn chicken, and the pure joy of youth. We were all working in-between kind of jobs that we didn’t care about. All that mattered was our obsession with the clink of those green and white MJ tiles and snacks. The best snack of all being Taiwanese popcorn chicken of course!
What is Taiwanese popcorn chicken?
Taiwanese popcorn chicken is an addictive night market snack from Taiwan. Like all good street foods, it has made its way into the cultural fabric of Taiwan and is now served in restaurants in Taiwan and all over the world. Just as with other extra crunchy deep fried chickens (Korean fried chicken, chicken karaage), Taiwanese fried chicken is twice-deep fried: first in a low temperature oil to cook through, then in a high heat oil to add crunch. As it comes out of the fryer, it’s tossed in a salt and pepper seasoning and garnished with deep fried basil leaves. Oh, and of course I have to mention, these little nuggets also come supersized as GIANT Taiwanese crispy fried chicken cutlets. Those giant chicken steaks (sometimes bigger than your head!) are served either whole, in a bag, that you can hold onto and bite, or cut up into pieces that you can eat with skewers or chopsticks.Taiwanese fried chicken ingredients
- Chicken - the main ingredient. Chicken thighs are best for juiciness and flavor. Most Taiwanese fried chicken is made from boneless skinless thighs.
- Light Soy Sauce - We need just a bit of light soy sauce for umami and salt. There are a bunch of recipes on the internet that have you marinating in a bunch of regular soy sauce, but if you do your chicken will end up super dark after frying. We just want a hint of soy, not too much. Our favorite brands of light soy sauce are Amoy, Pearl River, and Lee Kum Kee. You can find them either online or at the Asian grocery store.
- Starch - Here I used a combination of cornstarch and potato starch for a coating that was light and crisp. The kind of starch you use for your coating is pretty important. More on coatings further down.
- Five Spice Powder - This is what gives Taiwanese fried chicken it’s distinctive flavor. Five spice is a Chinese spice mix made up of star anise, cloves, cinnamon, Sichuan peppercorns, and fennel. You can find it at most grocery stores and online of course. All five spice powder mixes are different, so make sure you taste your fives spice and like it before using it.
- White Pepper - White pepper is the other distinct spice in Taiwanese fried chicken. It has a sharper, more floral note than regular pepper. Don’t skip out on it if you want the real deal.
- Thai Basil - Taiwanese chicken is almost always garnished with Thai basil that has been deep-fried. It adds a bit of earthy herb freshness to the whole dish. If you’re adverse to deep-frying herbs, you can just serve it fresh.
How to Make Taiwanese Fried Chicken
- Cut down your chicken: Start of with cutting the chicken into bite size pieces. Make sure you cut all your pieces the same size. You don’t want thin pieces because they tend to be drier, so try to make sure they are kind of chunky and thick.
- Marinate: From there you’ll want to marinate them in soy sauce, garlic, five spice, white pepper, and salt. It’s a pretty dry marinade so be sure to mix everything up evenly so that all the chicken pieces are coated. You want them to marinate for at least 30 minutes, ideally an hour. I like to leave them in a cool spot in the kitchen so the chicken can come up to room temp. This helps it cook more evenly and quickly instead of cooking it straight from the fridge. If you’re marinating overnight, just take the chicken out of the fridge a little bit before you’re going to cook.
- Coat the chicken: After the chicken has marinated, you want to coat it in the cornstarch/potato starch mix. You dont need to drain the marinade, since it’s pretty much a rub so just go ahead and toss the chicken in the starches, being sure to coat evenly.
- Fry: From there you can either deep-fry, air-fry, or oven-bake. The choice is yours!
- Toss: Toss the freshly fried chicken with the spice mix. This is a very important part to making your chicken authentic.
Air-frying/Oven Baking
If you’re air-frying or oven baking, you’ll need to spray the chicken with some oil. We like to use a simple oil mister bottle that we got on amazon so we can just use whatever oil we have on hand. Make sure there’s a good coating of oil on the tops of the chicken so it browns evenly, otherwise you might end up with chicken that’s not as golden.Deep-frying
For deep-frying, we’re going to do a double deep fry: once at a low temperature to cook the chicken through and then again at a higher temperature to get the chicken extra crispy and golden brown. Some tips:- Make sure you use a heavy bottomed deep pot to deep-fry.
- You want a lot of headspace so the oil doesn’t boil and bubble over.
- A kitchen thermometer is best, but if you don't have one, you can check the temperature by putting wooden chopsticks into the oil. There should be a bunch of little bubbles that come out the end. The ones that come with your take out orders are perfect.
- Gently add some pieces of chicken into the pot, being sure not to crowd, and fry until lightly golden. Drain on a wire rack and then turn up the heat and deep fry again until crisp and deeply golden.
Which Taiwanese popcorn chicken is the best: deep-frying vs air-frying vs oven-baking
Here we are! I went ahead and prepared Taiwanese fried chicken three different ways to figure out which method was best. I knew which chicken nugget was which but Mike did a double blind taste test and these are the results - they will shock you! Mike thought that all the chicken tasted kind of the same. He said that when hot, the differences were minimal. Once the chicken got cold - we're talking like hours later - this is what he came up with:- Deep-fried was the tastiest, probably because it had some extra flavor from deep-frying
- Air-fried was the crunchiest and crispiest
- Oven-baked was the juiciest
What is the best type of coating for Taiwanese popcorn chicken?
If you ever look closely at some Taiwanese fried chicken, you’ll notice that their coating looks different from fried chicken coated with flour. This is because they use a mix of cornstarch, potato starch, or sweet potato starch. The crust of Taiwanese fried chicken tends to be a bit powder-y with little balls of crunchiness. It’s not as golden as regular fried chicken because the starches used don’t brown up the same way. Starches tend to give a lighter, yet crisper coating because there’s no gluten in it. Look for coarse potato/sweet potato starch for extra crunchy chicken. Coarse starch has slightly bigger granules that make the chicken even crunchier. For the most authentic Taiwanese chicken you’re going to want to search for sweet potato starch. Other starches will work too, but sweet potato starch is the starch of choice. The best chefs often use a mix of starches (their ratios being trade secrets) for the perfect combination of crispy and crunchy.First off, what is starch?
Starch is a white, tasteless powder made up of two molecules: amylose and amylopectin. When heated, the molecules cross link with each other to form a rigid, brittle network that holds its shape. This translates to a crispy, crunchy feeling when we eat it. Bonus, starch is gluten-free!Sweet potato starch
This is the classic coating you’ll find on fried chicken in Taiwan. Sweet potato starch (红薯粉) is super popular in Chinese food for coating meats, making chewy mochi-like dessert balls, and of course, deep-frying. Sweet potato starch comes in regular and coarse ground. Coarse ground sweet potato starch is what you want for Taiwanese chicken. Its irregularly sized pieces give the coating a raggedy, craggy surface which ends up being crispier when deep fried. Sweet potato starch contains the highest percentage of amylose (30%) which makes it the crunchiest/crispiest of all the starches.Cornstarch
Cornstarch, made from corn kernels, is probably the most common starch for thickening sauces, baking, and coating things for frying. Its fairly high amylose (25-28%) makes it a really good choice for a deep fry coating. I always include it as the default choice for coating Asian fried chicken because it's probably in your pantry already.Potato starch
Potato starch, made from potatoes, has a fairly high amylose content (20-22%). It’s really easy to find at the grocery store so if you can’t get your hands on sweet potato starch a mix of cornstarch and potato starch will give you an acceptable facsimile. Note: potato starch is not the same as potato flour!Coatings to avoid
Stay away from flour, rice flour, tapioca starch, and rice starch if you want a crispy crunchy crust that will stay crunchy.What to eat with Taiwanese fried chicken
You can eat it on it’s own as a snack, serve it up with some fluffy white rice as a Taiwanese fried chicken bowl, enjoy it next to fried noodles or fried rice, or last but not least: serve with some green onion pancake beef rolls for an extra Taiwanese experience.Taiwanese Popcorn Chicken
How to Make The Best Taiwanese Popcorn Chicken Three Ways: Baked, Air Fried, and Deep Fried
- 1 lb boneless skinless chicken thighs (cubed)
- 2 cloves garlic (crushed)
- 1/2 tbsp soy sauce (light)
- 1/2 tbsp chinese five spice powder
- 1/2 tbsp garlic powder
- 1/2 tsp white pepper
- 1/2 tsp salt
- 2 tbsp cornstarch
- 2 tbsp potato starch
- oil/cooking spray
- thai basil (if desired)
Salt and Pepper Mix
- 1/2 tsp salt
- 1/2 tsp white pepper
- 1/2 tsp black pepper
- 1/2 tsp chinese five spice powder
- 1/2 tsp garlic powder
In a bowl, marinate the chicken in the garlic, soy sauce, five spice, garlic powder, white pepper, and salt for 30 minutes. If you are air frying or baking, add a 1/2 tablespoon oil to the marinade.
Lightly pat the chicken dry with paper towels. Place the cornstarch and potato starch in a bowl and, working in batches, toss and coat several pieces of chicken, making sure they are well coated. Alternatively, put the cornstarch and potato starch in a bag or container, add the chicken, and shake to coat. The chicken should be well coated and look fairly dry.
Deep Fry
Prepare a wire cooling rack over a paper towel lined rimmed baking sheet. Heat up 2 - 2.5 inches of oil in a deep heavy bottomed pot until it reaches 325°F. It doesn’t need to be too deep, it depends on the size of your chicken. Use a pair of tongs to gently add a couple of pieces of chicken to the hot oil, being careful not to overcrowd. Fry in batches until lightly golden, about 1 1/2 minutes. Remove from the oil and let rest on your prepared wire rack. Repeat with the remaining chicken until all of it has been fried once.
Turn the heat up to 350°F and fry the chicken a second time around until deeply golden and crispy, another 1-2 minutes. Drain on the wire rack, sprinkle with the extra spice mix if desired, and enjoy immediately!
Air Fry
Lightly oil or use cooking spray on the air fryer basket. Place the coated pieces of chicken in the basket, with at least 1/4” of space in between pieces. Lightly spray the tops of the chicken with cooking spray. Cook at 400°F for 5 minutes, then flip and lightly spray with extra cooking spray. Cook for 5 more minutes at 400°F. If your pieces of chicken are large, you might need an extra minute or two. Let the chicken cool for 5 minutes, then air fry for an extra 5 minutes at 400°F to crisp it up.
Immediately remove from the air fryer basket and let rest on a wire rack. Sprinkle with the extra spice mix if desired and enjoy immediately!
To Bake
Heat the oven to 450°F. Oil or use cooking spray to fully coat a wire rack in a foil lined baking sheet. Place the coated pieces of chicken on the rack, with at least 1/4” of space in between pieces. Lightly spray the tops of the chicken with cooking spray.
Bake for 20 minutes, then flip, lightly coat with extra cooking spray and bake for an extra 5 minutes. The pieces of chicken should be golden brown, crispy, and cooked through. Remove from the oven, sprinkle with the extra spice mix if desired and enjoy immediately!
You probably won’t use all the spice mix – dust and taste to see what level of extra salty peppery-ness you like.

Popular
 2015 Holiday Giveaway
  One-Pot Lemon Scallop Pea Spaghetti
  Beer Battered Onion Rings, Jalapeno Aioli
  2014 Holiday Gift Guide and a Giveaway
  Easy Gourmet Hot Wings and a Giveaway!
 The Ultimate Veggie Sandwich
  Vegan(!) Creamy Corn Soup Recipe
  Sunday Brunch: Grilled Cheese Eggs Benny

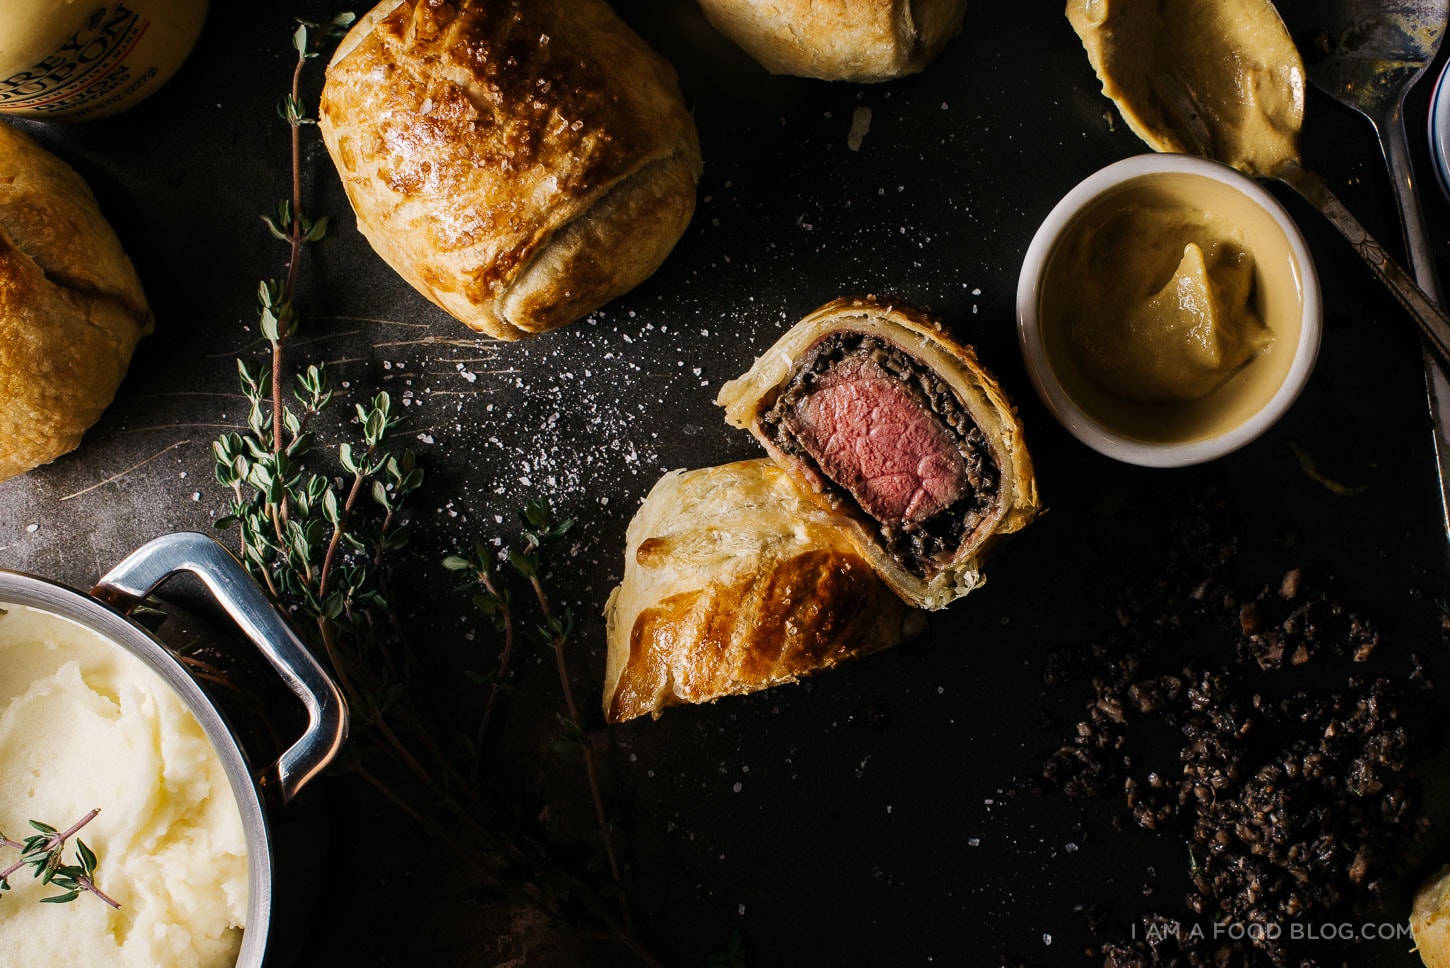