I Am... Our 10 Best Instant Pot Recipes
We love our Instant Pot! It’s the best in class for set it and forget it dinners. Here are our best Instant Pot recipes, the ones we turn to again and again. Instant Pots take time to come up to pressure, but the best thing about them is once everything is inside, you don’t need to baby it. Forget monitoring the temperature or flipping things, just pop everything in, wait, and eat!
Instant Pot pho
This is the best pho recipe on the internet, fight me. I might be biased because it’s Mike’s super secret family recipe but after making it and serving it to multiple people and getting rave reviews, I’m positive it’s everything you’re looking for. Deep, rich, full of spice and big beefy flavors, this is what we make in our Instant Pot the most. We even have a dedicated sealing ring that we use for pho only. Honestly, this pho will change your life. Recipe hereInstant Pot carnitas
The second most made recipe in our Instant Pot (and the other one that has a dedicated sealing ring) is carnitas. There’s something about pressure cooking pork shoulder that makes it incredibly soft and just ready to be crisped up for tacos, carnitas plates, burritos, and on its own. Super simple and delicious. Recipe hereInstant Pot butter chicken
Butter chicken doesn’t need much of an introduction. It’s a creamy chicken curry made with tomatoes, spices, butter and cream. This particular butter chicken is full of flavor, just a touch of heat, and the right amount of cream. It comes together so quickly and it’s the perfect cozy home cooked meal. Recipe hereInstant Pot bolognese
I am obsessed with bolognese and when I need it, I need it. Imagine a rich and full bodied ragu in under an hour. It can be done! Reducing liquids and pressure cooking means you’ll get a thick, luscious sauce that clings to each and every strand of pasta. This is a tomato-rich bolognese with a mix of pork and beef that is the epitome of an Italian American Sunday sauce, but on a weekday. Recipe hereInstant Pot Thai red curry ramen
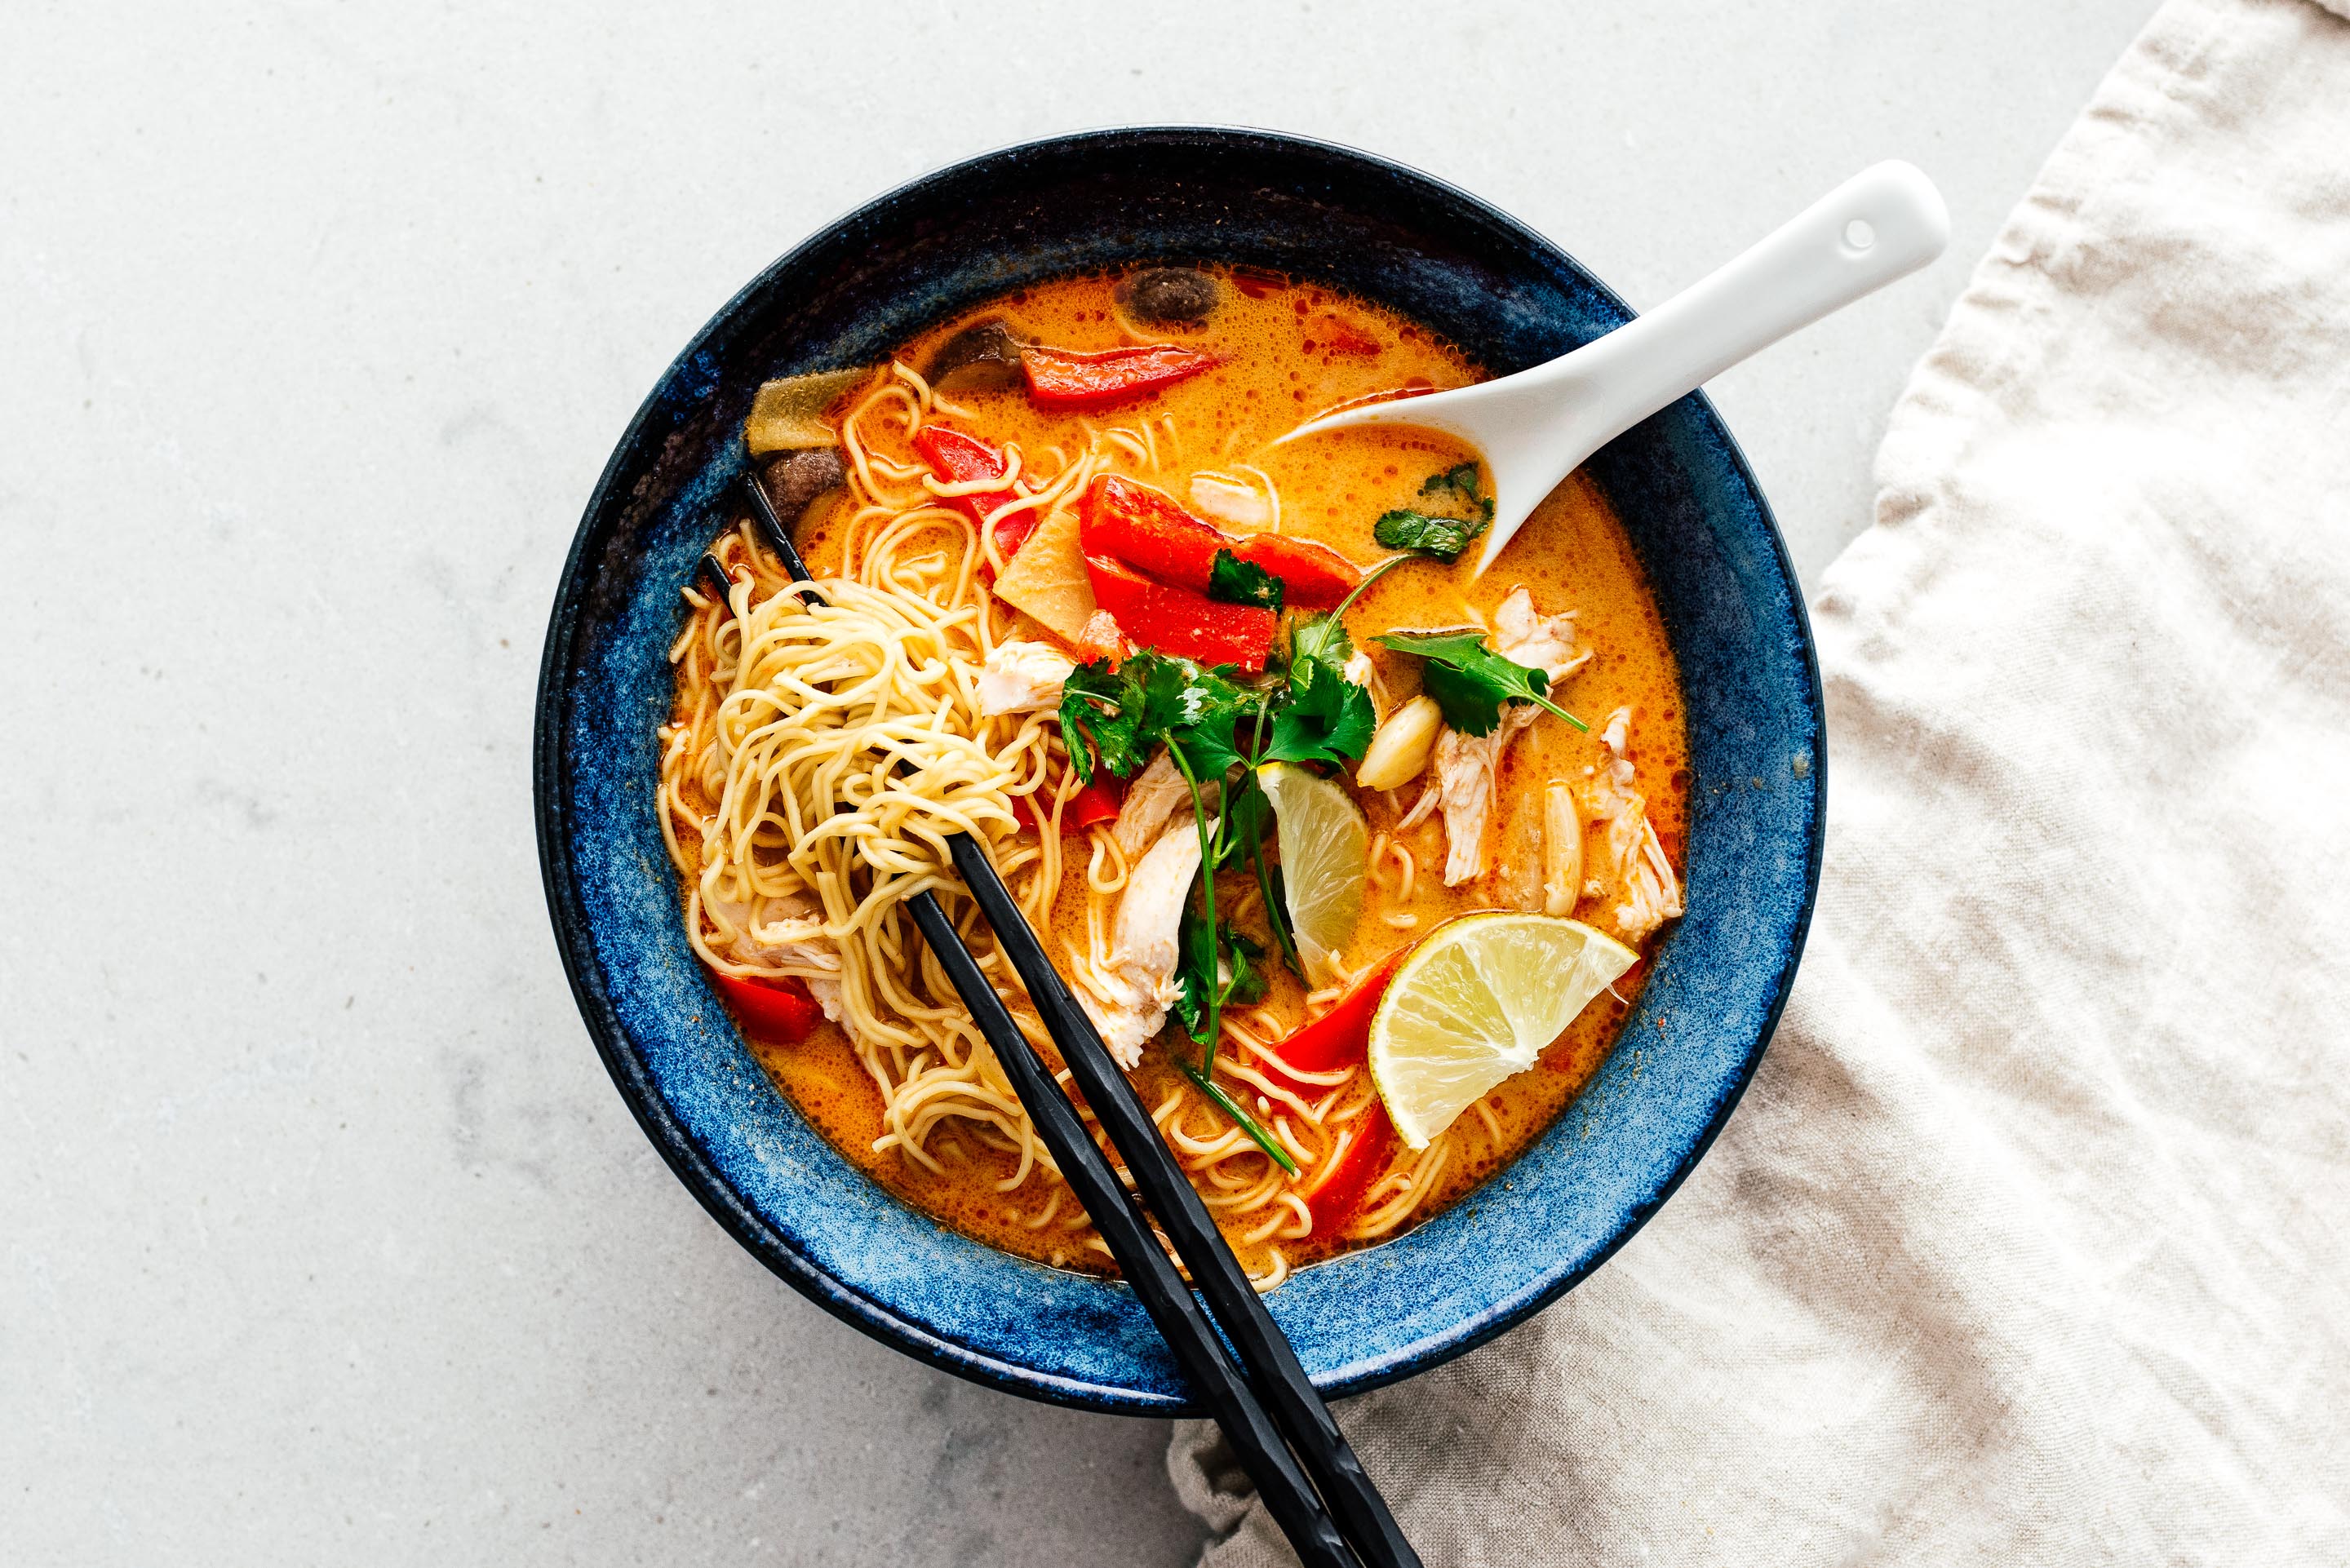
A super simple satisfying weeknight dinner full of flavor, lean protein, vegetables, and noodles. This soup is packed with flavor from the curry and sesame, giving you a creamy, nutty soup that hits all the right flavor notes. I especially love the mushrooms. Don’t worry if the coconut milk “breaks” in the Instant Pot – you want it too, it’s how they make curries in Thailand and Malaysia and it’s a sign of a good curry :) Recipe hereInstant Pot black dal
Inspired by London’s famous Indian restaurant Dishoom – this black dal is based on their signature dish that takes over 24 hours to make. This Instant Pot comes together in a flash and is so GOOD. Tender lentils in a rich and creamy tomato gravy seasoned with cinnamon, coriander, cardamom, fennel, and graham masala. Finish everything off with with butter and heavy cream and serve it up with homemade naan. Recipe hereInstant Pot Meatballs and Pasta
I’ve been obsessed with making Instant Pot pastas ever since discovering that you can cook pasta in sauce without having to drain the pasta. Seriously, what a game changer. The pasta gets infused with the flavors of the sauce and everything cooked up together in the Instant Pot means it’s truly a one pot meal. You might think making meatballs for the Instant Pot would be fussy, but this recipe has ZERO browning, so that means that all you have to do is drop them right into the sauce. The meatballs are tender and juicy and the pasta is perfectly done. Recipe hereInstant Pot Chicken Pot Pie Pasta
This is one of our most made recipes on the blog and it’s a personal favorite of mine as well! Cooking pasta in sauce right in the Instant Pot means no draining and so much flavor. This is a super creamy pasta that tastes just like chicken pot pie. Recipe hereInstant Pot Teriyaki Chicken
Chicken in the Instant Pot is always a pro move - it comes out perfectly cooked, tender and juicy every time. This teriyaki chicken is no exception: sweet and tangy glossy teriyaki sauce and juicy chicken thighs. Serve it up with fluffy rice and some broccoli and forget about delivery. Recipe hereInstant Pot Chicken Tortilla Soup
Tortilla soups are delicious. Tortilla soup that comes together in the Instant Pot is delicious and smart. Full of tender chicken, smokey fire roasted tomatoes, and a bit of spice, this tortilla soup will warm your right up. Extra toppings are a must! Recipe here Read More →
I Am... 22 Best Air Fryer Recipes
These air fryer recipes are just what you need if you want to expand your air fryer horizons. Did you just get a new air fryer? Maybe you want to be a little healthier? Are you looking for new things to make other than frozen french fries? we love our air fryer and these recipes represent the best things we've made with it. One thing: look into getting a rack for your air fryer because you can triple your air fryer abilities. If you’re buying a rack, whether online or offline, don’t forget to check the diameter so you can be sure it fits in your air fryer!
Pok Pok Style Fish Sauce Chicken Wings
No one is really traveling right now but you can get a taste of Vietnam via Portland with these super savory sweet and salty crispy air fryer chicken wings that are finger licking good. Bonus, they’re not battered so less carbs means you can eat more wings! [wprm-recipe-roundup-item id="28693"]Air Fryer Crispy Cacio e Pepe Chickpeas
Do you love those crispy chickpeas you get on salads sometimes? Make a big batch and enjoy snacking at its finest: protein rich air fryer chickpeas with a huge amount of parm and freshly cracked black pepper. [wprm-recipe-roundup-item link="https://blitzdealz.info/oven-roasted-or-air-fryer-crispy-cacio-e-pepe-chickpeas/" newtab="0" name="" summary=""]Air Fryer Chicken Tacos
These are probably the best air fryer tacos you’ll ever make in your air fryer. Juicy chicken seasoned with garlic, oregano, and cumin, and the crispiest, crunchiest taco shells ever. [wprm-recipe-roundup-item id="33683"]Air Fryer Kale Chips
Like chips, but kale because you’ve been feeling a bit fluffy lately. Let’s face it, they’re not potatoes, but air fryer kale chips are crispy, full of vitamins, and almost just as addictive. [wprm-recipe-roundup-item link="https://blitzdealz.info/crispy-air-fryer-kale-chips/" newtab="0" name="" summary=""]Air Fryer Chicken Breasts
The perfect air fryer chicken breast recipe: juicy breasts every time! Use them in salads, with pasta, over rice, with noodles, in tacos, even as a snack! Meal prep, here you come! [wprm-recipe-roundup-item id="34718"]Air Fryer Roasted Brussels Sprouts
Everyone knows the best sprouts are the ones that are deeply caramelized. Air fryer brussels sprouts are so good: the outer edges get crisp and charred and insides are tender and savory. The best part? You don’t have to heat up your oven. [wprm-recipe-roundup-item id="34801"]Air Fryer Chicken Thighs
If you’re a thigh lover, these air fryer chicken thighs are tailor made for you. So quick and juicy and perfectly full of chicken-y goodness. These with a side of salad or crispy roast potatoes are the ultimate meal. [wprm-recipe-roundup-item id="34490"]Air Fryer Potatoes
These air fryer potatoes are like giant fries. Or roast potatoes. You choose. no matter what you call they, they’re crispy, golden, crunchy on the outside and fluffy and tender on the inside. I love you air fryer potatoes! [wprm-recipe-roundup-item id="35009"]Air Fryer Chicken Wings
What’s that saying? Teach someone to fish and you feed them for a lifetime? Learn how to make air fryer chicken wings and you’ll never go hungry again! Juicy, fast, crispy, and undeniably delicious. Customize them anyway you want! All the flavors! [wprm-recipe-roundup-item id="34092"]Easy Roasted Air Fryer Asparagus
Spring is coming and if you can’t wait this air fryer asparagus is here to save the day. Tender and crisp and bright green, all happy asparagus things! [wprm-recipe-roundup-item link="https://blitzdealz.info/easy-roasted-air-fryer-asparagus/" newtab="0" name="" summary=""]Air Fryer Char Siu
Um, did you know that you can make Chinese BBQ pork in the air fryer? Because you can. It has the char, the umami, the meatiness, the sweetness, and all the good things you love about char siu. [wprm-recipe-roundup-item id="31358"]Air Fryer Tofu
This is a super simple air fryer tofu, no batter or breadcrumbs needed. The tofu puffs up and becomes crisp and delicious. Two ingredients, gluten free, low-carb, this tofu is everything. Make several batches and your meal prep is done. [wprm-recipe-roundup-item link="https://blitzdealz.info/crispy-air-fryer-tofu/" newtab="0" name="" summary=""]Korean Fried Chicken
Looking for some spicy saucy crispy crunchy wings to snack on while you binge K-Dramas? This double fry air fryer technique combined with a sweet and spicy gochujang-honey sauce will satisfy ALL your cravings. [wprm-recipe-roundup-item id="31643"]Air Fryer Vietnamese Chicken Wings
These air fryer chicken wings are coated in legit what I think is the BEST seasoning mix ever. So addictive! Crispy, salty, sweet, these wings are everything. [wprm-recipe-roundup-item link="https://blitzdealz.info/air-fryer-vietnamese-chicken-wings/" newtab="0" name="" summary=""]Air Fryer Roasted Broccoli
If you're looking for perfectly crispy broccoli with just the right amount of char, it's time to break out the air fryer. [wprm-recipe-roundup-item link="https://blitzdealz.info/how-to-make-crispy-air-fryer-roasted-broccoli/" newtab="0" name="" summary=""]Crispy Air Fryer Chicken Strips
Air fryer chicken tenders, um yes please, especially with ALL the sauces. The panko outsides are crispy and crunchy and the chicken tenders are so juicy. [wprm-recipe-roundup-item link="https://blitzdealz.info/crispy-air-fryer-chicken-strips/" newtab="0" name="" summary=""]Air Fryer Pork Chops
Did you know that pork chops are best made in the air fryer? They end up being like no pork chop you’ve ever tasted: tender, juicy, and full of flavor thanks to a Italian green sauce. Best part: they less than 30 minutes. [wprm-recipe-roundup-item id="34877"]The Crunchiest Air Fryer Asian Fried Chicken
These are going to be the crispiest, crunchiest, juiciest wings to ever come out of your air fryer. They’re blank slate for all of your flavor dreams so what are you waiting for?! [wprm-recipe-roundup-item id="31807 "]Air Fryer Parmesan Garlic Knots
Air fryer garlic knots are dangerously delicious: fluffy on the inside, crisp on the outsides, dunked into a super aromatic garlic butter and finished off with a huge shower of parm. I can eat all of these in one sitting. [wprm-recipe-roundup-item id="34896"]One Ingredient Air Fryer Keto Popcorn Cheese Puffs
These are going to be the crispiest, crunchiest, juiciest wings to ever come out of your air fryer. They’re blank slate for all of your flavor dreams so what are you waiting for?! [wprm-recipe-roundup-item id="32075"]Air Fryer Bacon
Seriously the best way to make bacon. For bonus points, twist the bacon into straws and enjoy the texture difference between the soft insides and the crispy edges. [wprm-recipe-roundup-item id="37988"]Air Fryer Eggs
Perfect eggs, every time, just the way you like them! [wprm-recipe-roundup-item id="38933"]
I Am... How to Brown Butter: Tips, Tricks, and Recipes
Just 10 minutes and you can have the best brown butter to add a nutty, deep richness to both sweet and savory recipes. If you ask me what the best thing you can do for your baked or savory goods that only takes an extra 10 minutes, it’s to use browned butter. If you’ve tasted the toasty, nuttiness of browned butter, then you know that it’s a certain kind of magic. This step-by-step tutorial will show you the best way to brown butter and all the best ways to use it!
What is brown butter?
Brown butter, also known as beurre noisette (hazelnut butter in French), is an out-of-this-world delicious concoction originally used in savory French foods but is now used everywhere butter is used. It’s deeply golden, flecked with brown bits, nutty, and incredibly aromatic. Browned butter is perfection. To make it, butter is slowly melted down, separating butter fat and milk solids. The milk solids sink to the bottom of the pan and toast, caramelize, andbrown, making it smell nutty and wonderfully aromatic. Browned butter brings so much flavor to both sweet and savory goods for just a tiny bit of extra effort. It adds a nutty caramel roundness and highlights both sweet and savory flavors making everything it touches taste more deep, rich, and intense. I just LOVE it!Ingredients
All you need for this amazing ingredient is butter. Usually if I’m using brown butter for something sweet I go for unsalted butter. For savory dishes, I use unsalted too, but I have used salted butter. You can use either but because the flavor of the butter concentrates, salted butter is definitely more intensely savory. Aside from the butter you’ll need a skillet or saucepan and something to stir with.How to make brown butter
Melting unsalted butter over very low heat, allows it to separate into butter fat and milk solids. The milk solids fall to the bottom of the pan where they start to brown until they reach the color of hazelnuts. Here’s a step by step!- Warm: start your butter, cut in in small pieces, in a cold pan and warm it slowly so that it melts evenly.
- Sputter: once the butter has melted, it will start to bubble and foam as the water cooks off and the fat left behind begins to sputter. The butter will still be yellow. Stir gently and turn down the heat if it starts to splatter too much.
- Foam: the butter will foam and the foam will change from pale to very yellow as the water cooks off even more and you’re left with the milk solids, which you should see floating near the bottom of the pan.
- Brown: the butter will start to look deeply yellow and start to become golden and brown. The milk solids will become even more visible and your place will smell amazingly toasty, nutty, and caramel-y.
- Remove: Once your butter is to your liking, take it off the heat and pour it out into a heat proof bowl or liquid measuring cup as the milk solids will continue to toast in the residual heat. Be sure to scrape the toasted brown bits at the bottom of the saucepan. They are the toasted milk solids and are what gives brown butter its amazing flavor.
Tips and tricks
- Use a light colored saucepan so you can see the color of the butter change. An enamel milk pan is perfect for this. This is the one we own.
- Stir the butter so that it melts and heats evenly.
- Butter can burn quickly. Once your butter is the right color, transfer it out of the pan so it doesn’t continue to heat up.
Salted or unsalted butter
It’s up to you, I use unsalted mostly, but for savory dishes salted butter works too!How long does it take to brown butter?
It really varies because different brands of butter have different amounts of water. Generally I say it takes between 4-8 minutes.What kind of pan
A light colored saucepan is best so you can see the brown butter bits. If you have a white milk pan that will work, also, regular stainless still saucepans work too.Does browned butter solidify?
Yes! You can make brown butter then pop it into the fridge where it will turn into solid brown butter. You can cream solid brown butter for frosting, cookies, cake, and basically anywhere you use regular butter.How to store browned butter
If you need to keep your browned butter for later, just pour it into an airtight container and keep it in the fridge for up to 1 week. It will solidify in the fridge. If you need it at room temp, you can leave it out, just like regular butter. You can also melt it again for sauces, just be sure to do it over very low heat so it doesn’t brown again.How to use brown butter in any recipe
You can use browned butter in any recipe in a direct 1 to 1 swap. If your recipe calls for sold butter, be sure to pop the brown butter in the fridge so it turns solid. For recipes that call for melted butter, you can gently melt it or use it straight after you brown it. Brown butter adds so much flavor to every dish. Honestly I’ve eaten it just drizzled over vegetables, it’s THAT good. Here are some ideas to get your started:Sweet brown butter recipes
- The best ever chocolate chip cookies
- Snickerdoodles
- Brown butter brownies
- Macadamia dark chocolate cookies
- Pumpkin cupcakes with browned butter frosting
- Blueberry oat bars
Savory brown butter recipes
- Garlicky mushroom risotto
- Garlic parmesan noodles
- Sage and butter spinach pasta
- Steak with a drizzle of browned butter is amazing
- Brown the butter in this garlic lobster pasta for umami overload
How to make brown butter
Just 10 minutes and you can have the best brown butter to add a nutty, deep richness to both sweet and savory recipes.
- 1/2 cup butter (cut into 1 inch pieces)
Add the butter to a small sauce pan (try to use a light colored sauce pan if you can).
Melt the butter over medium heat, stirring. The butter will melt then eventually foam up.
After a couple of minutes, the butter will separate into milk fat and milk solids. The milk solids will start to brown on the bottom of the sauce pan. Keep stirring and use your nose, once it starts to smell nutty and turn amber, it’s time to take the pan off the heat.
Carefully pour the browned butter in a heat proof container, being sure to scrape up the brown bits. Let cool for 10 minutes and use in your recipe as directed. If you need solid brown butter, cool in the fridge until solid.

I Am... 5 Easy Baked Brie Recipes
Baked brie has got to be the most crowd pleasing, easiest appetizer there is. Everyone loves it, it seems fancier than it actually is, and it’s super easy and quick to prepare. Plus there are so many variations you can make! I remember the first time I ever had baked brie. It was the most magical thing ever, no joke. It was at a Christmas party years and years ago and I had no idea my life was about to change. The host brought out a baked brie out with a huge pile of crackers and all of a sudden I was that one person that was next to the cheese all night. Some people are extroverts, some people are introverts, I’m a cheese-o-vert. Melty brie is my idea of a good party.
What is baked brie?
Baked brie is the best melted cheese ever. Period. It’s brie, that’s baked. That simple, yet compelling and seductive. Cutting through the mild and tender rind to have the brie melt out like lava is addictive. With baked brie, everything is right with the world.Why you should make baked brie
It’s the easiest appetizer ever. All you do is pop brie into a warm oven (or even the microwave!), put it on a platter, add some crackers and it’s cheese pull heaven. Add some extra flavors and you too can change someone’s world.How to make baked brie
Bake it in a round, shallow oven proof dish. That’s it! If you don’t have a dish, place it on parchment paper and then use the parchment to transfer it to a serving plate later on.What kind of brie for baked brie
There are so many kinds of brie out there with different price points. I tend to grab 8 ounce rounds of brie that’s locally made or something that’s affordable.Do you take the rind off baked brie?
Nope! The rind of brie is perfectly edible and it helps the brie keep its shape and insulates the insides from drying out. You don’t need to take the rind off when you bake it, just cut straight into it when it comes out of the oven melty and hot. If you don’t prefer to eat the rind, simply remove the top layer before or after baking and dip into the brie like fondue.What to bake brie in?
Use an oven proof baking dish, skillet, or small rimmed shallow bowl that is just a bit larger than your brie. You can use a gratin dish, a mini cast iron skillet, or even just crumpled up parchment paper that you can then move to a plate after baking.How long will baked brie stay melted?
If you bake it in a skillet or dish, the dish will help keep the brie scoopable and gooey for about 15 minutes. You can reheat it gently in the microwave for 30 seconds at a time to make it gooey again.How do you serve baked brie?
I put the dish that it’s been baked on on a platter or a larger dish with crackers or crunchy things around it, kind of like how you would style a charcuterie board. Add a knife so people can optionally use it to scoop up some melty cheese, but most people will just take their crackers, toasts, or whatever and just dip and scoop.Baked brie ideas
If you’re looking for your own take on baked brie, here are some tips! Add something:- nutty - a little bit of crunch and nuttiness is never wrong. I like using toasted or candied nuts as opposed to raw ones. Try toasted walnuts, pecans, macadamia nuts, pistachios, almonds, hazelnuts, pine nuts or even seeds like roasted sesame or sunflower seeds
- sweet - honey, maple syrup, jams, compotes, and fresh fruits highlight the buttery richness of brie.
- savory - most of the time people do sweet things with baked brie but things like crispy bacon, crispy pancetta, roasted tomatoes, sun dried tomatoes, pesto, roasted garlic, caramelized onions, roasted mushrooms, or even chili oil are AMAZING.
- herby - fresh herbs are pretty and aromatic, try thyme, rosemary, mint, sage, basil, oregano
What to serve with baked brie
- sourdough crackers: amazing with baked brie!
- fruit: grapes, sliced pears, sliced apples, sliced peaches, or berries are delicious!
- nuts: toasted almonds, walnuts, pecans, candied nuts taste amazing with brie.
- kettle chips: this is my absolute favorite mix of high-low. You haven’t lived until you’ve dipped a folded over kettle chip into melty brie!
If you love brie, here are some other brie recipes to try!
- Cran-brie grilled cheese: cranberry and brie
- Four cheese pizza with mozza, parm, brie, and ricotta
- Roast beef and brie puffs
- The best charcuterie board featuring brie
Classic Baked Brie
Classics exist for a reason, amirite? This is essentially how you bake brie and warm it to a melty point. Accent the creamy, buttery flavor with a drizzle of honey and some fresh thyme or add your favorite jam or accents for your own take. Baked Brie serves 6 15 minutes 6-8 ounce round brie honey thyme sprigs- Heat the oven to 350°F.
- Unwrap the brie (leave the rind on) and place in a small, round shallow oven proof dish.
- Bake for 15-20 minutes. To see if it’s melty, gently poke the center of the brie, it should feel melty and wobbly under the rind.
- Remove from the oven and place the dish on a larger serving plate.
- Drizzle with a generous amount of honey and top with fresh thyme.
- Serve with crackers and a knife/spoon to help with scooping.
Jammy Pecan Baked Brie
Holiday vibes all around with this gorgeous baked brie. The red and white is super festive and sweet-tart cranberries and pecans are amazing together with melty brie. Jammy Pecan Baked Brie serves 6 5 minutes 15 minutes 6-8 ounce round brie 1/4 cup raspberry jam or jam of choice 1 teaspoon oil 1/4 cup pecans 1 tbsp brown sugar rosemary, to finish- Heat the oven to 350°F.
- Unwrap the brie (leave the rind on) and place in a small, round shallow oven proof dish.
- Top the brie with the cranberry jam.
- Toss the pecans with a bit of oil and brown sugar then place on top of the cranberry jam.
- Bake for 15-20 minutes. To see if it’s melty, gently poke the center of the brie, it should feel melty and wobbly under the rind.
- Remove from the oven and place the dish on a larger serving plate.
- Serve fresh rosemary and crackers and a knife/spoon to help with scooping.
Pistachio and Pear Baked Brie
Crunchy, nutty pistachios with warm, melty brie, a crisp pear, and a cracker are so delicious together. I love how the pistachios look against the brie and green Anjou pears echo the green of the pistachios. A little drizzle of honey and flaky sea salt makes this the perfect combination of sweet and salty. Pistachio and Pear Baked Brie serves 6 5 minutes 15 minutes 6-8 ounce round brie 1/4 cup chopped pistachios honey, to drizzle flaky sea salt 1 pear, thinly sliced- Heat the oven to 350°F.
- Unwrap the brie (leave the rind on) and place in a small, round shallow oven proof dish.
- Bake for 15-20 minutes. To see if it’s melty, gently poke the center of the brie, it should feel melty and wobbly under the rind.
- Remove from the oven and place the dish on a larger serving plate.
- Top with chopped pistachios, drizzle with honey, and finish with flaky sea salt.
- Serve thinly sliced pears, crackers and a knife/spoon to help with scooping.
Apricot and Almond Baked Brie
Apricot jam is velvety, tangy and sweet - and I absolutely love it with brie. When it warms in the oven, it almost turns into a glaze and helps caramelize the almonds a bit. The softness of the brie with the crunch of the almonds is divine. Apricot and Almond Baked Brie serves 6 5 minutes 15 minutes 6-8 ounce round brie 1/4 cup apricot jam 2 tbsp chopped almonds fresh thyme- Heat the oven to 350°F.
- Unwrap the brie (leave the rind on) and place in a small, round shallow oven proof dish.
- Top the brie with the jam and sliced almonds.
- Bake for 15-20 minutes. To see if it’s melty, gently poke the center of the brie, it should feel melty and wobbly under the rind.
- Remove from the oven and place the dish on a larger serving plate.
- Serve fresh thyme, crackers and a knife/spoon to help with scooping.
Mini Baked Brie Bites
Make these when you want to pull out all the stops! Baked brie en croute, the fancy French way of saying brie baked in pastry, is probably going to be one of the best bites you ever put in your mouth. Flaky, buttery puff pastry wrapped around gooey warm brie, and a tiny bit of sweetness from honey or jam. HEAVEN.Mini Baked Brie Bites
Make these when you want to pull out all the stops!
- 1 sheet puff pastry (thawed)
- 6 mini brie
- 3 tbsp jam (jam of choice, or honey)
- 1 large egg
Heat the oven to 400°F. Gently roll out the puff pastry to a 12x12 square, then cut into 9 equal squares. Place a teaspoon of jam or honey onto each square, then top each square with a mini brie bite.
Wrap the dough around the brie bite, pressing to secure. Flip the bites over so the smooth side is on top.
Lightly beat the egg with 1 tbsp water then brush the tops of the pastry with the egg. Score the tops with a sharp knife.
Bake for 20-25 minutes or until golden brown and cooked through. Let cool slightly and enjoy!
I Am... 9 Best Thanksgiving Leftover Recipes
Here are 9 of my favorite Thanksgiving leftover recipes turned into bestovers. The best part of Thanksgiving is the leftovers because you can enjoy all the food without any of the cooking! But, if you’re so inclined, sometimes, the things you can make with the leftovers is better than Thanksgiving dinner. Think: turkey noodle soups, the best sandwiches, deep fried croquettes, and turkey curry. I’m getting hungry just thinking about it!
Must try Thanksgiving leftover recipes
Potato turkey pot pie
It’s like a shepherd’s pie but make it turkey! Creamy béchamel, turkey, carrots, and peas tucked under a mashed potato blanket.Thanksgiving croquettes
All the best parts of a turkey dinner, mixed up and deep fried to perfection! Dip them in cranberry sauce for bonus points.Turkey rice bowl
You know that super viral Tiktok salmon rice bowl? Why not try it with turkey? Instead of leftover salmon, shred some leftover turkey and breakout the seaweed snacks!Noodle-based Thanksgiving leftover recipes
Turkey spaghetti
This super creamy, hearty, and comforting baked spaghetti is on my list this year. It’s chicken spaghetti, but with turkey and it’s so, so good.Turkey curry udon
Japanese curry is such a comfort food vibe! Creamy, thick, and so satisfying, especially with udon noodles.Turkey BBH
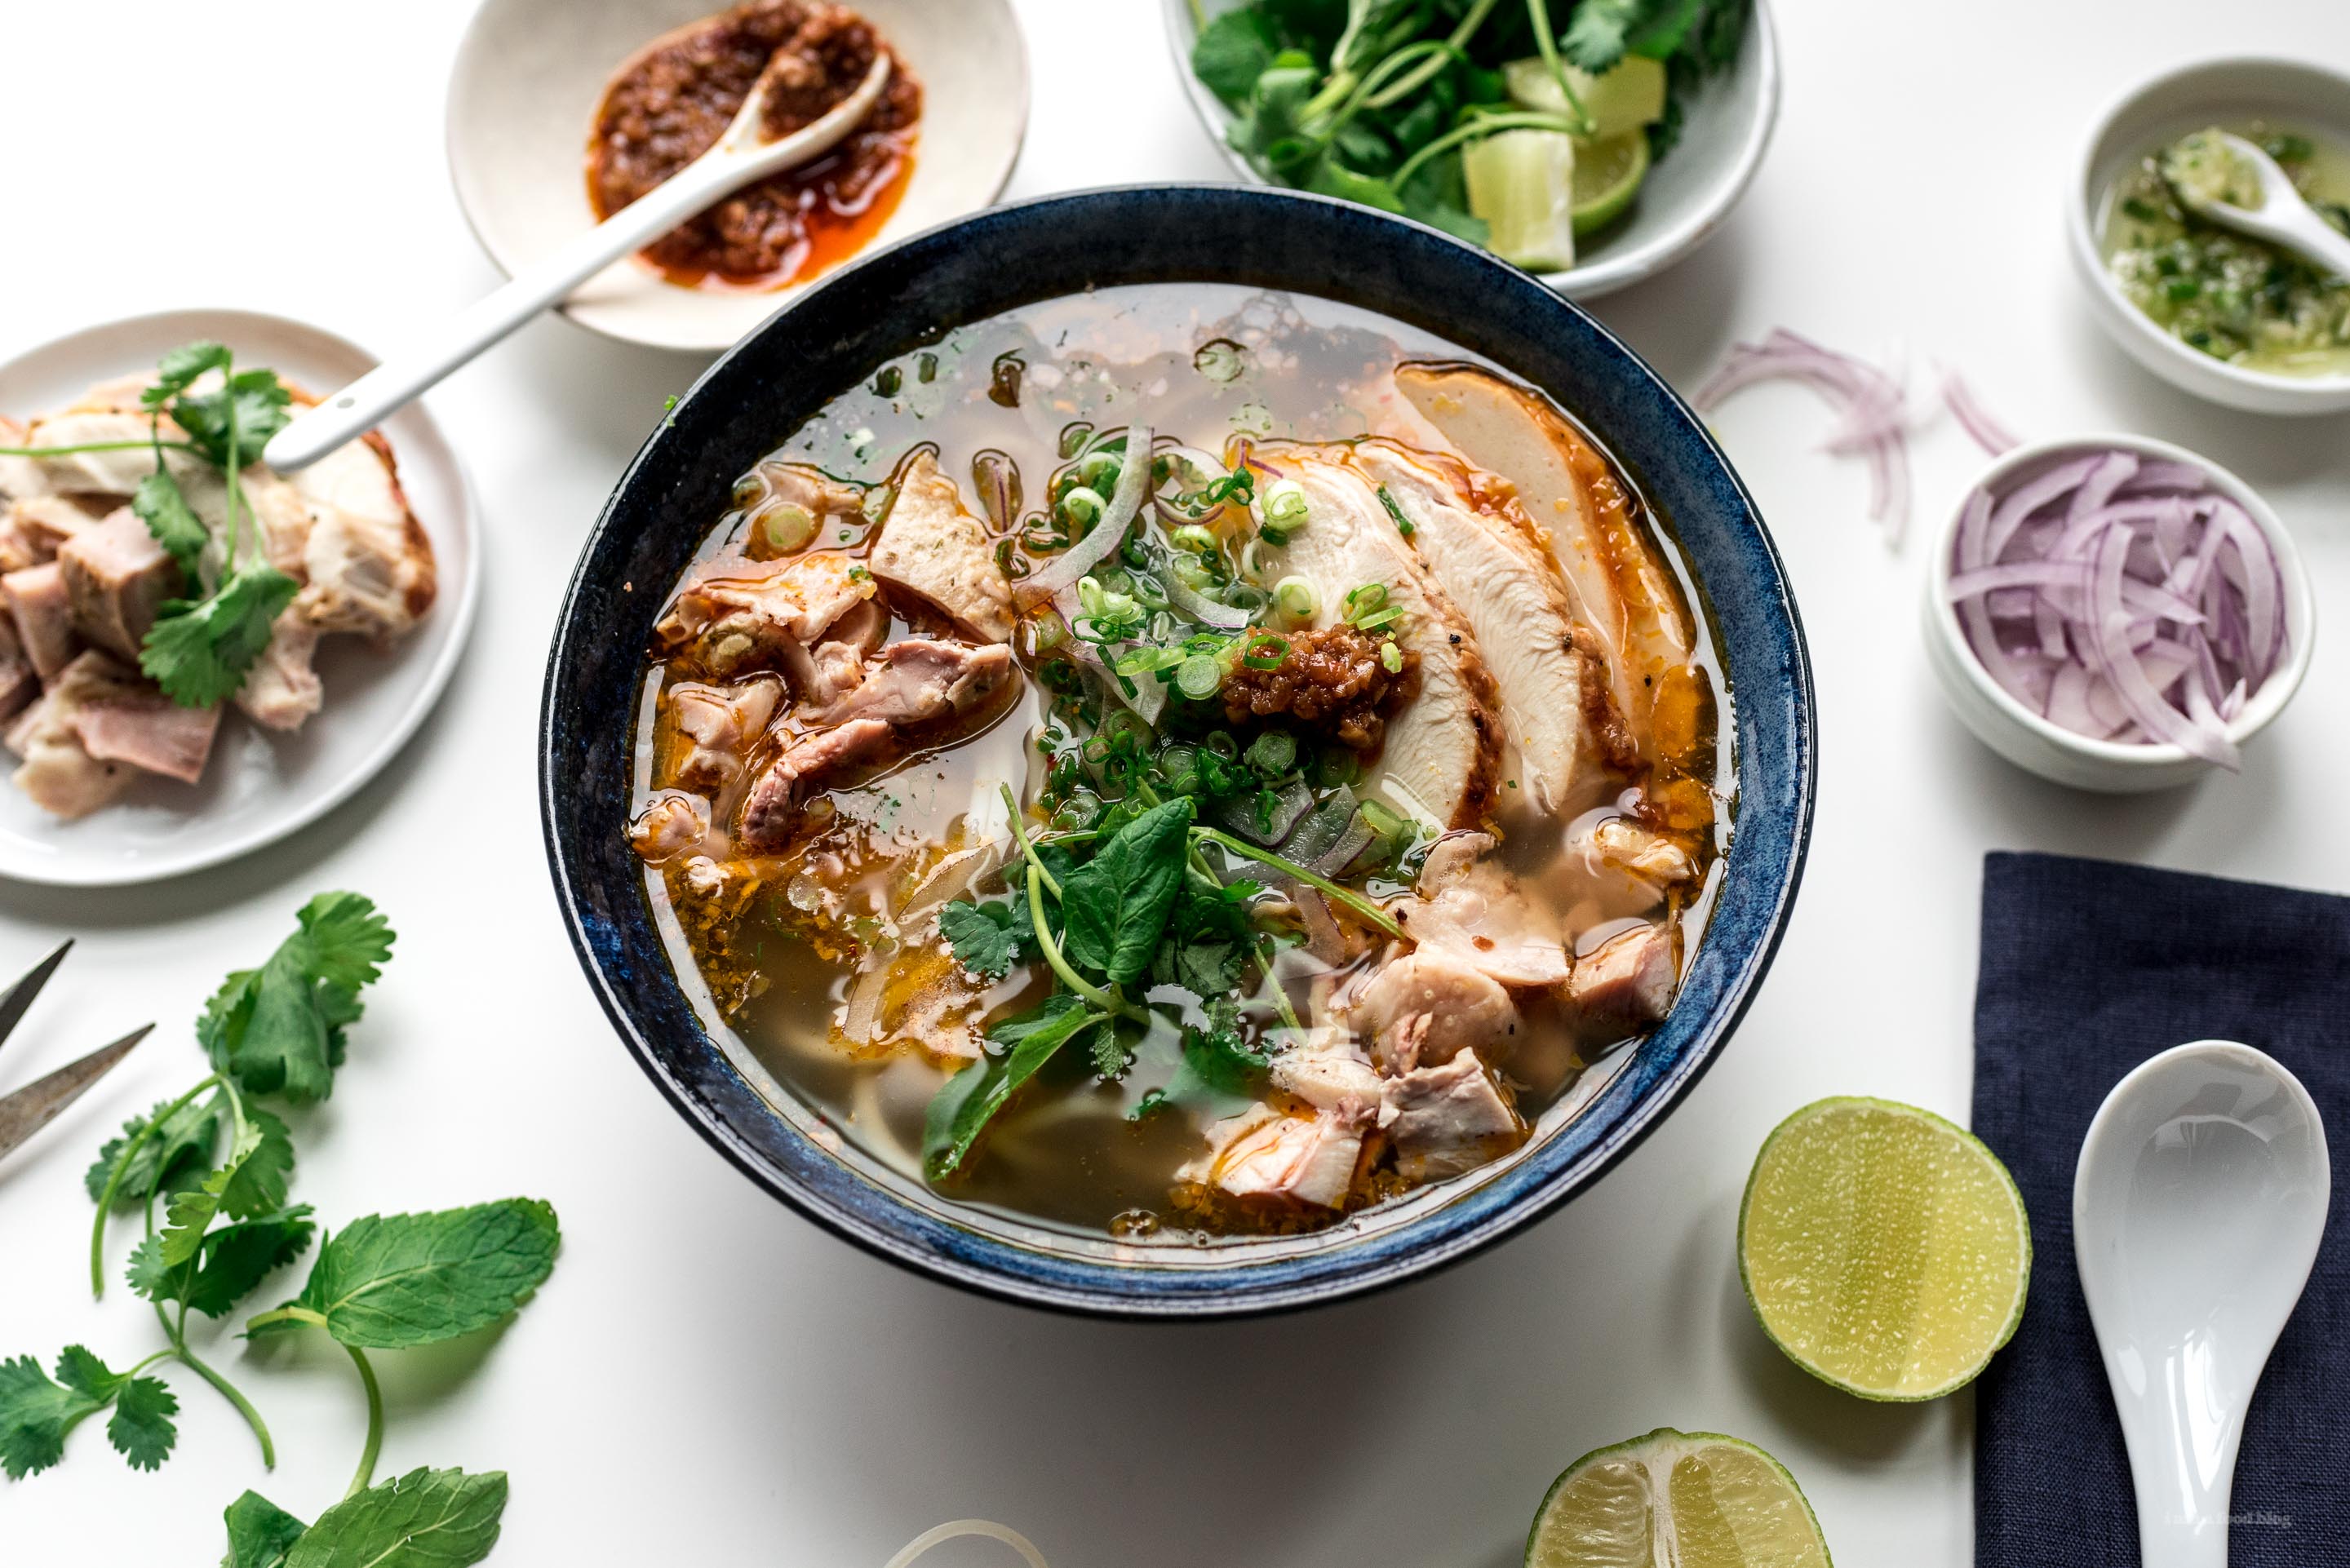
If you know Vietnamese food you know bun bo hue, the spicy Hue style beef noodle soup. Make it with turkey, it’s so incredibly flavorful and delicious!Asian Inspired Thanksgiving leftover recipes
Turkey fried rice
Fried rice forever and ever right?! Just make this egg fried rice and toss leftover cubed up turkey in. Seriously good.Turkey banh mi
A Vietnamese sub with turkey, crispy sunny side up eggs, cilantro, jalapeños, cucumbers, and carrots.Turkey yakiudon
Fancy up your yakiudon with turkey. Super simple, just substitute the pork for turkey and slurp away. Read More →
I Am... The Best Parker House Rolls
Pillow-y soft, light as air, chewy, and garlicky Parker House rolls are my dream bread. They’re so buttery, bread-y, and delicious. Recently, Mike and I went on a trip to Montreal. We stopped for dinner after a very long walk at McKiernan, a sister restaurant to the very famous Joe Beef. They had fresh baked-to-order garlic Parker House rolls on the menu and even though we ordered a huge amount of food, I couldn’t resist. They were a revelation. It was the single most delicious bun I’ve ever put in my mouth. They came with four and if I’m being honest, I ate all four except a tiny bite that Mike tried. I loved them. It was my first time trying Parker House rolls and I am obsessed. So, I’ve been making rolls now for about 3 weeks straight and this is my best version. So fluffy and dreamy. Sinking your teeth into a warm bun brushed with garlic butter and finished with a sprinkle of flaky sea salt is maybe the best thing ever? It’s definitely a must have on our Thanksgiving
But wait, what are Parker House Rolls?
Parker House come from the Parker House Hotel in Boston. They are buttery, soft, sweet, and have a crisp top. They’re not really round rolls like we see today, instead they’re ovals folded over with a pocket of butter inside. I didn’t shape these buns in the classic Parker House way and I didn’t leave them plain either. Instead I’ve slathered them in garlic butter because garlic. You’ll love these rolls. They’re buttery, soft, pillow-y and a bread lovers dream come true. And they’re simple to make too!How to make garlicky Parker House rolls
- Start by buttering a baking pan. This recipe makes 9-12 rolls so you can go with an 8x8 or a 7x11 inch pan. The butter is going to coat the bottoms of the rolls and make them extra delicious.
- Melt the butter in the milk and stir in the honey.
- In the bowl of a stand mixer (or a large bowl), stir together yeast, flour, and salt.
- Make an indent in the flour then add the milk mixture and 1 egg plus 1 egg yolk. Knead with the dough hook (or by hand) until smooth.
- Lightly butter a large bowl, form the dough into a ball, cover, and let rise for 1 hour or until doubled.
- Divide the dough into 9 or 12 equal pieces then shape into balls and place them in the buttered pan. Cover and let rise until doubled, about 1 hour.
- Brush them with the remaining egg white and bake. While they’re baking make the garlic butter by adding minced garlic to butter and heating it over low heat. Stir in some freshly chopped parsley.
- When the rolls come out, brush them generously with the garlic butter and enjoy warm!
Tips and Tricks
- These taste best fresh and warm but you can easily keep them in an air tight container or sealed bag at room temp for a couple of days.
- Warm them up again, wrapped in foil in a low 200°F oven to make them extra tasty the next day.
- A sprinkle of flaky sea salt adds prettiness and crunch.
- If you don’t have instant yeast you can use active dry yeast, just add the yeast to the warm milk and let bloom before stirring in the butter and honey.
- These rolls are perfect for making ahead, more on that below!
Make ahead Parker House rolls
If you want to make these the day before, just follow the recipe up until they’re shaped. Put the rolls in the pan, cover them tightly, and place them in the fridge to rise slowly overnight. When ready to bake, let them rest on the countertop for 30 minutes, then bake as directed. You can also go ahead and bake the rolls and save them already baked. Just cool completely and keep in an air tight container. Pop the rolls back into an oven safe container, wrap them in foil and warm in a 200°F oven for 10 minutes and serve with softened butter. Happy rolling! I hope these bring you as much joy as they brought me. I made 3 batches in 3 days! xoxo stephGarlic Parker House Rolls
- 1 cup milk
- 7 tbsp butter (plus extra for buttering the pan)
- 3 tbsp honey
- 1 large egg
- 1 large egg yolk
- 3 1/3 cup flour
- 1 tsp salt
- 3 tsp rapid rise instant yeast
- 4 cloves garlic (minced)
- 1 tbsp fresh flat leaf parsley (finely chopped)
- flaky sea salt (as desired)
Lightly butter an 8x8 or 11 x 7 inch baking dish or pan and set aside.
In a small pot, warm the milk and 3 tbsp butter over medium low heat until the butter melts. Stir in the honey.
Add the yeast, flour and salt to the bowl of a stand mixer. Add the milk mixture, 1 egg and 1 egg yolk. Use the dough hook and knead for 7-10 minutes or until smooth and elastic. The dough will be slightly tacky.
Lightly rub a large bowl with some butter. Shape the dough into a ball and transfer the dough to the bowl. Cover and let rise until doubled, about 1 hour. It will be soft and slightly sticky.
Punch the dough dough and divide it into 9 or 12 equal pieces. If you want to be precise, use your kitchen scale to see how much your dough weighs, then divide by 9 or 12.
Roll the dough into balls, stretching, and pinching and tucking into balls with smooth tops. Place them in the buttered pan, cover and let rise until doubled and puffy, about 1 hour.
Heat the oven to 350°F. Brush the tops of the rolls with the remaining egg white mixed with 1 teaspoon water. Bake until golden brown and cooked through, about 20-25 minutes.
While the buns are baking, make the garlic butter by melting the remaining 4 tbsp butter, along with the garlic over low heat in a small sauce pan. When melted, stir in the parsley.
Once the buns come out of the oven, immediately brush the tops with the garlic butter and finish with flaky sea salt. Enjoy warm!

I Am... The Ultimate Kale Salad
I have been living on this kale salad. It’s so pretty and festive and it just gets me in my fall feels. It has all the textures and flavors and is full of healthy stuff! It’s the perfect side for Thanksgiving or any special fall/winter meal. Heck, I eat it as a meal in itself all the time.
Why this kale salad is the best
I love how you can make this salad ahead of time, with dressing, and it just gets better and better. The kale and shredded Brussels sprouts stay hearty and hold up to the dressing and nothing wilts or gets limp and sad. The apples add a bit of sweetness and crunch, the cucumbers add crisp cool freshness, the carrots add color, and the sliced almonds are the nutty kiss on top. Even better is when you add chicken breast and roasted squash. Seriously, so good!The dressing
The dressing is a really simple but addictive mix of Japanese rice vinegar, soy, mirin, a touch of sugar and toasted sesame oil. It’s light and tangy and full of umami. It lets the salad ingredients shine while still bringing the flavor.What kind of kale for salad
My favorite kind of kale for kale salad is Tuscan kale, also known as dinosaur kale or Lacianto kale. It’s flat and a deep, dark green. It’s thinner and more tender than the classic curly kale you see and it tastes amazing raw. You can also use curly kale for this salad, but dinosaur kale is my kale of choice.How to prep kale
- Wash the kale and throughly dry.
- Use a pairing knife to cut out the center stems or simply tear the leaves off the stem. The stems are tough - you can discard them.
- Roll the leaves up into a tight roll and slice thinly, into ribbons.
- Your kale is ready for salad!
How to shave brussels sprouts for salad
I love brussels sprouts in salad - they’re just like tiny cabbages. To shred sprouts, easily, wash, trim the ends off, cut them in half, place them cut side down on the cutting board and thinly slice cross-wise to create shaved sprouts.How to make kale salad
- Make the dressing in a bowl or liquid measuring cup. Sometimes I like to use my milk frother to really emulsify the dressing.
- Toss together all the ingredients in a large bowl, but save some apples, cucumber, carrots, and almonds for garnish.
- Dress the salad according to taste - you might not need all the dressing. I tend to dress my salads on the lighter side, I usually make a half portion of dressing. This salad is all about you so dress accordingly!
- Finish up by garnishing the top of the salad with the reserved toppings and enjoy!
What to serve alongside kale salad
I like this salad as a meal but it makes an excellent side dish for proteins such as:- weeknight steak
- Italian style pork chops
- slow roasted salmon
- honey garlic mustard chicken thighs
- crispy oven baked tofu
- honeynut squash
The Ultimate Kale Salad
This kale salad is all the fall feels.
- 1/4 cup rice vinegar (Japanese preferred)
- 2 tbsp soy sauce
- 2 tbsp mirin
- 2 tbsp neutral oil
- 1 tbsp sugar
- 1 tbsp toasted sesame oil
- 2 bunches kale (thinly shredded, approx 8 cups, dinosaur/tuscan/lacinato preferred)
- 1 lb Brussels sprouts (shredded, approx 6 cups)
- 1 cucumber (sliced)
- 1 apple (cut into matchsticks, Fuji preferred)
- 1 carrot (shredded)
- 1/4 cup sliced almonds
- roasted chicken breast (sliced, optional)
- roasted squash (cubed, optional)
In a liquid measuring cup or bowl, whisk together the dressing ingredients, taste, and adjust.
Toss together the shredded kale, sprouts, cucumber, fuji apple, and carrots in a large bowl. Dress evenly to taste and top with sliced almonds.
Optionally top with roasted chicken breast and roasted squash! Enjoy!

I Am... Air Fryer Squash
If you love roasted squash it’s time to turn to the air fryer because roasted air fryer squash is AMAZING. Super crisp and tender squash in just a fraction of the time it takes to do in the oven.
It's gourd season!
Come fall, I’m all about the squash. It’s so hearty, delicious, filling, and nutritious. My favorite of all the fall/winter squashes are delicata and honeynut. But I also LOVE kabocha, butternut, buttercup, and acorn. I recently just tried red kuri, a small squash that looks kind of like pumpkin. All the squashes are just so perfect, especially when roasted in the air fryer. They turn golden brown, perfectly caramelized, sweet, salty, with the best buttery texture. It’s a must have fall dish. If I’m being honest, it’s an anytime of the year dish for me but when squash is in season, it’s definitely a daily thing. This is my go to roasted squash recipe. It’s super easy, with only 4 ingredients: squash, olive oil, salt and pepper. The prep takes hardly any time at all and it’s good enough to enjoy on its own, as a side dish, or in other recipes. Meal prep a bunch of roasted squash at the beginning of the week and you’ll have deliciousness on hand for days.How to prep squash
This depends on which squash you choose. Technically, all squash skin is edible. Still, that doesn’t mean that all squash skin tastes amazing. Sometimes the textural difference between the skin and the squash is too much. Generally, I tend to peel butternut and kabocha because their skins are a little tough. Honeynut, acorn, and delicata have tender, easy to chew skin so you don’t need to peel them. If you need to peel your squash, the easiest way is to use a vegetable peeler.How to cut squash
Get a large, heavy knife and a solid cutting board and chop off the stem then slice the squash in half, vertically. If the squash is super hard, you can pop it in the microwave for 1-2 minutes, which will soften it slightly. Use a spoon to scoop out the seeds and any pulp and then dice or slice the squash into evenly sized pieces.How to air fry squash
- Toss the cut squash with a generous drizzle of olive oil and salt and freshly ground pepper.
- Add the squash to the air fryer basket and air fry at 400°F for 12-15 minutes or until crisp and golden brown, shaking halfway.
- Let cool slightly and enjoy!
How long to air fry squash
I find that 12-15 minutes at 400°F is perfect! The high heat caramelizes the outsides and the timing is perfect for soft and tender insides.What air fryer do you have?
If you’re wondering which kind of air-fryer we have, it’s this style. It’s quiet and easy to clean and fairly wide. We love it.How to use roasted squash
Golden brown, caramelized air fried squash is delicious on its own or as a simple, hearty side dish. If you have any extra on had, there are tons of ways to use roasted squash. Here are some of my favorites:- in salads
- blended, in soups
- blended as dips
- in curries
- in omelettes
- with quiche or frittatas
- in savory tarts
- in tacos, burritos, or quesadillas
- with pasta (especially mac and cheese!)
- on pizza
- on toast
Air Fryer Squash
Super crisp and tender squash in just a fraction of the time it takes to do in the oven.
- air fryer
- 1 medium squash (eg. delicata, honeynut, butternut, buttercup, kabocha, red kuri, acorn)
- 1-2 tbsp olive oil
- salt and freshly ground pepper
Wash and dry your squash. If desired, peel. Then trim, de-seed, and cube your squash.
Toss with a generous drizzle of olive oil and season with salt and freshly ground pepper.
Add the squash to the insert of the air fryer and air fry for 12- 15 mins at 400°F, shaking halfway, or until tender and golden brown. Enjoy!

I Am... Yaki Imo: Roasted Japanese Sweet Potatoes
Baked Japanese sweet potatoes are the best sweet potato you’ll ever eat: nutrious, creamy, and sweet.
What is yaki imo?
Yaki imo is a baked Japanese sweet potato! Yaki imo translates to baked (or roasted) potato. Most people in Japan, when they’re referring to yaki imo, they’re talking about Satsuma imo, which are Japanese sweet potatoes, named after the Satsuma region on Kyushu island. Satsuma imo have dusty pinkish-purple skin and pale cream insides. When they’re roasted, the insides turn a beautiful golden yellow. They’re quite a bit smaller than your usual orange sweet potatoes. If you’ve seen the sweet potato emoji, you know exactly what a satsuma imo looks like: 🍠 . They’re super sweet and delicious, incredible and satisfying.What is the best way to cook a Japanese sweet potato?
Baking! It’s the absolute best way: the subtle sweet and toasty aroma that will fill your house is absolutely irresistible.Types of sweet potatoes
In Japan, there are hundreds of varieties of Satsuma imo, each with different sweetness levels, textures, and skins. Here in North America, the sweet potatoes we usually see are orange skinned sweet potatoes. Orange sweet potatoes are completely different, both in looks, taste, and texture. Japanese sweet potatoes start out their lives with pale creamy insides that turns golden after being cooked. They’re also a lot starchier, fluffier, and a bit more dry than orange sweet potatoes. When you bake them, their incredible sweetness caramelizes and condenses into a slightly, sweet, soft texture.Where to buy Japanese sweet potatoes
They sell Japanese variety sweet potatoes at Asian grocery stores, Whole Foods, Trader Joe’s, and farmer’s markets. Sometimes speciality stores will actually import in potatoes that have been grown in Japan, but usually what you’ll find are the Japanese variety of sweet potato that’s been grown in North America. If you have the chance and see imported Japanese sweet potatoes that have been grown in Kagoshima, please get them! I just did a side by side taste test and they are SO MUCH BETTER. Creamier, softer, sweeter, and more custard-y. I found imported Kagoshima Honey Potato Beniharuka and they were amazing. They were labeled as small and were very slender. I would have preferred the medium size, but even having access to Japanese grown potatoes is amazing so I’m not complaining! Pro tip: If you live near an Asian grocery store such as H-Mart or a Japanese grocery store, they may sell yaki imo. They keep roasted sweet potatoes in brown bags in a heated box and sell them as snacks. If you don’t have time to roast your own, you can grab some ready to go.How to choose good sweet potatoes
Choose firm, smooth skinned potatoes that are dense and not too big. The smaller potatoes are sweeter and have the bonus of not taking as long to bake!How to store
Keep your raw sweet potatoes in a cool, dry, dark space for up to 4 weeks.How to bake Japanese sweet potatoes
Making yaki imo at home is incredibly easy: simply bake and allow the starch in the potatoes to break down and caramelize, becoming soft and sweet. Start off by scrubbing and drying your sweet potatoes. If desired, use a fork to lightly poke a couple of holes in the potatoes. Place them on a wire rack and bake in the oven, naked and without foil, until the skins are crisp and the insides are very tender and soft.Baking at different temperatures will give you different potato textures.
325°F. Bake for 1-1.5 hours depending on size for a super sweet fluffy cake-like texture. 375°F. Bake for 1-1.15 hours depending on size for a super sweet tender custard inside and crisp caramelized outside. I personally like baking at 375° which makes the outsides super crisp and caramelized with a very tender, very sweet, buttery dessert, custard-like texture.Stove top yaki imo
If you don’t have an oven, you can also make yaki imo on the stove top. Place the sweet potatoes in a cast iron pan and cover the potatoes and cook over low, turning every 20 minutes until they’re soft and cooked through, about 1 hour and 15 minutes.Nutritional information and health benefits
Japanese sweet potatoes are super healthy complex carbs. They’ll fuel you with energy and keep you full because they’re high in dietary fiber. They’re also rich in Vitamin A, C, and B6. Because they’re so satisfying, they make a great snack, side, or main.How to eat yaki imo
Just like that! Enjoy them warm out of the oven after they’ve rested a bit. You can hold them, peel the skin, and eat them, or you can eat the skins too. Sometimes I like to use a spoon to scoop out the insides then eat the crispy skin at the end when I’m done scooping out the creamy middles. Seriously SO GOOD.How to store cooked roasted sweet potatoes
If you have any extra yaki imo left over, wrap them up and place them in air tight container in the fridge. You can enjoy them straight from the fridge or reheat them in the microwave for a warm potato. I love yaki imo so much. We’ve even been to Kagoshima, where satsuma imo are from to enjoy super local sweet potatoes. I love them so much that I have a favorite yaki imo shop in Ginza. It’s called Tsubo Yaki-imo. They sell Japanese sweet potatoes that roast in traditional pots. They are absolutely amazing. Lots of people buy them for omiyage and their imo is one of the things I miss most about Japan. If you love Japanese sweet potatoes and are ever in Tokyo, please go! Until travel opens again, I hope you find some Japanese sweet potatoes and roast them at home. You’ll love them, trust me!The Best Yaki Imo Recipe
The best sweet potato you’ll ever eat: nutrious, creamy, and sweet.
- 6 Japanese sweet potatoes
Heat the oven to 325°F or 375°F depending on sweet potato texture preference. Wash and dry the Japanese sweet potatoes. Lightly prick the surface with a fork, if desired. I find that the potatoes don’t need it.
325°F for 1-1.5 hours depending on size for a super sweet fluffy cake-like texture or 375°F for 1-1.15 hours depending on size for a super sweet tender custard-y inside and crisp caramelized outside.
Let rest for 10 minutes then enjoy warm! You can either peel the skins and eat the insides or you can enjoy the skins too.

I Am... 10 Best Simmer Pot Recipes
We are deep into cozy season and I am here for it with 10 of my best simmer pot recipes. What is a simmer pot you ask?! It’s the absolute best way to make your home smell warm and inviting. All you do is bring a small pot of fruit and spices to a simmer – your house will fill with the most amazing smells.
Cottage core
Give me all the cottage core feels because in another life I would definitely be living out in the woods, wearing a long flowy dress with my chickens happy outside. Of course all my food would come from my garden and everything would be just so. Freshly baked sourdough and soup would be on the menu and everything would smell amazing because of my simmer pot! Ever since fall hit, I’ve been doing a different simmer pot everyday and it’s been so nice! It really adds something to the feels of home and having a pot simmering and steaming on the stove is so cozy. Usually I drive Mike nuts with lighting expensive candles, but I haven’t been giving in to my candle addiction as much because I’ve been all about the simmer pots.What is a simmer pot?
A simmer pot is an alternative to scented candles, completely all natural and beautiful smelling. All you do is simmer a pot of spices on the stove and your home fills up with the smells of a cozy fall day. Things like cinnamon sticks, apples, oranges, cloves, vanilla, star anise, and nutmeg makes it feel like you have the sweetest smelling home ever.What can I use for a simmer pot?
Anything you love the smell of! You can use whole fruits or you can save your fruit peels in the freezer until you have enough. Warming spices smell amazing and vanilla is a delicious touch.How to make a simmer pot
Fill a small saucepan with water and add your simmer pot ingredients, bring to a boil, then turn the heat down to a simmer. Add water every 30 minutes or so. The beauty of simmer pots is that they are an art, not a science. You don’t need definitely recipes and your house will still smell amazing. I’ve included my favorite combinations below!Crock pot simmer pot
If you don’t want to use your stove, you can easily use your slow cooker on low or simmer. Just fill it most of the way up, add the ingredients, turn the heat up until it stems, then turn the heat down.Apple cinnamon
- apples, cut in half, sliced or just peels
- 1-2 sticks cinnamon
- 2 tsp vanilla extract
Lemon bar
- 1 lemon, cut in half, sliced, or just peels
- 1 knob fresh ginger
- 2 tsp almond extract
Citrus vanilla
- 1 lemon, cut in half, sliced, or just peels
- 1 orange, cut in half, sliced, or just peels
- 2 tsp vanilla extract
Cranberry orange
- 1/2 cup fresh cranberries
- 1 orange, cut in half, sliced, or just peels
- 1 cinnamon stick
- 2 springs fresh rosemary
Pumpkin spice simmer pot
- pumpkin peels (if you have them)
- 2 sticks cinnamon
- 1 whole nutmeg
- 1 knob fresh ginger
- 5-6 whole cloves
Chai spice
- 1 knob fresh ginger
- 2 tsp fennel seeds
- 5 whole cardamom pods
- 5 whole cloves
- 1 stick cinnamon
- 2 star anise
- 1 tsp whole black peppercorns
Gingerbread
- 1 knob fresh ginger
- 1-2 sticks cinnamon
- 5 whole cloves
- 1 whole nutmeg
- 5 whole cardamom pods
- 2 whole star anise
Christmas clementine
- clementines, sliced in half (or clementine peels)
- cedar sprigs
- bay leaves
- fresh rosemary
Festive forest
- cedar sprigs
- spruce sprigs
- eucalyptus sprigs
Warm woods
- cedar sprigs
- pear, sliced or halved
- smoked wood chips (you can find these at outdoor/garden stores)
Simmer Pot Recipe
A simmer pot is the absolute best way to make your home smell warm and inviting.
- 1-2 cups aromatics
- 2-3 cups water
Add the simmer pot ingredient into a pot filled with 2-3 cups water. Heat over low heat until steaming and simmering. Add water when the water level gets low.
Enjoy the warming, cozy smells!

I Am... Dalgona Candy
You only need 2 ingredients to make the iconic Dalgona candy from Squid Game! I can’t remember the last time I had a birthday party but if I did one right now, it would definitely be a Squid Game themed party, minus the dying. We would compete for the money of course! One of the most iconic games in Squid Game was the dalgona candy game and I just had to make some for me and Mike to try. Spoiler, I lost, guess I’m ded LOL.
What is dalgona candy?
If dalgona candy sounds familiar it’s probably because you might have heard of the viral dalgona coffee sensation last year? Everyone and their grandmas made it! Dalgona candy is an old school Korean honeycomb candy that’s similar to seafoam or honeycomb toffee or the inside of a Crunchie bar. It’s sweet and crunchy and delicious. In Korea, street vendors sell dalgona (also known as ppopgi) stamped with shapes. If you manage to eat around the candy keeping the shape intact, sometimes they give you a free candy! Of course in Squid Game it’s much more deadly.How make dalgona candy?
Making dalgona is super easy, basically you melt sugar and mix in a bit of baking soda so it foams up. It ends up looking like whipped coffee, which is where dalgona coffee got the name from. After you stir in the baking soda and it foams up, you pour it out, stamp in a shape and let it cool.Ingredients
- sugar - sugar, when you heat it up, it turns a lovely golden caramel. You can use white or brown sugar, up to you! Brown sugar will come out much darker.
- baking soda - this is what makes the caramel foamy. Make sure you use baking SODA, not baking powder.
Dalgona tools
- stainless steel ladle
- wooden chopstick
- parchment paper
- a metal flat surface - I used the back of a metal round tin, you can also use a flat metal spatula, or even better, these okonomiyaki spatulas
- cookie cutters
Tips and tricks
I made so many of these, super frustrated that my dalgona kept sticking to the bottom of my flat metal tin. All the recipes on the internet said that you just need to wait 30-40 seconds before pressing but after lifting, the tops would just come off. Finally I decided to lightly oil and sugar the bottom of the tin and YAY, no sticking. I really recommend it if you’re having trouble. Here are some other tips and tricks I learned along the way.- Make sure you have all the tools and ingredients on hand: sugar, baking soda, lightly oiled and sugared flat metal surface, a parchment paper or silicon lined baking sheet, a metal spatula, a wooden chopstick, and the cookie cutters.
- You don’t need to stir the sugar too much, especially at first. Let it melt along the edges and the sides until it’s clear and melty, then start stirring. If you stir too early it will take forever for you to melt your sugar.
- Don’t add too much baking soda. It’ll make the candy bitter and it won’t taste good. You only need a very tiny pinch. Just make sure you stir it in really well and it will aerate and puff up the sugar.
- Let the candy cool a tiny bit before pressing it down or it will stick and you will be sad, like me. But even better, lightly oil and sugar the surface and you won’t have any problems with sticking.
- If you’re planning on making more than one (I made so many so I could get them perfect!), bring a pot of water to a boil then turn it off. After you pour out the candy, you can carefully add the ladle to the hot water and the excess candy will just melt right off. Just be careful because it will sizzle and expel a lot of heat.
- To get perfectly round dalgona candy, don’t worry about getting every little bit of candy out. Just use the chopstick to gently help the candy fall out into a blob. I tried using a rubber spatula to try to scrape everything out and ended up with blobs instead of circles.
Dalgona Candy
The iconic candy from Squid Game
- 1 tbsp sugar
- 1 small pinch baking soda
Gather all your tools and ingredients. Lightly oil and sugar a flat metal spatula. Add the sugar to the stainless steel ladle and hold over medium low heat.
Let the sugar melt along the edges until it’s clear, then stir with a wooden chopstick, until the sugar is melted and starts to caramelize. The sugar should be clear and lightly amber.
Move the ladle off the heat and stir in the baking soda, quickly until it starts to foam and turn a light caramel color. Move the ladle between on and off the heat to keep it warm.
Pour the candy onto a parchment paper lined baking sheet.
Let cool for 10-20 seconds and then press with the sugared spatula to the desired thickness.
Stamp with a cookie cutter part of the way through. Let cool until firm and crunch and enjoy!

I Am... Crispy Rice
I am absolutely in love with crispy rice. It’s beloved around the the world: the saffron yellow socarrat of Spanish paella, the golden crispiness of Persian tahdig, and the best parts of Korean hot stone bowl dolsot bibimbap. Crispy rice has the most aromatic toasty nuttiness and I can’t get enough. Sometimes when I make rice on the stove, I let the bottom get scorched a little just so I can have a little treat. I love it so much that whenever I see a crispy rice dish when we go out to eat, I have to have it. It’s pretty common on Korean or Japanese menus: a little crispy rice nugget topped off with spicy tuna or salmon with a pile of kimchi or thinly sliced scallions. It’s the best bite: savory and nutty from the crispy rice, fresh from the fish, a bit spicy, and full of flavor and texture.
What is crispy rice?
Crispy rice is a little crispy rice cake made from fresh or leftover rice. You can use plain rice, but it tastes even better if you season it as sushi rice. Press the rice into a pan and chill it overnight and the next day, you cut the rice into little cakes and fry them until crisp on the outside and tender on the inside. You can snack on the crispy rice cakes as is or top them off with a myriad of toppings!Tiktok crispy rice
Crispy rice has been trending all over Tiktok and I am here for it. There are so many Tiktoks of people making gorgeous little crispy rice cakes. Some people use leftover rice, some people make rice fresh, some of them deep fry, some shallow fry, basically anything goes in the crispy rice world. I’m not sure who trended first with crispy rice but for me, I based this recipe off of the spicy tuna volcano at Gyu Kaku, a Japanese BBQ place. The spicy tuna volcano is heap of spicy tuna on crispy fried rice and it’s so good. I always order it when we go. Tiktok inspired me to make my own at home!Crispy rice ingredients
All you need is:- rice - the best rice to use is short grain Japanese rice. That’s what they use to make sushi. We usually buy a bag of Koshihikari, which is a popular type of rice variety from Japan. Koshihikari is soft, moist, fluffy, a tiny bit nutty and sweet. It has amazing texture and flavor.
- rice vinegar - go for unseasoned rice vinegar because we’re going to season to taste with sugar and salt. They sell rice vinegar in the Asian aisle at most grocery stores. We usually buy Kikkoman or Marukan unseasoned rice vinegar.
- sugar - there’s a bit of sugar in sushi vinegar, it adds sweetness and rounds out the rice vinegar.
- salt - one of the three components of sushi vinegar.
- oil - you’ll need a bit of neutral oil to fry the rice cakes. I like using canola, rice bran, or grapeseed. You don’t need much, we’re not deep frying, just shallow frying.
- toppings - you can enjoy your crispy rice cakes plain (I do it all the time, dipped in spicy mayo!) or you can top it with whatever your heart desires. I included some inspiration down below.
How to make crispy rice
First off you need to make rice, preferably short grain rice! I like to make rice on the stove. Here’s how I do it:- Wash and rinse one cup of rice until the water runs clear.
- Add the rice and one and a quarter cup water to a pot with a lid. Bring everything to a boil over high heat and when it’s bubbling rapidly, turn the heat down and put the lid on.
- Let it cook on low, covered, without peeking, for 17 minutes.
- When the time is up, leave the lid on for the rice to steam for 10 minutes.
- When the 10 minutes are up, fluff up the rice.
- After you fluff the rice, pour the sushi vinegar over it and use a spatula or rice paddle to fold the vinegar into the rice.
- Press the sushi rice into a baking pan, cover and place in the fridge overnight.
- The next day, take the rice out of the pan and use a sharp knife to slice into 2 x 3/4 inch slices. Now you’re ready to crisp them up!
To pan fry
Heat up a generous amount of oil in a pan over medium heat. Add the rice cakes and fry until golden and crispy, flipping once.To air fry
Lightly coat the rice cakes with oil and air fry at 400°F for 15 minutes, flipping halfway through.To bake
Heat the oven to 475°F. Lay down a sheet of aluminum foil and lightly brush with neutral oil. Lightly coat the rice cakes with neutral oil and bake, flipping once, until crisp and lightly golden, 15-20 minutes.Tips and tricks
- Don’t skip out on seasoning the rice! Plain rice will definitely work for this, but seasoned sushi rice is better.
- Speaking of rice, if you have it, use short grain Japanese rice. Our favorite rice is Koshihikari.
- Lightly wet your hands or spatula when pressing the rice into the pan so it doesn’t stick.
- It’s tempting to just pop the rice into the fridge, give it an hour, and slice it up, but if wait until it solidifies overnight, you’ll end up with a much more neatly sliced rice cake.
- Take your time and crisp the rice until golden and crispy. It’s tempting to turn up the heat but low and slow is the way to go.
Crispy rice toppings
Go wild! Essentially you’re making a crispy sushi rice cake so anything that you’ve had on sushi will taste amazing. Try:- sashimi grade tuna or salmon diced and mixed with kewpie mayo, sriracha, and fish eggs
- crab, avocado, kewpie mayo
- miso baked eggplant
- miso tuna salad
- Japanese egg salad
- if you’re vegan, sub the tuna or salmon with cubes of tomato
Crispy Rice
How to make gorgeous, nutty, satisfying crispy rice cakes topped with spicy tuna or salmon.
- 1 cup short grain rice (preferably Koshihikari)
- 2 tbsp rice vinegar
- 1 tbsp sugar
- 1 tsp salt
- 1 lb tuna (sushi grade, or salmon)
- 1/4 cup kewpie mayo
- 1 tbsp sriracha
- 2 tsp soy sauce
- 1 tsp toasted sesame oil
- 1 avocado (sliced)
- 1-2 jalapeños (sliced)
- toasted sesame seeds (as needed)
Place the sushi rice in a colander, rinse throughly and let drain for 15 minutes. Cook rice according to the package instructions or your preference.
While the rice is cooking, mix together the rice vinegar, sugar, and salt, until the sugar and salt dissolves.
Transfer the rice to a large bowl and fluff. Sprinkle on the sushi vinegar and use a rice paddle to fold the sushi vinegar into the rice.
Line a baking tray with parchment paper or plastic wrap. Spread the rice out, pressing it down, until it is about 3/4 inch high. Cover and let cool in the fridge overnight.
The next day, make the spicy tuna and prep the toppings. Cut the tuna into small pieces. Combine the tuna with the kewpie mayo, sriracha, soy sauce, and toasted sesame oil. Keep cold in the fridge.
Take the rice out of the fridge and slice into 2 inch by 3/4 inch pieces. Heat up a generous amount of oil in a pan and heat it up over medium heat.
Add the rice cakes and fry until golden and crispy, flipping once. Drain on a wire rack.
Top the crispy rice with slices of avocado, the spicy tuna, a slice of jalapeño, and a sprinkle of toasted sesame seeds. Enjoy!
