I Am... The ultimate guide to pho at home
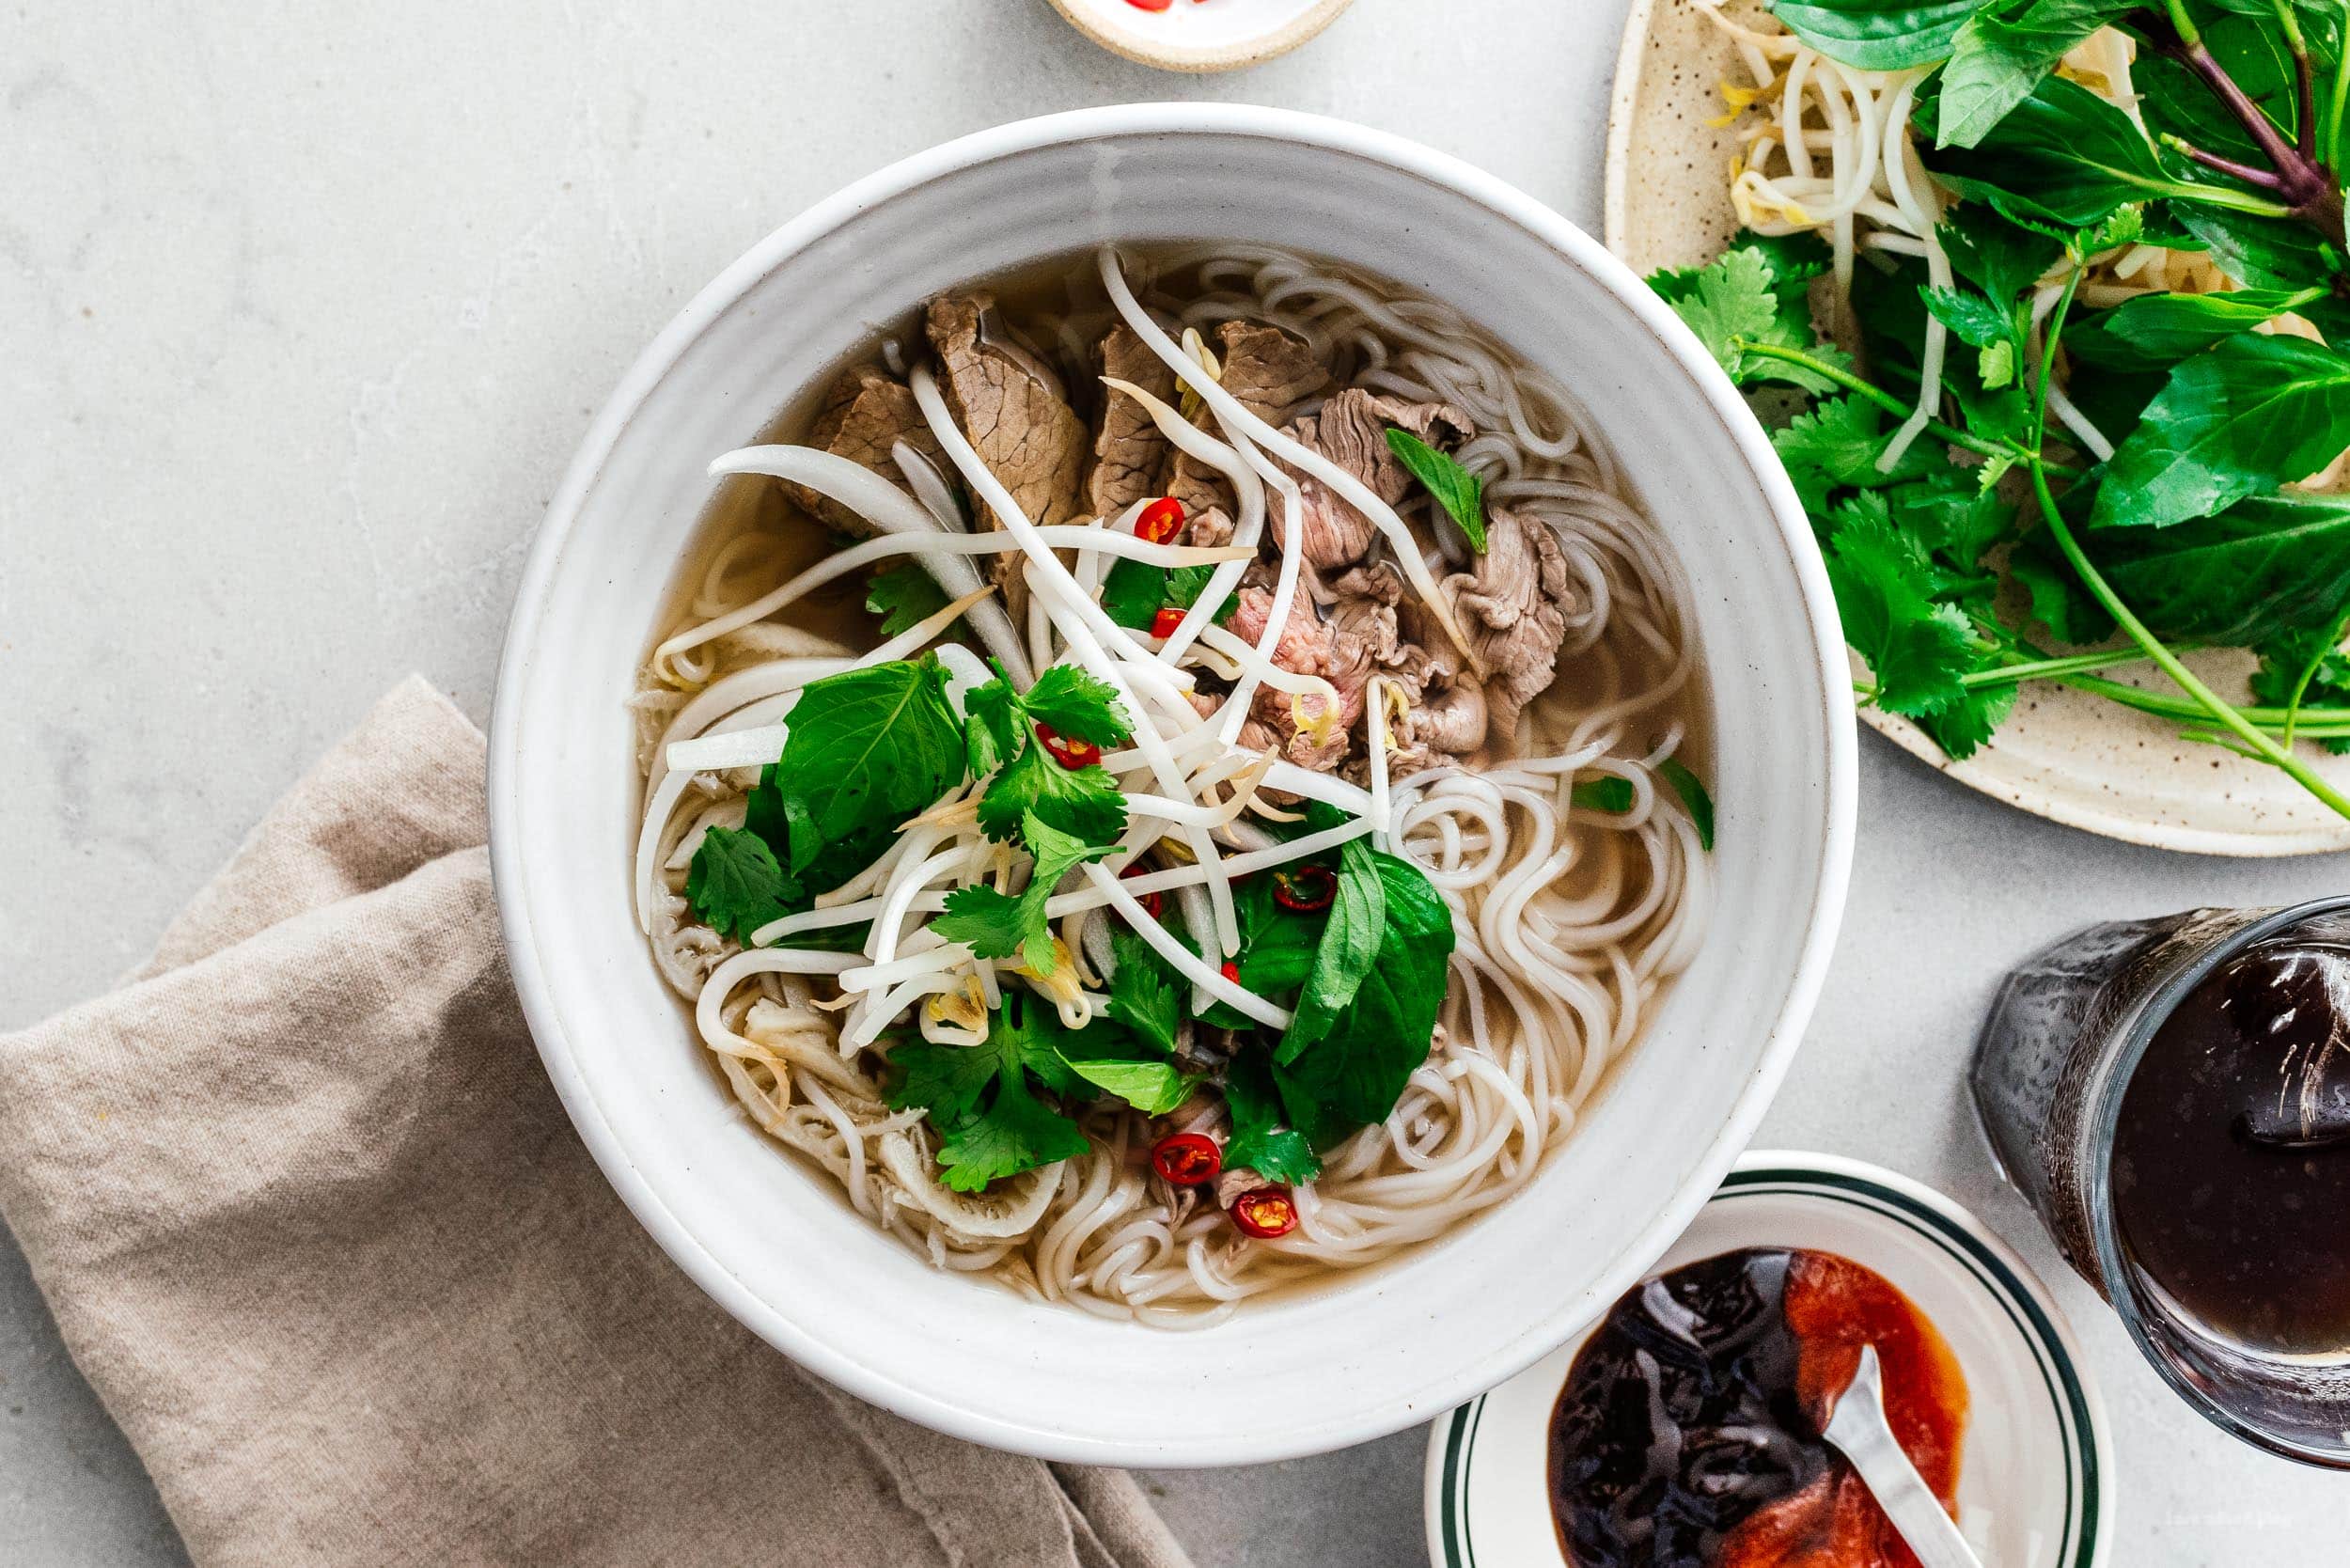
This is the best bowl of pho I know how to make over 20 years of making pho from scratch. You know pho needs no introduction. The deeply spiced fragrant broth is the stuff dreams are made of. The bouncy rice noodles, tender fresh beef, and bright poppy herbs and that gentle hint of lime, it's all I need in life (other than Steph).
What is pho?
Pho is a cozy, beefy, aggressively spiced soup that is also light, fresh, and bright at the same time. The simple combination of fresh rare steak, melty brisket, tender rice noodles, and that magical soup comes together to rival anything out of a Michelin starred restaurant, usually under $15 (sigh, the days of a $5 bowl are sadly long gone). If you want to know everything about pho, you can read this 3000 word ode to pho, but I think it's better just to jump right into making it.Why this pho recipe?
This recipe includes all the little tips and tricks I’ve picked through 20 years of making pho. It includes key points such as:- Throwing your spices in at the end to preserve their subtle flavor.
- Drying out your rice noodles so they soak up extra flavor.
- Separating out the process over two days for ultimate tastiness and relaxation.
The two day version
When you want to go all out, optionally separating your pho making over two days gives the best results. On day 1, you make the pho and strain it into a container, then refrigerate the soup and the brisket separately. On the morning of the next day, the fat will have solidified on the top of the soup. Remove the fat and melt it down over low heat in a small pot, then strain it into a small container and refrigerate. Rinse/slice the toppings, wrap them up, and throw them in the fridge too. Finally, half an hour to an hour before you want to eat, reheat the pho soup and season it to taste. Make the noodles and let them hang out in a colander to dry out a bit. Neatly slice your cold brisket and drop the slices in the soup to reheat. Thinly slice your steak if you didn’t buy it presliced. Then just build your bowls, adding the fat back in if desired, and go to town.Oxtail makes the best pho soup
Over the years I’ve tried everything that can make a good soup, and when I want to go all out, I splurge on oxtail. It has the perfect combination of collagen for body, fat for taste, and of course, beefiness for beefiness. It’s a little on the expensive side but totally, 100% worth it. I long for the days when oxtail was cheap and unknown. When we live in the desert and it’s hard to get oxtail, marrow/soup bones are great. But oxtail is by far the best option for the best pho soup. Note: After you are done with the oxtail, the meat is a little tasteless but very tender and falls right off the bone - remove and enjoy it with some soy sauce or fish sauce as a chef’s treat, or serve it, it's up to you!How to make pho soup
- Blanch the oxtails. Rapidly boil the bones for 5 minutes to clear out any impurities that might be there. Tip: I like to use a small pot to blanch the meat faster while heating up my 8 cups of water in a larger pot simultaneously. That way, I can just use tongs to transfer the bones from the small pot to the big pot without a lot of effort, and it saves time because you’re heating up both pots at the same time, and also because then you don’t need to wash a giant pot; the little one just goes in the dishwasher.
- Char the onions and ginger. I use a blowtorch exclusively for this. You can char them in a pan on the stove or under the oven broiler, but a good blowtorch is a super essential kitchen tool that’s not very expensive, and bonus, you can make creme brulee.
- Simmer the oxtails, onions, and ginger as low as possible for 3.5 hours. I’ve tried this at 3 hours and 4 hours, and 3.5 hours is the right amount of time. You’re looking for something super low, like 1 bubble every 30 seconds low. Preferably put a slightly ajar lid on it. Check back at the 1.5 hour mark to make sure you have at least enough water to cover the bones.
- Char the other spices. This is an optional step that I always do. You don’t need a lot of time, just a brief kiss with the blowtorch. If you don’t have a blowtorch, toast the spices over low heat until they become fragrant.
- Drop the brisket and spices in at the 3.5 hour mark and continue simmering for another 2 hours.
- And you’re done. You’ll need to season it with fish sauce, salt, and sugar, but I save that for the second day.
Stovetop vs Crockpot vs Instant Pot
- Can you make this with a crockpot? Yes! You can do everything in a crockpot if you skip the blanching step since you’re straining it at the end anyway. Skip the blanching step and do everything else in a crockpot on high/low (as appropriate) and you’ll have the best crockpot pho ever.
- What about the instant pot? Also yes! The instant pot is one of my preferred ways to make pho when I want something simple, although, full disclosure: it’s not as good as the stovetop/crockpot version. Since the instant pot is about speed, you can just drop everything on high pressure for 40 minutes, and you’ll have some amazing (and amazingly fast) pho.
Ingredients for pho
While pho is easy to make, technique-wise, it can be a little daunting to gather all the ingredients. If it’s your first time, the spices can even seem a little much, but the spices are good for many, many bowls of pho, as well as many other awesome dishes.Oxtail
This is the key to the most amazing pho. It used to be super cheap back in the day. As it became more popular in recent years, it’s also gotten more expensive, but it’s 100% worth it. After you’re done making the pho soup, the meat falls right off the bone. I don’t usually include it in the pho because it’s not as aesthetically clean as all the sliced meats, but if you wanted to, you totally could. Have it with a little Thai chili crushed into some soy sauce as a reward for all that work you did.Brisket
If you want your brisket to be 100% fall apart in your mouth, cook it for 4 or even the whole 5.5 hours. Personally, i like mine to have a little body (the rare steak provides the softness anyway) so I only cook it for 2 hours, which both gives it structure and leaves most of the taste where it belongs, in the brisket. You probably don’t need a large brisket - the recipe calls for just 1/4lb per person - so if a large brisket is all you can find, switch it out for an equally as traditional flank steak.Sirloin
This is the traditional rare steak that is the basis of pho tai, the default (and amazing) pho bowl you get everywhere. It’s a tender fall-apart melt-in-your-month affair that’s raw when it comes to you on the table, both to show off the quality of the meat and to let you finish the cooking so that its as perfect as possible. Tip: If the thought of serving raw steak to your diners (or yourself) turns you off, cook it in the soup on the stove for 5 seconds or so, then serve it on a separate dish so it doesn’t overcook in the hot pho soup. Ask your butcher to slice this, or buy hot-pot ready meats.Spices & Aromatics
In order of importance, my pho spice mix is: star anise, cinnamon, cloves, coriander seeds, white (or black) peppercorns, cardamom, fennel, and cumin. You’ll also need onion and ginger.Toppings
Toppings take a great noodle soup to the next level. For pho, we use lime wedges for brightness, fresh or blanched bean sprouts fior earthiness, fresh cilantro, sliced onions, fresh Thai basil, and jalapenos or thai chilis if you like spice.Pho noodles: dried or fresh?
Pho isn’t pho without rice noodles. As with almost all noodles, fresh pho noodles are best, but the dried stuff works too. Sometimes the noodles will be called rice stick or Thai rice stick noodles. For me, medium thickness is best. Unlike with ramen or other noodle-intensive dishes, the rice noodles are super forgiving. In fact, it’s better if you make them in advance. Briefly blanch the noodles about halfway to your desired softness, then drain and rinse them in cold water and let them dry out while you do other things. Letting the noodles sit and dry out seems counterintuitive since you just cooked them, but it’s the secret to flavorful noodles as they absorb the pho soup as they rehydrate.Assembling your pho
If you’ve never served multiple bowls of noodle soup simultaneously before, it can be a little complicated. Here's how to do it with the least amount of stress or fuss possible. You need large deep bowls that can fit 3 cups of liquid in them.- Heat your bowls by filling them with hot tap water for at least 2-3 minutes, then drain. Heating up your bowls ensures that the soup absorbs the heat of the bowl, instead of the other way around.
- Boil a pot of water for the noodles. In another pot over very low heat, warm up your pho soup .
- Cook your noodles half of the time indicated, then rinse them in cold water and drain. Divide evenly into each bowl.
- Prep the toppings: rinse and dry the bean sprouts, thai basil, and cilantro. Slice the onions and limes and plate everything. Put the bottles of sriracha and hoisin sauce on table.
- Slice your meats. The brisket should be 1/8” thick or so. Throw it in with the pho soup once it’s been sliced to warm it up. Slice the steak if you didn’t get that done for you at the shop, then divide both the steak and brisket evenly between each bowl.
- Once everyone is ready to eat, ladle the now piping hot soup over the raw beef in each bowl, then deliver to the tables.
- Eat as soon as possible, as loudly as possible, with as many toppings as possible.
Pho Recipe
An intensely cozy and beefy beef noodle soup.
- blowtorch
Pho Soup
- 1 lb oxtail
- 1/2 medium onion (charred)
- 2 oz ginger (halved lengthwise and charred, about 3")
- 8 cups water
Pho Spice Mix
- 5 star anise
- 1 cinnamon stick
- 1/2 tsp cloves
- 1/2 tsp coriander seeds
- 1/2 tsp peppercorns (white preferred)
- 5 cardamom pods
- 1/2 tsp fennel seeds
- 1/2 tsp whole cumin seeds
Assembly
- 1 lb brisket
- 1 lb sirloin (thinly sliced)
- 2 tbsp fish sauce
- 2 tbsp sugar (or to taste)
- 1-3 tsp sea salt (or to taste)
- 4 portions fresh pho noodles (or dried)
Toppings for Pho
- 4 lime wedges
- 1 cup bean sprouts (raw or blanched)
- 4 springs Thai Basil
- 4 springs cilantro
- 1/2 medium onion (thinly sliced)
Day 1
Bring a small pot of water to the boil and blanch the oxtails for 5 minutes. Bring a second, larger pot with 8 cups of water to a boil.
Transfer the oxtails to the second pot along with the charred onion, charred ginger, and 8 cups of water. Simmer on low for 3.5 hours.
Char pho spice mix, then add to the pho soup along with the brisket and continue simmering for another 2 hours (5.5 hours total)
Transfer the brisket to its own container, then strain and separate the pho soup. Refrigerate both.
Day 2
Skim the solidified fat from the pho soup with a fork and melt over low heat, then strain and refrigerate in a new small container. Prepare pho toppings as needed, cover and refrigerate.
When you are ready to serve
Combine the pho soup with enough water to make 8 cups, then season with fish sauce, sugar, and salt, if needed. I like 1 tsp of fine sea salt, but you should feel that your pho is on the verge of being too salty to compensate for the unsalted meat and noodles. Bring the soup to a low simmer. Slice the cold brisket and drop into the soup to reheat.
Bring a large pot of water to the boil and cook the noodles halfway, then rinse in cold water and drain. Heat up the bowls with hot tap water for 5 minutes, the drain. Divide the pho noodles evenly between bowls.
Slice sirloin if necessary, then divide between bowls along with brisket.
Ladle pho broth overtop, serve and enjoy immediately with many toppings.
See post for more detailed 2 day, instant pot, and crockpot instructions.

I Am... 8 Keto Starbucks Drinks for Fall
If you’re anything like me, you’re totally susceptible to all those pumpkin spice latte ads you’ve been seeing. But what about keto?! Here are some keto Starbucks options for all my keep peeps out there.
Read More →
I Am... Sausage Gravy
Sausage gravy and flaky buttermilk biscuits are the best breakfast out there - fight me! I still remember the first time I had sausage gravy. It was a revelation: creamy, thick super savory gravy studded with bits of well browned breakfast sausage smothering the perfect biscuit. It was at Pine State Biscuits in Portland way back when they first opened. I was absolutely hooked. From then on, it was sausage gravy or nothing. As someone who didn’t grow up in the South, I don’t have a family recipe. I didn’t grow up eating it and I’m not set in my sausage gravy ways. In my eyes, this is a good thing. I’ve been able to try countless sausage gravies throughout my adult life without being blinded by a childhood ideal of what it should be. I’m an impartial judge without any biases on whether it should contain milk or cream or bacon fat or cayenne pepper. I just want my gravy to taste good. After countless tests, this is my best sausage gravy. I think you’ll like it too!
What is sausage gravy
Sausage gravy is a traditional Southern American breakfast dish, typically served with biscuits. First, pork sausage is browned, then mixed with flour to create a roux. The cooked roux and sausage combine with milk to make a thick, pourable gravy that’s usually seasoned with lots of freshly ground black pepper, and that's it! Sausage gravy usually comes with flaky buttermilk biscuits.How to make sausage gravy
This is one of the easiest gravies to make!- Brown the sausage. Remove the breakfast sausage from the casing and brown in a skillet over medium high heat, breaking up the pieces into small bits.
- Add a bit of fat. Melt butter into the cooked sausage.
- Make a roux. Sprinkle on flour and stir, cooking the flour with the sausage fat and butter into a roux, which will thicken the gravy.
- Stir in milk. While whisking, slowly stir in the milk.
- Thicken. Let the gravy bubble and thicken.
- Enjoy. Season with plenty of freshly ground black pepper and enjoy!
Best sausages to use
Sausage gravy is typically made from breakfast sausage, which is fresh ground pork mixed with herbs and spices. Breakfast sausage comes in links, patties, or even loose. Besides your standard breakfast sausage seasoned with salt, black pepper, and sage, they also come in a multitude of flavors, including maple syrup, brown sugar, and spicy. You can go ahead and buy your favorite breakfast sausage from the store or you can make your own breakfast sausage mix using ground pork and spices.Can you make your own sausage
Yes! All you need to do is brown 1 lb of ground pork with 1 tbsp fresh chopped sage, 1 tsp fresh chopped thyme, 1 tsp crushed fennel seeds, and a pinch of nutmeg. Season to to taste with salt and pepper. If you like your breakfast sausage sweet, add a drizzle of maple syrup or a bit of brown sugar.Milk or cream
I like using milk but lots of people use cream or a mix of milk and cream. I find using cream makes the gravy a bit too thick and rich. The perfect sausage gravy isn’t too thick and whole milk is the best choice!Tips for the best sausage gravy
- Use a potato masher to crumble up the sausage into small bits as it cooks.
- You don’t have to buy sausage, you can make your own!
- Whole milk is going to give you the creamiest, most luxurious gravy.
- You can make it ahead of time and keep it in the fridge. To reheat, simply warm over medium on the stove in a pan, loosening with a splash of milk, if needed.
- Freshly cracked black pepper is absolutely needed, it adds that spicy, fresh aroma that is crucial to sausage gravy.
- Try some crispy fresh sage leaves to really amp up the flavor.
Pairings
- Biscuits of course!
- If you’ve ever tried steak with this, you know it’s amazing
- Mashed potatoes smothered with gravy is out of this world
- For a sweet-n-savory combo, try it on french toast with a drizzle of maple syrup - SO GOOD.
And if you’re wondering what to serve with biscuits and gravy, I’ve got you:
- Twisted bacon - try it, you’ll never eat bacon any other way
- Crispy fried eggs because what is breakfast if you don’t have eggs
- The best roastie potatoes so you can pour gravy on them
Sausage Gravy
Sausage gravy and flaky buttermilk biscuits are the best breakfast out there - fight me!
- 1 lb breakfast sausage
- 1 tbsp butter
- 1/4 cup all purpose flour
- 1 tsp garlic powder
- 1 tsp onion powder
- 2 1/4 cup whole milk
Remove the breakfast sausage from the casing and brown in a skillet over medium high heat, until browned and cooked through. Use a potato masher or a wooden spoon to break it up into little pieces. When the sausage is brown, melt the butter into the sausage then evenly sprinkle on the flour, garlic powder, and onion powder.
Stir in the flour and spices and cook over medium heat, until the flour is lightly toasted and cooked through 1-2 minutes.
Slowly stream in the milk while whisking and let come to a simmer to thicken. When thick, season with plenty of freshly ground black pepper. Enjoy!
Pro tip: Crisp up some sage for a little bit of extra love
Heat up a bit of oil or butter over medium heat and add whole sage leaves and fry, flipping as needed, until crisp, 15-20 seconds depending on size. Crumble into your sausage gravy or serve whole on top.

I Am... Panko Breadcrumbs Guide
If you love crunchy foods and you don’t know about the wonderful world of panko, your life is about to change!
What is panko?
Panko are Japanese breadcrumbs made from crustless white bread. They’re vastly different from regular breadcrumbs - fluffier and larger. The irregular flakes are what make Japanese tonkatsu so crunchy. Its drier and flakier consistency absorbs less oil which means lighter, crunchier fried foods. It's a big deal in Japan. Dedicated factories bake bread to different specifications just for panko. You can get fresh or dried versions in many different sized flakes. They even have different ways of baking the bread, either oven baked or electrically baked using currents. Many restaurants have fresh panko delivered daily. No panko, no life.What is panko made from?
It's made from a specific type of Japanese bread called shokupan (shown above), which literally means “eating bread” and can be thought of as “daily bread” or “regular bread.” Japanese shokupan is fluffy and soft, mild, and slightly sweet. Some say it is the best bread in the world and it inspires long lineups in Japan to get the best stuff.What’s the difference between panko and bread crumbs?
- Regular bread crumbs are made from all kinds of bread which have been torn with the crusts still on. Panko is made from crustless white bread, which makes it finer, flakier and evenly white.
- Breadcrumbs come seasoned. Panko is plain.
- Breadcrumbs are smaller and rounder. Panko is large flakes and shards.
Fresh (nama) panko/生パン粉
This kind has a light and super crispy texture. Fresh panko has the most moisture because the bread hasn’t been dried or toasted, and it's fluffier and more voluminous because it hasn’t been dried out. If you live in Japan you can buy the fresh stuff at bakeries and the grocery store, and no matter where you are, if you’re making it at home, you’re making nama panko!Dried (kansa) panko/乾燥パン粉
You use dried panko for breading or binding (like in meatballs). It’s the more common kind that you’ll find packaged in grocery stores.Flake sizes
- Large flakes: Used to give food a thicker, more voluminous coating.
- Medium flakes: The standard one.
- Small flakes: Mostly use for small ingredients and also items that have high moisture content - small flakes give you more coverage than large.
Where to buy
It's sold in most grocery stores in the Asian aisle but it’s cheaper to buy it at an Asian grocery store. You can also get it online. I prefer Japanese brands. With store brands, sometimes you’ll see something labeled panko but it looks like regular breadcrumbs. Check out the package and look for large, irregular, shards that are flat.What aisle would panko bread crumbs be in?
You can find it in the Asian aisle at most grocery stores, usually in a bag or cardboard box.How to make panko breadcrumbs
- Trim the crusts off of white bread.
- Use the grater attachment of your food processor and grate the bread OR let the bread dry out a bit then use a coarse cheese grater to grate the bread.
How to bread anything in a crispy, crunchy coat
- Set up three shallow dishes that are able to fit the items you are breading.
- Put flour in one dish, lightly beaten egg in the next dish, and panko in the last dish.
- Season your items with salt and pepper.
- Using one hand, dip your item in the flour, coating both sides. Shake off the excess flour and place it in the egg.
- Use your other (clean) hand to turn the items in the egg. Shake off any excess egg and place the items in the panko.
- Using the hand you used to flour, flip and press down on the items to coat, being sure to gently adhere the flakes all over. Shake off the excess flakes and you’re ready to cook!
Where to use
You can use it anywhere you would use regular breadcrumbs.- To coat fried food with a light, airy, delicately crisp texture.
- To bind meats, like meatballs or meatloaf.
- As a topping to add crunch to casseroles or pasta, like mac and cheese or Sicilian pasta.
If you’ve fallen in love, please try these recipes:
- Tonkatsu
- Korean corn dogs
- Salisbury steak
- Swedish meatballs
- Cheesy potato balls
- Crispy air fryer chicken strips
- Thanksgiving croquettes
- Cheddar cheese cauliflower tots
- Velveeta mac and cheese (as a crunchy topping!)
How to make panko breadcrumbs
It's probably better to buy the real thing though.
- food processor
- 1 loaf white bread (preferably unsliced)
Trim the crusts off your white bread. If using unsliced bread, cut the bread into manageable 3-4" cubes.
Use the grater attachment of your food processor and grate the bread OR let the bread dry out a bit (15-30 min uncovered) then use a coarse cheese grater to grate the bread.

I Am... The Ultimate Guide to Boba
Everything you need to know about bubble tea, including types, toppings, how to order, and where to get the best boba tea. Nowadays, it seems like you can go anywhere – even small town America – and see at least one shop that sells boba. But, what the heck is boba, where did it come from, and how do you drink it? As a long time boba addict, let me take you into the wonderfully sweet and chewy world of boba! My first taste of boba was in the 90s, just like much of America. Next to the Asian grocery store we visited every weekend was a tiny shop that seemed to pop up overnight. The signs were in a mix of English and Chinese and the nice shop owners explained to everyone curious that boba nai cha (bubble milk tea) was the most popular drink all over Taiwan.
I LOVE boba. Boba runs through my veins.
I mean, not really because the pearls would get stuck, but I love boba tea so much I would have it every single day of my life, twice a day. It’s my go-to treat: creamy and sweet with a fun chew. It comes in so many flavors with so many toppings that I’m pretty sure I could have a new kind every day for a really long time.What does boba tea taste like?
The classic boba milk tea is creamy and sweet with the essence of tea. The pearls are chewy with a tiny bit of mild sweetness. Boba milk tea is comforting and refreshing. If you take your tea with milk and sugar, you have an idea of what boba milk tea tastes like. The pearls add a pleasant chewiness similar to how gummy candies are chewy.What is boba?
Boba is a broad term: it can refer to chewy black tapioca pearls or to a category of drinks sold in a boba tea shop. It’s kind of an umbrella term so you’ll hear people say they’re having boba when they’re having a slushy fruit drink boba OR a pumped up drink topped with cheese foam and oreos. Essentially, people use boba as a catch all phrase for all the delicious drinks sold in a boba shop. It’s also called boba tea, bubble tea, tapioca milk tea, or pearl milk tea. Originally the bubbles in bubble tea referred to the bubbles in shaken tea and not the pearls at all.Boba milk tea
The most common and standard boba is boba milk tea, which strongly brewed tea mixed with milk and sugar shaken vigorously with ice and served with glossy black tapioca pearls. You get a thick straw so you can suck up the pearls and tea at the same time, simultaneously giving you something you drink and chew.Where is boba from?
Maybe it seems like boba came out of no where, but the truth its, it’s been around since the 80s. Just like other popular foods out there, there are a couple of shops that claim to be the first ever creators of boba tea. Milk tea is not a new thing and chewy tapioca balls aren’t new either - they’ve been around in Asian and South East Asian desserts for a long time. The combination of the two together came together in Taiwan in the 80s. The two shops that claim that they were the first are Chun Shui Tang and Hanlin Tea Room. The rumors go, Chun Shui Tang was already serving cold tea and they were looking for ways to improve sales. The product manager, Lin Hsiu Hui put some tapioca balls into her iced tea and thus boba milk tea was born. It’s not too clear on how Hanlin Tea Room invented boba milk tea but they claim to be the first as well and have been around since the 80s.The tea/base
Boba drinks usually start with a base: either tea or fruit. Teas can range from black, green, oolong, and matcha. Fruits are pretty obvious, they can come as fruit juices or blended up with ice as fruit slush.Milk
To the tea or fruit base, you can add milk, like the ever popular boba milk tea. When boba first came around the milk was a creamy mix of evaporated milk and condensed milk or non-dairy creamer, but now you can get all kinds of milk, depending on how hipster the boba shop you’re visiting. There are places that do soy milk, almond milk, oat milk, almond milk, you name it, if it’s milky, you can probably add it to your boba. The milk section also includes things like yogurt or yogurt drinks like Yakult.Boba tea flavors
There are a plethora of flavors added to boba via syrups, powders, or fresh ingredients. Some common flavors are: taro, coconut, almond, black sesame, melon, ovaltine, chocolate, mango, lychee, matcha, and the list goes on. Each boba tea shop will have it’s own list of curated flavors.Toppings
The name toppings is kind of a misnomer because the toppings actually sink down into the bottom of your cup, but most boba shops refer to their mix-ins as toppings. You can get as many toppings as you like, making boba drinks infinitely customizable. Most toppings have a pleasant chewiness or “QQ” which means bouncy, chewy, and satisfying.Pearls
The most popular and common topping for bubble tea. Balls of tapioca boil and simmer until chewy and tender, then soak in either brown sugar, sugar, or honey. They are subtly sweet, chewy, and absolute perfection when done right. All boba shops cook their pearls daily because they harden and don’t last overnight or in the fridge.Coconut or lychee jelly
Coconut jelly or nata de coco is coconut water set with gelatin. It comes in little clear rectangles and is a touch more crunchy rather than chewy. Sometimes they flavor the jelly with lychee and boom, it’s lychee jelly. Coconut and lychee jelly go great in tropical fruit based teas that don’t have any milk in them.Aloe vera
Aloe vera are clear jellied cubes that are harvested from the gel inside of large aloe vera leaves. They’re loaded with antioxidants and vitamins. Aloe ver is super refreshing, juicy, soft, and jelly-like with QQ. They’re soaked in syrup so they have a bit of sweetness and are they’re great in teas or fruit drinks that don’t have milk.Pudding
This isn’t your regular pudding cup pudding. Instead, think of pudding-like flan or custard. Essentially, it’s a jiggly custard made from eggs, cream, sugar, and gelatin. It’s extra creamy and soft with a bit of texture. You can suck it up through a thick straw and it pairs perfectly with creamy milk teas making them extra luxurious. The standard pudding flavor is vanilla but sometimes they have mango, taro, almond, or black sesame pudding too.Grass jelly
Grass jelly comes made from a plant that’s in the mint family. It’s a bit firm and can come either cut into small cubes or giant soft scoops that are easily sucked up through a straw. Think of it like jello but with a refreshing, slightly sweet, and herbaceous flavor. It goes great with milk tea and coffee based drinks and is lower calorie than boba making it a popular choice.Red bean
Red bean is an incredibly popular dessert flavor in asian desserts and red bean boba is delicious! Adzuki beans simmer until tender with sugar, making them starchy, chewy, and fragrant. They go great in milky teas and matcha based drinks, giving them an earthy, sweet chew.Foams
Foams are relatively new development in the boba world. Whipped foam toppings come in a huge array of flavors and is a fun and fluffy way of adding creaminess to boba. They have things like tiramisu cream, sea salt cream, and cheese tea. The idea is that the foams/whipped toppings are a liquid fluffy mousse or cheesecake that add an extra dimension of texture and flavor.Ice and sugar levels
Boba is all about customization and two of the basic customization questions you’ll get are: ice and sweetness. Boba comes warm/hot, which is perfect in the fall and winter. Ice and sugar can range from full ice/sugar to less ice/sugar. Boba shops usually have a handy little chart for you to look at with the ice and sweetness levels.From sweetest to zero sugar:
Extra sugar Regular sugar Less sugar Half sugar Less sugar No sugarFrom cold to hot:
Extra ice Regular ice Less ice Half ice No ice Warm HotPackaging
After your boba master gets your order, they’ll make your drink according to your customizations and pop everything into a cup, either plastic or paper, depending on the store. The cups are sealed with a paper or plastic film and they give you a thick straw with a pointy tip so you can puncture the lid and get to the goodness. Some shops have switched over to tops that aren’t sealed and have pre-made holes for you to pop straws into. The best way to poke the straw in is to place the cup on a stable surface, position the straw on top of the lid with one hand while using the other hand to firmly push down on the top of the straw. Most boba places have switched to paper straws and you can even get reusable straws made out of metal or glass. Hot drinks are usually served in a typical to-go coffee cup with a spoon so you can scoop out your toppings.What type of boba should I get?
Is this your first time?
If yes: Go for the classic milk tea, cold, with pearls. Choose your ice and sweetness according to your preferences. If no: go to the next question!Hot or cold?
- Hot: Have you had hot bubble tea before? It’s amazing when it’s cold outside! A warm boba is like a cozy hug. Get a roasted milk tea with pearls. Warm pearls will change your life.
- Cold: Try a lychee green tea with aloe vera. It’s super refreshing and SO good.
Do you like tea or fruit?
Tea: Matcha is always a good choice, try it with red beans and a foam/cheese top for a mix of earthy, sweet, creamy goodness. Fruit: Peach mango tea with pearls and coconut jelly for the ultimate in QQ and refreshing flavor.Are you into creamy drinks?
Yes: Try a slush! It’s like a fruit slurpee. Melon or taro are classic choices and they’re both cult favorites and they’re blended and creamy. No: Fruit tea is the way to go. Passionfruit tea with any sort of jelly, especially grass jelly is extra delicious.Do you want toppings?
Yes: If you’re a topping pro, you know what to get. If you’ve had a couple of cups and want to branch out I suggest you try brown sugar boba, aloe vera, or pudding! No: NOOOOOOO you must get toppings, I beg you.Do you like it sweet?
Sweet: I usually go half sweet or less sweet, but if you have a sweet tooth you’ll probably want regular sugar. Not too sweet: Most people get less sweet and below, it’s up to you! You are the master of your boba.How to order boba
Most boba shops have their own way of ordering, but generally, you place your order like this:- Size
- Drink
- Toppings
- Sugar level
- Ice level
- Wait and slurp away!
example: regular roasted rice tea with half pearls/half grass jelly, half sugar, less ice.
Popular boba shops
There are so many world wide chains of boba shops, many from Taiwan, the birthplace of boba. If you want a boba education, try them out. They’re all known for different things and they are all delicious! In no particular order:Chatime
Chatime is one of the largest global tea houses there. They started out in 2005 and they are going strong with their purple topped cups. Their most popular seller is pearl milk tea and it’s an excellent example of a classic boba milk tea: creamy and sweet with soft and chewy pearls. They’re also known for their QQ mix, which is pearls + coconut jelly. Each of their stores will have a top 10 drinks selection which can help you see what’s popular where you live. I personally love their roasted milk with pearls and pudding, half sweet, half ice.Coco Fresh Tea & Juice
Another brand started in Taiwan, Coco Fresh Tea & Juice might be the most well known boba brand around with other 4500 locations worldwide. The have a cute blob as their logo and they’re known for their fresh squeezed juices and fruit teas. They have cloud cream toppings and their combination toppings 2 ladies (pudding and pearls) or 3 guys (pearls, pudding, and grass jelly) are super popular.Gong Cha
Gong Cha, again out of Taiwan, tries to bring a more upscale, high-end feeling to boba. They use premium teas and you can really taste the flavor difference. Gong Cha has locations in the US, Canada, and Australia and they are one of my favorite bubble tea shops. They always have fun seasonal drinks that are incredibly pretty and delicious and their royal milk tea is creamy with a huge fragrant tea flavor. They have a ton of interesting toppings like white pearls, basil seeds, and ai-yu jelly as well as oreo and regular milk foam.Happy Lemon
Happy Lemon focuses on freshly squeezed juices and natural sweeteners. They’re known for their salted cheese foam series which is similar to a liquid cheese cake that’s poured on top of their regular menu items. Their Yakult (Japanese yogurt) drinks are very popular and they also have delicious made to order bubble waffles [https://blitzdealz.info/make-bubble-waffle-ice-cream-cones-at-home-its-the-best-way-to-eat-ice-cream-this-summer/](https://iamafoodblog.com/make-bubble-waffle-ice-cream-cones-at-home-its-the-best-way-to-eat-ice-cream-this-summer/)Tiger Sugar
Tiger Sugar’s signature drink is their brown sugar pearl milk and it’s delicious. You’ve probably seen Tiger Sugar on your Instagram feed because they went viral a couple of years ago and it’s thanks to them that we have the brown sugar boba trend. Brown sugar boba is sweetened with brown sugar and has a deep caramel flavor. The streaks of brown sugar against the cup contrast with milk or tea make it look like tiger stripes. Most boba shops now offer brown sugar boba - give it a try, they have a deeper, more caramel flavor.Boba Guys
An American chain based out of San Francisco, Boba Guys focuses on high quality ingredients. They brew real tea, use local organic milk, and make house made syrups. Boba Guys make their boba in America at their very own pearl factory. They have a boba kit which means even if you don’t live anywhere near a Boba Guys, you can try their boba at home. I love their drinks and whenever I’m near one, I can’t resist. More about Boba Guys here. [caption id="attachment_25906" align="alignnone" width="1450"] Hong Kong Style Milk Tea & Lychee Green Tea from Boba Guys SF[/caption]My go to boba order
My go to order at any new boba shop is their classic milk tea with pearls, half sweet, half ice. It’s an excellent way to judge a shop - if they do it right, then you know that the more interesting creative orders have a chance of being good too. The tea should have a strong essence, the sweetness and ice should be moderate, and the pearls should be slightly warm, bouncy, and chewy.My all time favorite boba that I have had in my life
Chun Shui Tang
These guys are the originators of classic boba milk tea and they are my absolute FAVORITE. They don’t have a lot of overseas locations and the first time I had one was in Japan. There was a long but quick moving line and because I am not the most proficient at Japanese I just got the classic pearl milk tea without any modifications. The tea was just the right amount of sweet and creamy, the ice was crushed and crunchy and the pearls were small and chewy. It was so good. I might have been because I was thirsty and hot but man, that boba just hit different. I haven’t been back to a Chun Shui Tang since because I’m afraid to ruin the memory.Machi machi
This is a super aesthetic Taiwanese tea shop that offers really premium (and expensive) teas. They have a cute series in bottles as well as teas in cups. As I wanted to say that it was a gimmick that was over priced, I REALLY liked them. I had the black milk tea latte with grass jelly and the grass jelly was soft and delicious and the milk tea was not too sweet and had plenty of black tea flavor. The black milk tea with a creme brûlée foam (lite sugar) and gold pearls is my ultimate boba dream drink. Definitely one of my top bobas of all time. The cream be brûlée foam topping was rich and creamy and the tea and the gold pearls matched perfectly. I’m dreaming of one right now.Ben Gong’s Tea
Tiny tea cubes are Ben Gong's signature. Think black tea set with gelatin and cut into tiny cubes. I love their tea cubes and their brown sugar boba but I wish their drinks had a more tea forward flavor. Depending on the order sometimes they’re more milk than tea with milk. I think it depends on the location because some have really good brewed tea and some are lighter in flavor. But when it’s done right, it’s SO GOOD.Chun Fun How
Another one of my favorite tea shops! They have beautiful cups and their drinks are flavorful and the toppings are chewy and fresh. Every drink I’ve tried from them is delicious. Their pearl oolong milk tea is one of the best milk teas I’ve tried. I also LOVE their lychee jade tea with aloe vera. It’s one of their best sellers and it’s refreshing delicate and the little chunks of aloe vera are jelly and QQ. I haven’t tried their sweet potato drinks but that’s next on my list because they’re one of the few shops that does fresh sweet potato.Boba must dos
- Get toppings! The whole point of boba is the toppings. It’s the fun in having something to drink and chew at the same time. If you get boba without any toppings are you even having boba at all? If you’re not a huge fan of pearls at least try a foam topping or salted cheese, they add an extra dimension of flavor.
- Don’t wait too long to drink it. Boba is best fresh. Like right when you get it. Some shops have warm pearls and the contrast between warm pearls and a cold drink is a match made in heaven. Boba doesn’t keep well so don’t even think of getting it in the morning and saving it.
- Half and half cups. Some shops have half and half cups and while they tend to be a bit pricier, it’s a great way to try out two flavors.

I Am... Sunomono Japanese Cucumber Salad
I’ve eaten sunomono every night for the last week. It’s hot out there. So hot maybe I don’t feel like eating? Who am I kidding, I always feel like eating. Especially cucumbers in the summertime. Heck, I love cucumbers anytime. I would even go so far as to say that cucumbers are my favorite vegetable. They’re crunchy, incredibly refreshing, and have a mild green flavor that goes with just about anything. I’ve been eating so much kyuri no sunomono aka Japanese cucumber salad that I think I’m going to turn into a cucumber soon. It’s so cooling, crisp, and refreshing. It’s the perfect accompaniment to any meal and I sometimes just eat it as a meal, it’s that good.
What is sunomono?
Sunomono are vinegar based dishes, kind of like pickles. The “su” in sunomono means vinegar in Japanese, the “no” means belonging to, and “mono” means things. So sunomono is vinegar things! They’re commonly served with Japanese meals, at the start or alongside the meal. The vinegar highlights and accentuates the other flavors in the meal and also whets your appetite. Sunomono are typically tangy, crunchy, and so, so good. It’s light and healthy and just about the perfect thing to eat anytime.How to make sunomono
Sunomono is essentially a light pickle. You make a vinegar based dressing and then toss your vegetables in the dressing then enjoy. It’s super simple and flavorful for a small amount of work.- Make the dressing. In a bow, mix together rice vinegar, mirin, and soy sauce.
- Slice and salt the cucumbers. Thinly slice the cucumbers and salt them to draw some of the moisture out. Rinse, drain well, and lightly squeeze any excess moisture out of the cucumbers.
- Soak the seaweed. Place dried wakame in water to rehydrate then drain well.
- Toss the salad. Toss the cucumbers and wakame with the dressing and finish with toasted sesame seeds.
- Enjoy!
Ingredients
- Cucumbers: go for either mini cucumbers or Persian, they have thin skins and are the perfect combination of crisp and fresh.
- Wakame: wakame is a dried edible seaweed. When rehydrated, it’s briny, slightly salty and tender with a bit of crunch. It’s often used in miso soup or salad.
- Rice vinegar: rice vinegar is delicate, sweet and tangy. It comes in seasoned and unseasoned. The seasoned rice vinegar has a bit of salt and sugar in it. You can use either in this recipe, but if you go with unseasoned, add a tiny bit of salt and sugar to taste. You can find rice vinegar in the Asian aisle or online.
- Mirin: mirin adds a bit of sweetness and depth to the dressing. It’s a Japanese sweet rice wine and a key ingredient in Japanese cooking. They sell mirin in the Asian aisle, at Asian grocery stores, and online.
- Soy sauce: It’s best to use Japanese soy sauce for this dish as it’s a lighter flavor with the right salt profile. We like Yamasa.
- Toasted sesame seeds: Toasted sesame seeds add a bit of crunch and nutty fragrance. It’s the finishing touch!
Which cucumber for Japanese cucumber salad?
The best cucumbers for sunomono are those cute mini cucumbers or Persian cucumbers. Japanese cucumbers tend to be smaller than English, with thinner skins. Garden cucumbers with thick skins and lots of seeds are not what you want. Persian cucumbers are the closest cucumber you can get in North America.To prep cucumbers for cucumber salad:
- Thinly slice. Slice the cucumbers thinly or use a mandoline to make even slices.
- Salt. Sprinkle the sliced cucumbers with salt to draw out excess moisture. Taking out the moisture allows the dressing to absorb into the cucumber making it more flavorful. Let the cucumbers sit for 5 minutes.
- Rinse. After the cucumbers have expelled a bunch of water, give them a rinse.
- Drain. Drain the cucumbers well.
- Squeeze. Lightly squeeze out any excess moisture and your cucumbers are ready to dress. They’ll be crunchy and ready to absorb all the delicious dressing.
Wakame
Wakame is a dried seaweed that’s beloved for it’s taste and texture. It comes sold dried in bags and it’s easy to rehydrate. Just put a small amount into warm water until it feels soft, about 5 minutes. Squeeze out any excess water and it’s ready to use in this salad. It’s also an amazing addition to miso soup.Where to buy wakame
You can find wakame where they keep the seaweed in your local Asian grocery store. They also sell it online.What to serve with sunomono
You can eat this salad on it’s own or serve it along side grilled fish or meats and rice. We like it with salmon or chicken karaage with fluffy Japanese rice.Tips and tricks
- Buy the right cucumbers. You want thin skinned, seedless cucumbers like Persians, which are small, seedless, sweet, and crunchy. They’re extra crisp instead of watery.
- Use a mandoline. If you have awesome knife skills, use them! But if you’re in a hurry and want perfectly sized slices a mandoline is your friend.
- Don’t skip out on the salting step. Salting the cucumbers adds flavor and draws out any extra moisture in the cucumbers. The dressing soaks into the cucumbers better after they’ve been salted.
- Add extra ingredients to customize. Feel free to add in extra items like baby shrimp, tako (octopus) or mung bean noodles.
Sunomono Salad
Cooling, crisp, and refreshing, it’s the perfect accompaniment to any meal.
- 2 tsp rice vinegar
- 2 tsp mirin
- 1 tsp soy sauce (Japanese preferred)
- 2 Persian cucumbers
- salt (to taste)
- toasted sesame seeds (to finish)
Combine the rice vinegar, mirin, and soy sauce in a bowl and set aside.
Thinly slice the cucumbers and sprinkle on 1 tsp salt and toss. Let the cucumbers sit for 5 minutes.
Soak the wakame in a bowl with water.
Rinse the cucumbers and drain very well, gently squeezing out some of the water. Drain the softened wakame and squeeze out any excess water. Mix the cucumber and wakame in a bowl and season with the dressing.
Finish with toasted sesame seeds and enjoy!

I Am... Whipped Lemonade
Whipped lemonade is the new dalgona coffee. It is SO hot outside right now. Give me ALL the cold, iced, blended drinks all summer long. We don’t have air conditioning so I’m all about the cold drinks. My bucket list dream purchase is a nugget ice machine, that’s how much I love iced drinks. I keep seeing whipped lemonade all over the Tok so of course I had to give it a try. Dalgona coffee is so 2020, lemonade is here to stay.
What is whipped lemonade?
Whipped lemonade is a creamy sweet, lemony, and refreshing blended lemonade drink made with lemonade, ice, and cream. I’ve seen two kinds floating around on Tiktok: one made with fresh lemon juice and one made with lemonade powder. Both are DELICIOUS. The fresh juice one has more zing and the powdered version is pure nostalgic flavors. If you like lemon ice cream or frozen lemonade you’ll love whipped lemonade. I’m not sure who the first person who invented it was, but the Tiktok that I’ve seen most people credit is @mtlajeunesse.How to make whipped lemonade
Fresh whipped lemonade
- In a blender, add ice and blend with sweetened condensed milk, fresh lemon juice, and heavy whipping cream until smooth and creamy.
- Pour into a glass and finish with whipped cream and enjoy!
Powdered whipped lemonade
- Use a milk frother to whip up powdered lemonade with heavy cream until super frothy and whipped.
- Shake the whipped mixture with ice and water until combined OR scoop onto a glass of ice water, being sure to stir it in.
- Finish with whipped cream and enjoy!
Ingredients
- Lemon juice - super simple, just squeeze some fresh lemons, being sure to remove the seeds.
- Heavy whipping cream - aka the liquid form of whipped cream. Heavy whipping cream has 36% milk fat and you can use a whisk to whip it up into fluffy whipping cream clouds. It adds body and creaminess to the lemonade.
- Sweetened condensed milk - this’ll add a nice creamy sweetness to the lemonade. It’s also delicious in Vietnamese coffee.
- Ice - any ice will do, blending it will give your lemonade that icy thickness that all frozen drinks have.
- Powdered lemonade - you’ll only need this if you don’t want to go the fresh lemon juice route.
Do I need a blender?
To make this with fresh lemon juice, you’ll need a blender to blend everything into a smooth and icy drink. If you don’t have a blender, you can make powdered whipped lemonade.Do I need a milk frother for the powdered version?
You don’t! Using a milk frother will make it a LOT easier, but you can whip it up by hand with a whisk. I love this milk frother. I use it all the time for dalgona or even whipping up tiny amounts of whipping cream. Time to set up a lemonade stand! Happy lemonade-ing!Whipped Lemonade
Whipped lemonade is a creamy blended lemonade drink that’s sweet, lemony, and refreshing. See notes for an easier version
- blender
- 1.5 cups ice
- 1/4 cup heavy whipping cream
- 1-2 tbsp sweetened condensed milk
- 2 tbsp fresh lemon juice
- whipped cream (to finish, optional)
In a blender, blend the ice, whipping cream, sweetened condensed milk, and lemon juice together until smooth and creamy.
Pour into a glass and finish with whipped cream, if desired. Enjoy!
For an even easier version, try whipping together 1/4 cup cold heavy cream and 2 tbsp lemonade powder until creamy and whipped.
Shake the whipped lemon cream with 1 cup water and 1 cup ice until mixed and frothy OR layer it on top of a glass of ice water and stir it in.
Top with extra whipped cream if desired and enjoy!

I Am... Brioche French Toast
Brioche makes the best French toast: soft and custard-y in the middle and crispy and golden brown on the edges. French toast is the best breakfast out there. It’s the sweetest, fluffiest way to start the day. It aslo happens to be one of the easiest to make breakfasts that looks the most impressive. A giant platter of brioche French toast topped with fruit and syrup is a glorious thing! If you’ve never had brioche French toast before promise me you’re going to do it. It’s perfect in the summer with summer sweet peaches or in the fall with toasted caramelized nuts. It goes perfectly with golden brown breakfast sausages and crispy bacon. I could eat brioche French toast every day of the year and never be tired of it.
What is brioche?
Brioche is a type of French bread that is soft and fluffy with a rich and tender crumb. Unlike regular bread, it’s enriched with eggs and butter making it extra luxurious. It is one of my favorite types of bread (after Japanese milk bread). If you’ve had challah before, the texture is very similar - they’re both rich yeast breads made with egg. The main difference between the two is that challah doesn’t have any butter in it.Why brioche for French toast?
Brioche is the best bread for French toast. It’s thick and soaks in just the right amount of custard and the richness of the brioche really shines through. It puffs up when you cook it giving you fluffy French toast, every time. If you’re looking for a luxurious treat, it’s got to be brioche.Where to buy brioche?
You can buy brioche at any French bakery as well as regular bakeries. You can even find it at the grocery store, in the bread aisle. Most grocery stores will make brioche in house so you can find it in the freshly baked bread section as well. I love buying unsliced brioche so I can slice the bread to my preferred thickness.What can I use if I can’t find brioche?
If you can find brioche, use a thick cut, fluffy white bread or even French bread. It won’t be as rich or tender but it will still be amazing. If you have challah, challah French toast is amazing!How to make brioche French toast
- Make the custard. In a shallow bowl, whisk together eggs, cream, milk, and a bit of sugar, making sure the eggs are completely incorporated.
- Soak the brioche. Take your brioche and soak it in the custard mix, flipping once.
- Pan-fry. Add the soaked bread to a hot pan and cook, flipping once, until golden brown and crispy.
- Top and enjoy. Finish it off with butter, syrup, powdered sugar, and fruit and enjoy immediately!
Ingredients
- Bread. Brioche of course! Some people say you need to use stale bread for french toast, but you can use fresh, just don’t soak it as long.
- Eggs. This is the next most important ingredient. If you don’t have eggs, you can’t make french toast. The most important thing about the eggs is making sure they’re completely whisked up so there are no bits of egg whites or yolks in the custard.
- Cream and milk. We’re going to use a mix of heavy cream and milk to give our toast base a lusciously rich custard texture.
- Sugar. Just a touch of sugar to add sweetness and help caramelize the outsides so your toast is crisp and not soggy.
The secret to really good French toast
The secret to the best french toast is the custard. You want to soak the brioche longer than you think. You want the bread to be saturated with the custard so that the inside of the bread is creamy and not dry. The second secret is cooking over medium to medium low heat then finishing on medium high. Starting on medium or medium low ensures that the custard-y insides cook all the way through and finishing on medium high gives it a golden brown and crisp caramelized crust.How long you should soak brioche for french toast
This depends on how old your brioche is, but soaking longer than you think is what will give you a creamy custard middle. Dry french toast is the worst!- If your brioche is fresh: 30 seconds to 1 minute per side
- If your brioche is old and dry: 2-5 minutes per side
Brioche French toast tips
- Mix well. Make sure you mix the custard extra well so you don’t have stray pieces of unincorporated egg whites or yolks.
- Use butter and oil to fry. Using a combination of butter and oil means you get the best of both worlds: flavor and no burning.
- Preheat the pan. Make sure your pan is heated to medium hot before you put your first slice in, it should sizzle slightly.
- Start on medium heat. You want to start on medium heat then move to medium high to finish. If you cook on high, you’ll end up cooking the outside of the bread, but the inside will still be soggy and raw.
- Take your time. Cook it on medium to medium low heat and aim for a golden brown crust with a creamy, custard-y cooked inside.
Brioche French Toast
Brioche makes the best French toast: soft and custard-y in the middle and crispy and golden brown on the edges.
- 3 large eggs
- 1/3 cup heavy cream
- 1/3 cup whole milk
- 2 tbsp sugar
- 4 slices brioche (thick slices: 3/4"-1")
- 1 tbsp butter
- 1 tbsp neutral oil
In a shallow bowl (that will fit the brioche flat), whisk together the eggs, cream, milk, and sugar, making sure the eggs are completely incorporated.
Take a piece of brioche and put it in the custard mixture and let soak, flipping once.
Heat up a cast iron or non-stick pan over medium heat. Add a bit of oil and butter and when the oil and butter are hot, add the custard soaked bread (let the excess drip back into the shallow bowl) and cook until golden and crisp on the bottom side.
Gently flip and continue to cook until the other side is golden and crisp. Turn the heat up to medium high if needed to brown.
Serve immediately with butter, syrup, fruit, and powdered sugar, if desired.

I Am... Pasta Chips
Do you love pasta but want to eat it with your hands and dip it into tomato sauce? Pasta chips are for you! Crispy, crunchy, and totally dippable, pasta chips are all over Tiktok right now. Essentially, it’s cooked, al dente pasta that’s tossed in oil, cheese, and seasoning, then crisped up in the air fryer. If you like crunchy with a bit of chew in the middle, give them a try!
What are pasta chips?
Pasta chips are golden brown “chips” that are basically deep fried pasta. You can make them in the air fryer which makes them a perfect, quick snack when you’re looking for something warm and crunchy. Any type of pasta works but larger shapes that you can pick up and dip are the best. Even though pasta chips are trending right now, they’re actually kind of an established snack. Crispy crunchy pasta chips have been on the internet at least since 2013. I remember seeing them on this crazy wonderful food/fashion blog and I wanted to eat crispy penne so much after reading that post.What do pasta chips taste like?
If you’re the kind of person who likes the crunchy edges of lasagna then pasta chips are going to be your jam. They’re crunchy and crisp with a tiny bit of pasta chew in the middle. They taste just the the crunchy edges of lasagna or the little bits of macaroni that stick up in baked mac and cheese. As a lasagna edge lover, I am all over these chips.How to make pasta chips
- Cook the pasta. Cook the pasta al dente in salted water according to package instructions. Drain well.
- Toss. Add some oil, grated parmesan, and seasoning to the pasta and toss well, making sure every piece of pasta is coated.
- Air fry. Working in batches, add the pasta to a lightly oiled air fryer basket and air fry on 400°F for 10-12 minutes, shaking the pan or stirring occasionally, until the pasta is golden brown and crisp.
- Make some dips. You can make some dips from scratch or warm up some jarred tomato sauce for dipping.
- Enjoy. Remove the pasta chips from the basket and let cool slightly, which will crisp them up some more. Dip, eat, and repeat!
Ingredients
- Pasta - You can use any kind of pasta you like but best would be larger pasta that you can grab onto and hold like a chip with some surface area for dipping.
- Oil - A neutral oil works best here, don’t go breaking out your super expensive extra virgin olive oil. I used grapeseed oil.
- Parmesan - Parmesan adds so much umami and cheesiness and it gets super crispy and crunchy too.
- Seasonings - Go wild and season to your heart’s delight. I kept it simple with parmesan and garlic. I have some more seasoning suggestions below.
What kind of pasta can I use for pasta chips?
Any large pasta that you can grab on to and use to scoop can be used. Here are some ideas:- penne
- ziti
- rigatoni
- fusilli
- farfalle/bow ties
- paccheri
- shells
- scoobi-doo/cavatappi
- any unique shapes you find like this trottole:
Pasta chips seasonings
- Salt and pepper: season with salt and pepper to taste
- Spicy: 1/2 tsp smoked paprika, 1/2 tsp garlic powder, 1/2 tsp onion powder, 1/4 tsp cayenne (pictured)
- Ginger garlic: 1/2 tsp garlic powder, 1/2 tsp onion powder, 1/4 tsp ginger powder
- Italian: 1/2 tsp garlic powder, 1/2 tsp dried basil, 1/4 tsp dried oregano, 1/4 tsp dried parsley, 1/4 tsp dried thyme
- Ranch: 1 tsp each buttermilk powder, dried parsley, dried dill, and onion powder
- Everything bagel: 1 tablespoon everything bagel spice
- BBQ: 1 tsp each smoked paprika, onion powder, brown sugar, and garlic powder
- Sour cream and onion: 1 tsp each buttermilk powder, onion powder, and garlic powder
What kind of dip do I serve with pasta chips?
- Whipped ricotta - I LOVE whipped ricotta. SO fluffy, so creamy, and the BEST dip, especially with crunchies for dipping. To make it: place 3/4 cups whole milk ricotta in a food processor and blend until very smooth and creamy. Season with salt and pepper and drizzle with extra virgin olive oil. Top it off with some roasted tomatoes and it’s amazing.
- Tomato sauce - I have an awesome recipe for pizza style tomato sauce here that would be perfect for dipping. You can also buy some of your favorite jarred sauce and heat it up.
- Pesto - Pesto and crispy pasta chips are a match made in heaven
- Bolognese - A little bit of meaty, savory bolognese
- Ranch - Homemade ranch is so much better than store bought but even store bought ranch is pretty darn good.
Pasta chips FAQ
I don’t have an air fryer, can I make pasta chips?
Yes, you can bake them in the oven at 400°F. They might not get as crispy, but they’ll still be crunchy and addictive.Can I deep fry pasta?
Yup, if you want to break out a deep fryer or even just do pasta chips in a pot with oil, you can. Cook, drain very well, toss and season then lightly fry them in hot oil for 1-2 minutes or until golden and crisp.Do they taste like raw pasta?
They kind of look like toasted raw pasta but these pasta chips don’t taste like raw pasta at all. They taste the the crunchy baked edges of lasagna.My chips aren’t crunchy or crisp
You might need to air fry or bake them a bit longer. Be sure to toss or shake in between and let them cool down before snacking. They will crisp up a bit more after they cool.What to serve with pasta chips
They taste great with dips!- You can also serve them along side a charcuterie board
- with some homemade garlic knots
- or another tiktok fave, baked feta pasta
Are pasta chips worth the hype?
YES! I just saw two opposing headlines right next to each other on google. One said that pasta chips are worthy and the other said that they’re not worth it. If you ask me, they are deliciously crunchy and absolutely worth the hype. It’s always interesting finding a new and different way to use ingredients and if you love the crunchy edges of baked pasta you’ll love pasta chips. Mike and I devoured our first batch. Mike was skeptical at first but he loved the crunch and the flavor. It’s a fun and quick snack and they’re super versatile, flavor wise. I think my favorite batch so far has been Tajin garlic parmesan used to scoop up creamy avocado crema. SO GOOD.Pasta chip nachos
For the ultimate in pasta chip heaven, try pasta chip nachos. They’re like lasagna but in crunchy chip form.- Make your pasta chips, seasoning them with garlic powder and Italian seasoning.
- Whip up some ricotta and season it with salt and pepper. Warm up some tomato sauce.
- When your pasta chips are ready, place them in a single layer on a sheet of foil in the air fryer. Top them with a layer of shredded mozzarella and a sprinkle of parm then continue to layer the pasta chips and cheese, just like your making nachos. Air fry for 1-2 minutes at 370°F or until the cheese is melts.
- Remove and enjoy dipping good cheesy pasta chips into the ricotta and warm tomato sauce!
Pasta Chips
Do you love pasta but want to eat it with your hands? Pasta chips are for you!
- air fryer
- 8 oz pasta
- 1 tbsp neutral oil
- 1/4 cup Parmigiano Reggiano cheese (freshly grated)
- 1 tsp garlic powder
Cook your pasta according to package directions.
Toss your pasta with the oil, grated cheese, and garlic powder
Air fry or bake your pasta:
Air fryer: Air fry at 400°F for 10-12 minutes, tossing occasionally, until pasta is golden brown and crisp.
Oven: Heat the oven to 400°F on convection mode. Bake the chips on a lightly oiled baking sheet for 20-25 minutes, tossing occasionally until pasta is golden brown and crisp.
Optionally toss with seasonings (see post) and serve immediately with dips.

I Am... Lettuce Water
Lettuce water: it works! I suffer from insomnia. It could be the fact that I have too many coffees a day, sometimes even in the afternoon. Or it could be my anxiety keeping me awake at night. I’ve resorted to taking melatonin, which apparently makes me sleep like the dead. Recently I ran out which meant a couple of nights of tossing and turning before heading to the store to buy another bottle. But then, I saw a bunch of people drinking lettuce water on Tiktok. So I gave it a try.
What is lettuce water?
It’s lettuce leaves and hot water. That’s it. The hot water wilts the lettuce and it mildly flavors the water. You can’t really taste it. It comes to us via Shapla who heard that it helps you sleep. She took some lettuce, put it in a cup with a bag of peppermint tea, then poured hot water on it and took out the lettuce and tea. Apparently it tastes like nothing and it made her sleepy. I happened to have lettuce in the fridge and at 3 in the morning, after staring at multiple lettuce water tiktoks I was more than ready to give it a try.How to make lettuce water
- Take a bunch of clean lettuce leaves and place them in a mug.
- Pour hot water on top and let the leaves wilt.
- Remove everything and drink the water.
Does lettuce water make you sleepy?
YES! It’s science. Lettuce and lettuce seed oil has long been used to promote sleepiness. Lettuce has high leaves of lactucin and lactucarium, which makes you sleepy, relieves mild pain, and promotes relaxation. Here’s an study on lettuce and sleepiness that I found interesting!Why does lettuce water make you sleepy?
The lactucin in lettuce makes you sleepy and relaxed. You could probably also just eat a bunch of lettuce, but it seems more night time to have a warm drink. Lettuce is the new sleepytime tea!What kind of lettuce can I use?
I used green leaf lettuce. You can also use romaine. The lettuce with the most lactucarium are wild lettuce. Wild lettuce isn’t sold in stores though.Lettuce in order of sleepiness effect (more sleepy to less sleepy)
- red romaine
- green romaine
- red leaf lettuce
- green leaf lettuce
Which lettuce doesn’t work?
If you want to fall asleep, don’t use iceberg lettuce. It doesn’t contain any lacturcarium.What does lettuce water taste like?
It doesn’t taste like much, like water with a slight, mild vegetal flavor.How can I make it taste nicer?
Add some tea! On Tiktok they added peppermint tea (which can actually help with deeper sleep and is caffeine free). You can also use chamomile, ginger, or any herbal caffeine free tea that you like.Did it work for me?
Yes! It might have been because it was really late at night but I think it was the combination of lettuce and chamomile that made me drowsy. After I finished my mug, I resisted looking at my phone in bed and drifted off to sleep what felt like instantly.The placebo effect
There have been a bunch of articles saying that lettuce water doesn’t work because it doesn’t contain enough lacturcarium. That might be true, but if it’s the placebo effect and it still makes me sleepy, that’s a win! As far as sleep remedies go, lettuce water is super natural and having a warm drink at the end of the night before bed is a nice little ritual.Good sleep hygiene
If you’re having problems sleeping and lettuce water isn’t working for you, make sure you’re not looking at your phone in bed. Or, if you are, be sure to check your settings and have them on night mode - looking at blue lights (like the ones that come from screens) can make you more alert and cause insomnia.What to do with all your extra lettuce
- Vietnamese spring rolls (pictured below)
- grilled romaine salad
- BLT fried rice
- fattoush
- summer soba salad
- with Japanese salad dressing
Lettuce Water
Fall asleep easier with lettuce water.
- 3-4 leaves lettuce (torn)
- 1-2 cups hot water
- 1 bag tea (of choice, optional)
Place the lettuce and herbal tea in a tea cup and pour boiling hot water on top.
Let steep for 5 minutes, then remove the lettuce and tea bag. Let cool slightly, enjoy, and fall asleep.

I Am... Oreo Sushi
Oreos are the perfect store bought cookie. You can do so many things with them. You can dunk them, make mug cakes with them, and even make oreo sushi. Yup, you read that right, oreo sushi! Why eat oreos the regular way when you can sushi-fy them!? Some of you might think that Japanese people would think that oreo sushi would be a travesty, but I assure you, Japanese people are totally down for innovation! Besides, obviously these oreo sushi are not really sushi. They are a sweet and fun oreo dessert shaped into little sushi rolls. It’s bussin as the kids say! I love oreos. In fact, we almost always have some in the pantry. Right now they’re oreo thins but I pretty much like all the oreos, even the wacky flavored ones like cinnamon bun and carrot cake. There’s just something incredibly nostalgic about the taste of oreos. They make me feel like everything is right with the world. This is not sponsored by the way. I just love oreos. Whenever I see a new oreo trend, I gotta try it. These lil oreo rolls are super cute and really easy to make.
What is oreo sushi?
Oreo sushi is made from oreos, crushed up and re-shaped into sushi rolls. Basically, you take oreos, separate them, crush the cookies, then mix them with milk to create a dough. The dough is rolled out, then spread with oreo cream. Roll everything up and slice it, like a sushi roll. Oreo sushi comes to us via Tiktok and it looks like @mariahortiz20 was the one who popularized it.How to make oreo sushi
- Separate the cookies. Twist the cookies and scrape off the cream into a bowl. Repeat until all of the cookies and cream are separated.
- Crush the cookies. Pop the chocolate cookies into a food processor and pulse until the cookies turn into a fine crumb.
- Make the dough. Add 3 tbsp milk to the cookies and pulse until everything comes together in a dough.
- Roll out the dough. On a piece of plastic wrap, shape the dough into a rough rectangle with your hands. Use a rolling pin to roll the dough out evenly. Trim the edges so they’re straight.
- Mix the cream. Mix the cream with 2 tsp of milk, until smooth and creamy. Spread the cream. Evenly spread the cream onto the cookie base.
- Roll. Roll up the cookie tightly around the cream, using the plastic wrap to help you. If you have time, wrap the roll up in plastic wrap and let it set in the fridge for a while.
- Slice. Use a sharp knife and slice through the roll to make cute lil sushi rounds and enjoy!
Ingredients
- Oreos - I went with standard oreos because they have the perfect cream to cookie ratio.
- Milk - You can use any kind of milk you like, non-dairy included. If you use a vegan milk, these oreo sushi end up being vegan because oreos are naturally vegan!
FAQ
How do I make perfectly round rolls?
When you’re rolling up the sushi, roll it slowly, evenly, and tightly across the entire roll, using the plastic wrap to help guide you. For extra clean rounds, wrap up the roll in plastic wrap and place in the fridge for a couple of minutes for it to firm up before slicing. When you slice, use a slicing motion instead of just pushing down on the knife.Why is my oreo sushi squished?
It’s possible that your oreo base got too warm or you added too much milk to the oreos when you were making the oreo dough. Try putting the rolled up sushi in the fridge to firm it up a bit before slicing.My oreo dough keeps falling apart
This is probably because you don’t have enough milk in your oreo cookies. Add a tiny bit more, a teaspoon at a time until the oreo dough can be squished into a ball and hold its shape.Do I have to use oreos?
You can use any cream sandwich cookie! You can even make this with other flavored oreos, not just the classic.Do I need a food processor?
It’s easiest to make this with a food processor because the food processor can break down the oreo cookies into a fine crumb which makes it easier to come together in a dough. It also helps with mixing the milk into the oreo cookies. We have this one, it was not too expensive and it's lasted us a long time!How can I crush oreos without a food processor?
If you don’t have a food processor, take your oreo cookies and place them in a ziplock bag and crush the cookies, as much as you can, until they turn into fine crumbs. You can use a rolling pin to crush and roll over them.I don’t have a rolling pin, how do I make oreo sushi?
If you don’t have a rolling pin, you can use a bottle or something with straight sides to roll out the dough. It might not be as pretty, but it will definitely work!How do I spread the cream evenly?
My all time favorite too for spreading things evenly is an offset spatula! You can also place a piece of plastic wrap on top of the cream and use a rolling pin to roll it out gently.If you love oreos, please try these other oreo recipes:
Oreo
A super easy, sweet and fun oreo dessert shaped into little sushi rolls.
- food processor
- 24 oreos (separated (one package))
- 1/4 cup milk
In a food processor, blitz the oreos until they become fine crumbs. Add 3 tbsp milk to the food processor and blitz until the cookies combine with the milk to become a ball of dough.
Take the ball of oreos and gather it together on a sheet of plastic wrap. Press the dough down into a rough square shape. Use a rolling pin to roll everything into an even layer, about 1/4 inch thick. Trim off the sides so it’s a perfect square.
Take the oreo cream and mix it together in a bowl with 2 teaspoons of milk until it is smooth and creamy.
Evenly spread the oreo cream onto the oreo square.
Roll up the oreo dough, using the plastic wrap to help you. You can wrap up the roll in plastic wrap and pop it in the fridge to firm it up a bit, if desired.
Unwrap the roll, slice, and enjoy!

I Am... Air Fryer Mushrooms
If you’re looking for a quick and easy side dish, air fryer mushrooms are here for you. Buttery, garlicky, sautéed mushrooms done right in the air fryer. Quick, easy, and full of flavor and texture. Sometimes I’ll make a big batch and snack on these. Sometimes I’ll even eat them as a meal. Garlicky mushrooms are pure comfort food: tender and juicy little pops of umami.
How to make air fryer mushrooms
- Clean and trim. Clean and trim your mushrooms, being sure that they don’t get too soggy. Cut them in half and dry them off.
- Toss. Mix up some oil, soy sauce, and garlic powder and toss in the mushrooms.
- Air fry. Heat the air fryer and when it’s hot, add the mushrooms and air fry, for 8-10 minutes, tossing or shaking in between.
- Enjoy. If desired, toss in a bit of butter and freshly chopped parsley and enjoy!
Ingredients
- mushrooms - clean, trim, and halve your mushrooms of choice.
- soy sauce - soy sauce adds a bit of color and a whole lot of umami.
- garlic powder - fresh chopped garlic can burn in the air fryer so we’re going to use dehydrated garlic to give us that garlicky flavor we need.
How to clean mushrooms
Try to pick out mushrooms that are smooth and clean in the first place. I don’t like washing mushrooms because they get discolored easily. I pick out the cleanest mushrooms then brush them gently with a wet or dry mushroom brush/paper towel. If you want to wash your mushrooms, the best way to do it is to spray them and dry in a salad spinner. Clean them right before you’re going to use them.
- Put the whole mushrooms in a salad spinner and spray until visible dirt is removed - don’t soak them!
- Spin the mushrooms dry and use a paper towel to absorb any extra water on the surface.
- Trim the bottoms and cut in half.
Which mushrooms for air fryer mushrooms?
I love how many varieties of mushrooms there are out there! To keep it simple I used crimini/brown mushrooms but you can also go with:- white button mushrooms
- portobella mushrooms
- shiitake mushrooms
- oyster mushrooms
- enoki mushrooms
- king trumpet/oyster mushrooms
- maitake mushrooms
- shimeji mushrooms
What air fryer do you have?
If you’re wondering which kind of air-fryer we have, it’s this style. It’s quiet and easy to clean and fairly wide. We love it.What to serve with air fryer mushrooms
- air fryer steak, of course!
- super creamy cacio e pepe with a side of mushrooms is my idea of heaven
- ham and mushrooms, yes please
Air Fryer Mushrooms
Buttery, garlicky, sautéed mushrooms done right in the air fryer.
- air fryer
- 8 oz mushrooms (cleaned, trimmed, and cut)
- 2 tbsp olive oil
- 1 tsp soy sauce
- 1/2 tsp garlic powder
Preheat the air fryer at 400°F. Toss the cut mushrooms with the oil, soy sauce, and garlic powder
Air fry in the basket at 400°F for 8-10 minutes, shaking and stirring halfway through.
Remove and serve immediately. If desired, toss with a bit of butter and chopped herbs such as Italian parsley.
