
I Am... One Ingredient Air Fryer Keto Popcorn Cheese Puffs Recipe
Guys, I just made keto popcorn cheese puffs and I am DEAD. They were SO good. Seriously, they are the perfect zero carb keto snack. I just did a little test run with just two ounces of cheese and to be honest I’m glad I didn’t make more because I think I could have devoured an entire pound in one sitting. They’re crispy, crunchy, cheesy, and everything you want in a snack. I am a snack monster in the best of times (please check out my favorite keto snacks here!) and the worst of times. Sometimes I think I could live on snacks alone. But the problem is, almost all snacks are super carb-heavy. I’m talking about chips and popcorn of course. There’s something about snacking, it’s almost like it is a law that snacks need to be crunchy and satisfying. Most low-carb snacks aren’t but I am here to save you from bad snacks. Keto popcorn cheese puffs are here! Keto popcorn cheese puffs are super easy to make at home, just one ingredient, and zero carb. I mean, win-win-win, am I right?! I first came across these when I did a google search for the best keto snacks to make at home. Keto popcorn kept coming up and after a few clicks down the google hole later, I knew that I had to make them. In three days. Because yes, it takes some time to prep your cheese before you make these guys. But trust me, it’s worth it. If you like ParmCrisps, Whisps, Moon Cheese or any of those other crispy cheese snacks you need to make these at home because they’re cheaper, more delicious (try them when they’re a little warm), and homemade.
What is Keto Popcorn?
Keto popcorn is not actually popcorn, it’s popped cheese! Little crispy, crunchy nuggets of air fried or oven baked puffed cheese. It’s zero carbs depending on the cheese you use and the most satisfying, addictive, crunchy keto snack.Ingredients for Making Keto Popcorn Cheese Puffs
Cheese. Yup, that’s it. All you need is cheese and how much you make is up to you.What Kind of Cheese Can I Use to Make Keto Popcorn Cheese Puffs?
I used medium cheddar but you can use any hard to medium hard firm cheese with a relatively low moisture content: parmesan, pardano, pecorino, white cheddar, gouda, colby, manchego, asiago, comte, emmental, gruyere, monterey jack, colby jack. Basically any cheese than can dry out to hard as a rock can be puffed.How to Make Keto Popcorn Cheese Puffs
1. Cut or crumble up your cheese of choice: I chose to crumble to make the puffs look more organic. You can do whatever is easiest. Aim for pieces that are 1/4 inch to 1/2 inch in size and try to keep them relatively consistent. 2. Dry out the cheese: Place the cheese pieces on a paper towel lined plate or tray and cover with another paper towel. Pop into your fridge. You could leave them out at room temp which is what all of the other recipes online say but the truth is the fridge is great at dehydrating and removing moisture. 3. Bake or Air-Fry: Either bake in a 390°F oven until puffy or pop into an air fryer at 390°F for 5 minutes. I prefer the air-fryer version because after waiting days for the cheese to dry out I don’t really want to wait for the oven to preheat. 4. Enjoy! Crunchy your way to satisfaction.What are the Macros for Keto Popcorn Cheese Puffs?
To be honest, this is going to change depending on what cheese you use. Just be sure that your cheese is truly zero carbs if you’re looking for a really zero carb snack!Keto Air Fryer Popcorn Cheese Puffs Recipe
One ingredient cheesy, crispy, crunchy keto popcorn
- 2 oz cheese of choice
Cut or crumble the cheese into very small 1/4 inch pieces. Place a paper towel on a tray and lay out the cheese pieces. Cover with another paper towel and place in the fridge to dry out for 3-5 days, or until completely dry and very hard. If the cheese doesn’t dry it out, it will just melt in the oven instead of puffing and turning crunchy.
To Bake
Heat the oven to 390°F and bake on a parchment paper lined baking sheet for 3-5 minutes, or until puffed. Let cool before enjoying!
To Air Fry
Preheat the air fryer to 390°F. Place the pieces of cheese in the air fryer for 5 minutes at 390°F. Let cool and enjoy!
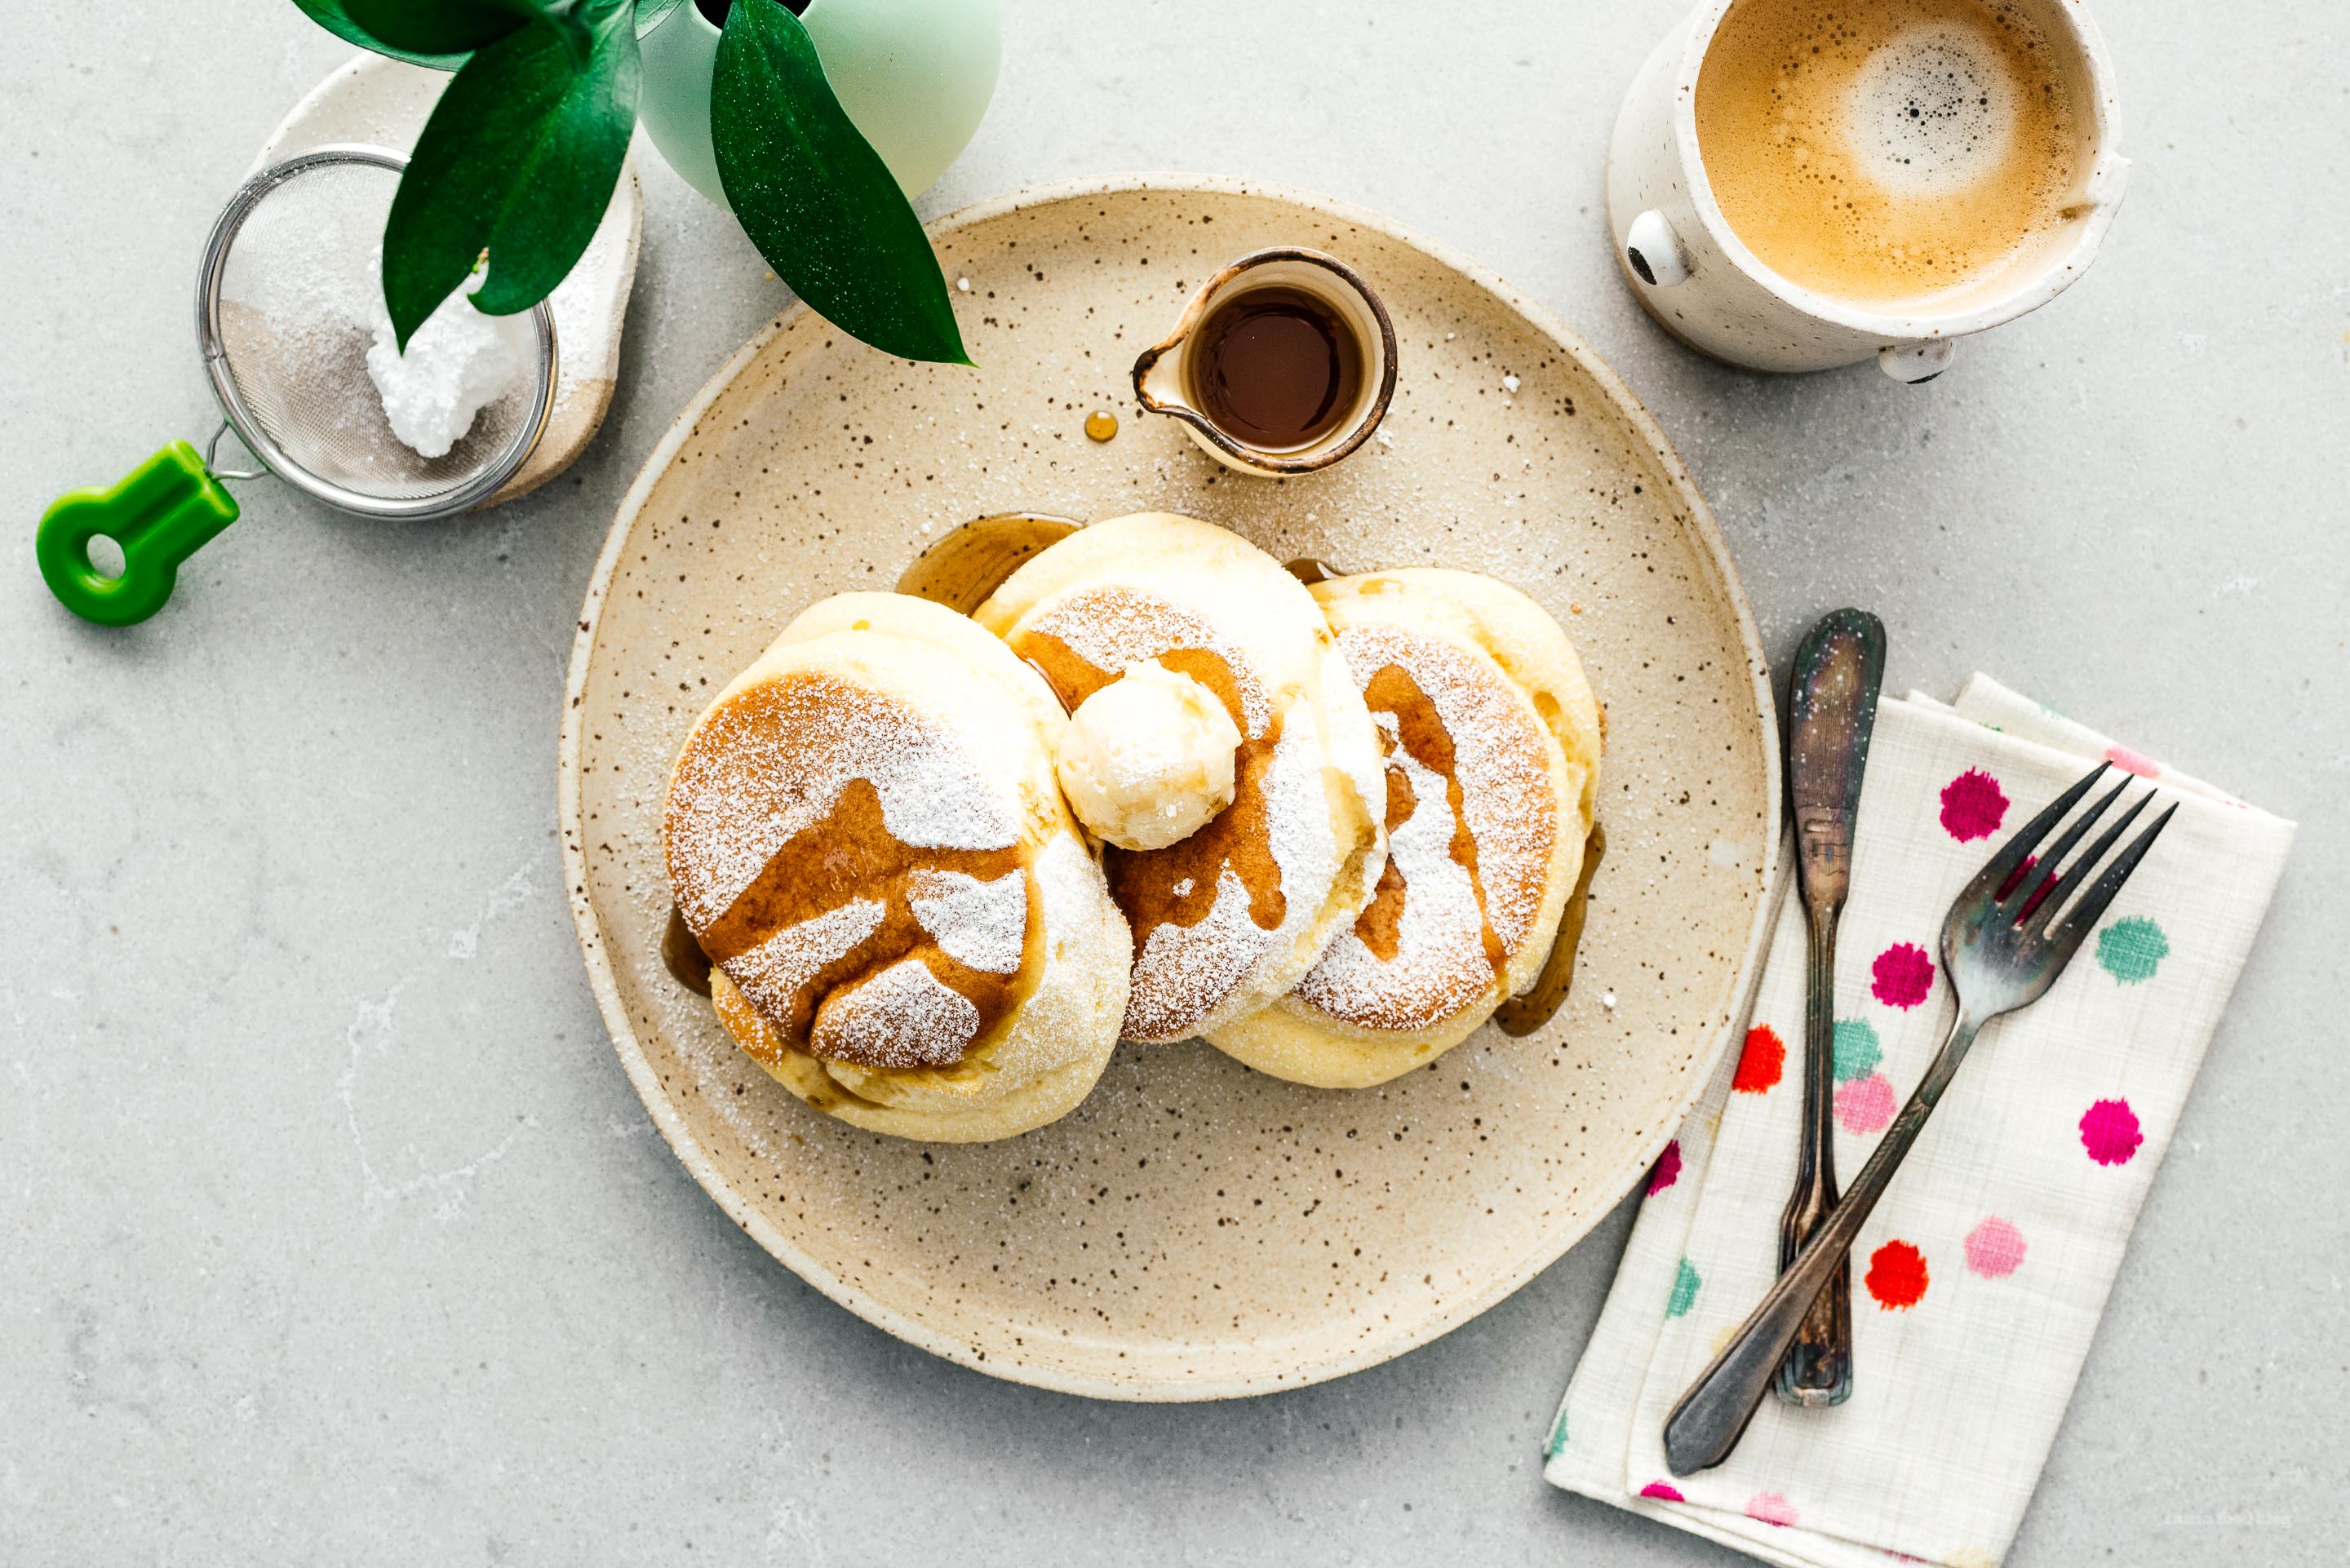
I Am... Top 17 Japanese Foods to Make at Home Because Your Trip to Japan Was Cancelled
Japan is a top destination for summer and we go every year, except this year. So let's bring Japan home with us! These recipes are super easy and pretty authentic, you'll feel like you're in Tokyo or Osaka in no time at all! Fluffy Japanese Soufflé Pancakes A must eat if you ever go to Japan because they’re SO FLUFFY! The Best Japanese Cheesecake This cheesecake sells out on the regular in Tokyo - it’s so hard to get your hands on it, they call it the Phantom Cheesecake Strawberry Sando Nothing says summer like strawberries and nothing says Japan like fruit sandwiches! Japanese Shokupan Fluffy Japanese bread is the best bread! Soboro Donburi So simple yet so delicious - sweet n salty pork with eggs on a fluffy bed of rice Tuna Onigiri If you miss those store bought combini rice balls, this is the recipe for you: miso tuna salad tucked into a delicious seaweed wrapped rice ball. Whipped Macha Maybe you won’t be hanging out in any cool Kyoto matcha houses, but you can still get your matcha on! Japanese Style Tamagoyaki French Toast Most people are obsessed with Japanese pancakes but this creamy custardy french toast can give those jiggly cakes a run for their money. Easy Oven Baked Tonkatsu Juicy pork, crispy panko outsides, all baked in the oven for extra ease. Crispy Chicken Karaage Juicy, crispy, maybe the best fried chicken snack ever?! Chicken Katsu Sando Oh gosh how I miss all the different sandos (sandwiches) they have in Japan. This one is filled with a crisp panko chicken katsu. Extra Tall and Fluffy Gram Pancakes Gram is famous for their pancakes in Japan. Good news - you can make them at home! Takoyaki Probably the best little street side snack with beer: crispy molten hot takoyaki. Make them at home, no trip to Osaka needed! Grilled Yakimochi Missing those yakitori vibes? Grill some mochi for a crispy chewy smoky treat. Creme Brûlée Soufflé Pancakes Because creme brûlée soufflé pancakes. Enough said :) Egg Salad Tamago Sando Like those creamy egg sandwiches you can find at 7-11 in Japan but even better because you didn’t have to fly anywhere. Spicy Savory Mentaiko Udon Udon is maybe the best Japanese noodle. Yup, I went there... PS - If you want to live vicariously through old travel posts, please check these out! The Best Combini Sweets The Place for Tuna Lovers in Tokyo 24 Hours in Nagoya Where to Eat Fluffy Shokupan Sakura Season in Tokyo The Search for the Best Udon in Japan I hope I see you soon Japan! xoxo steph
Read More →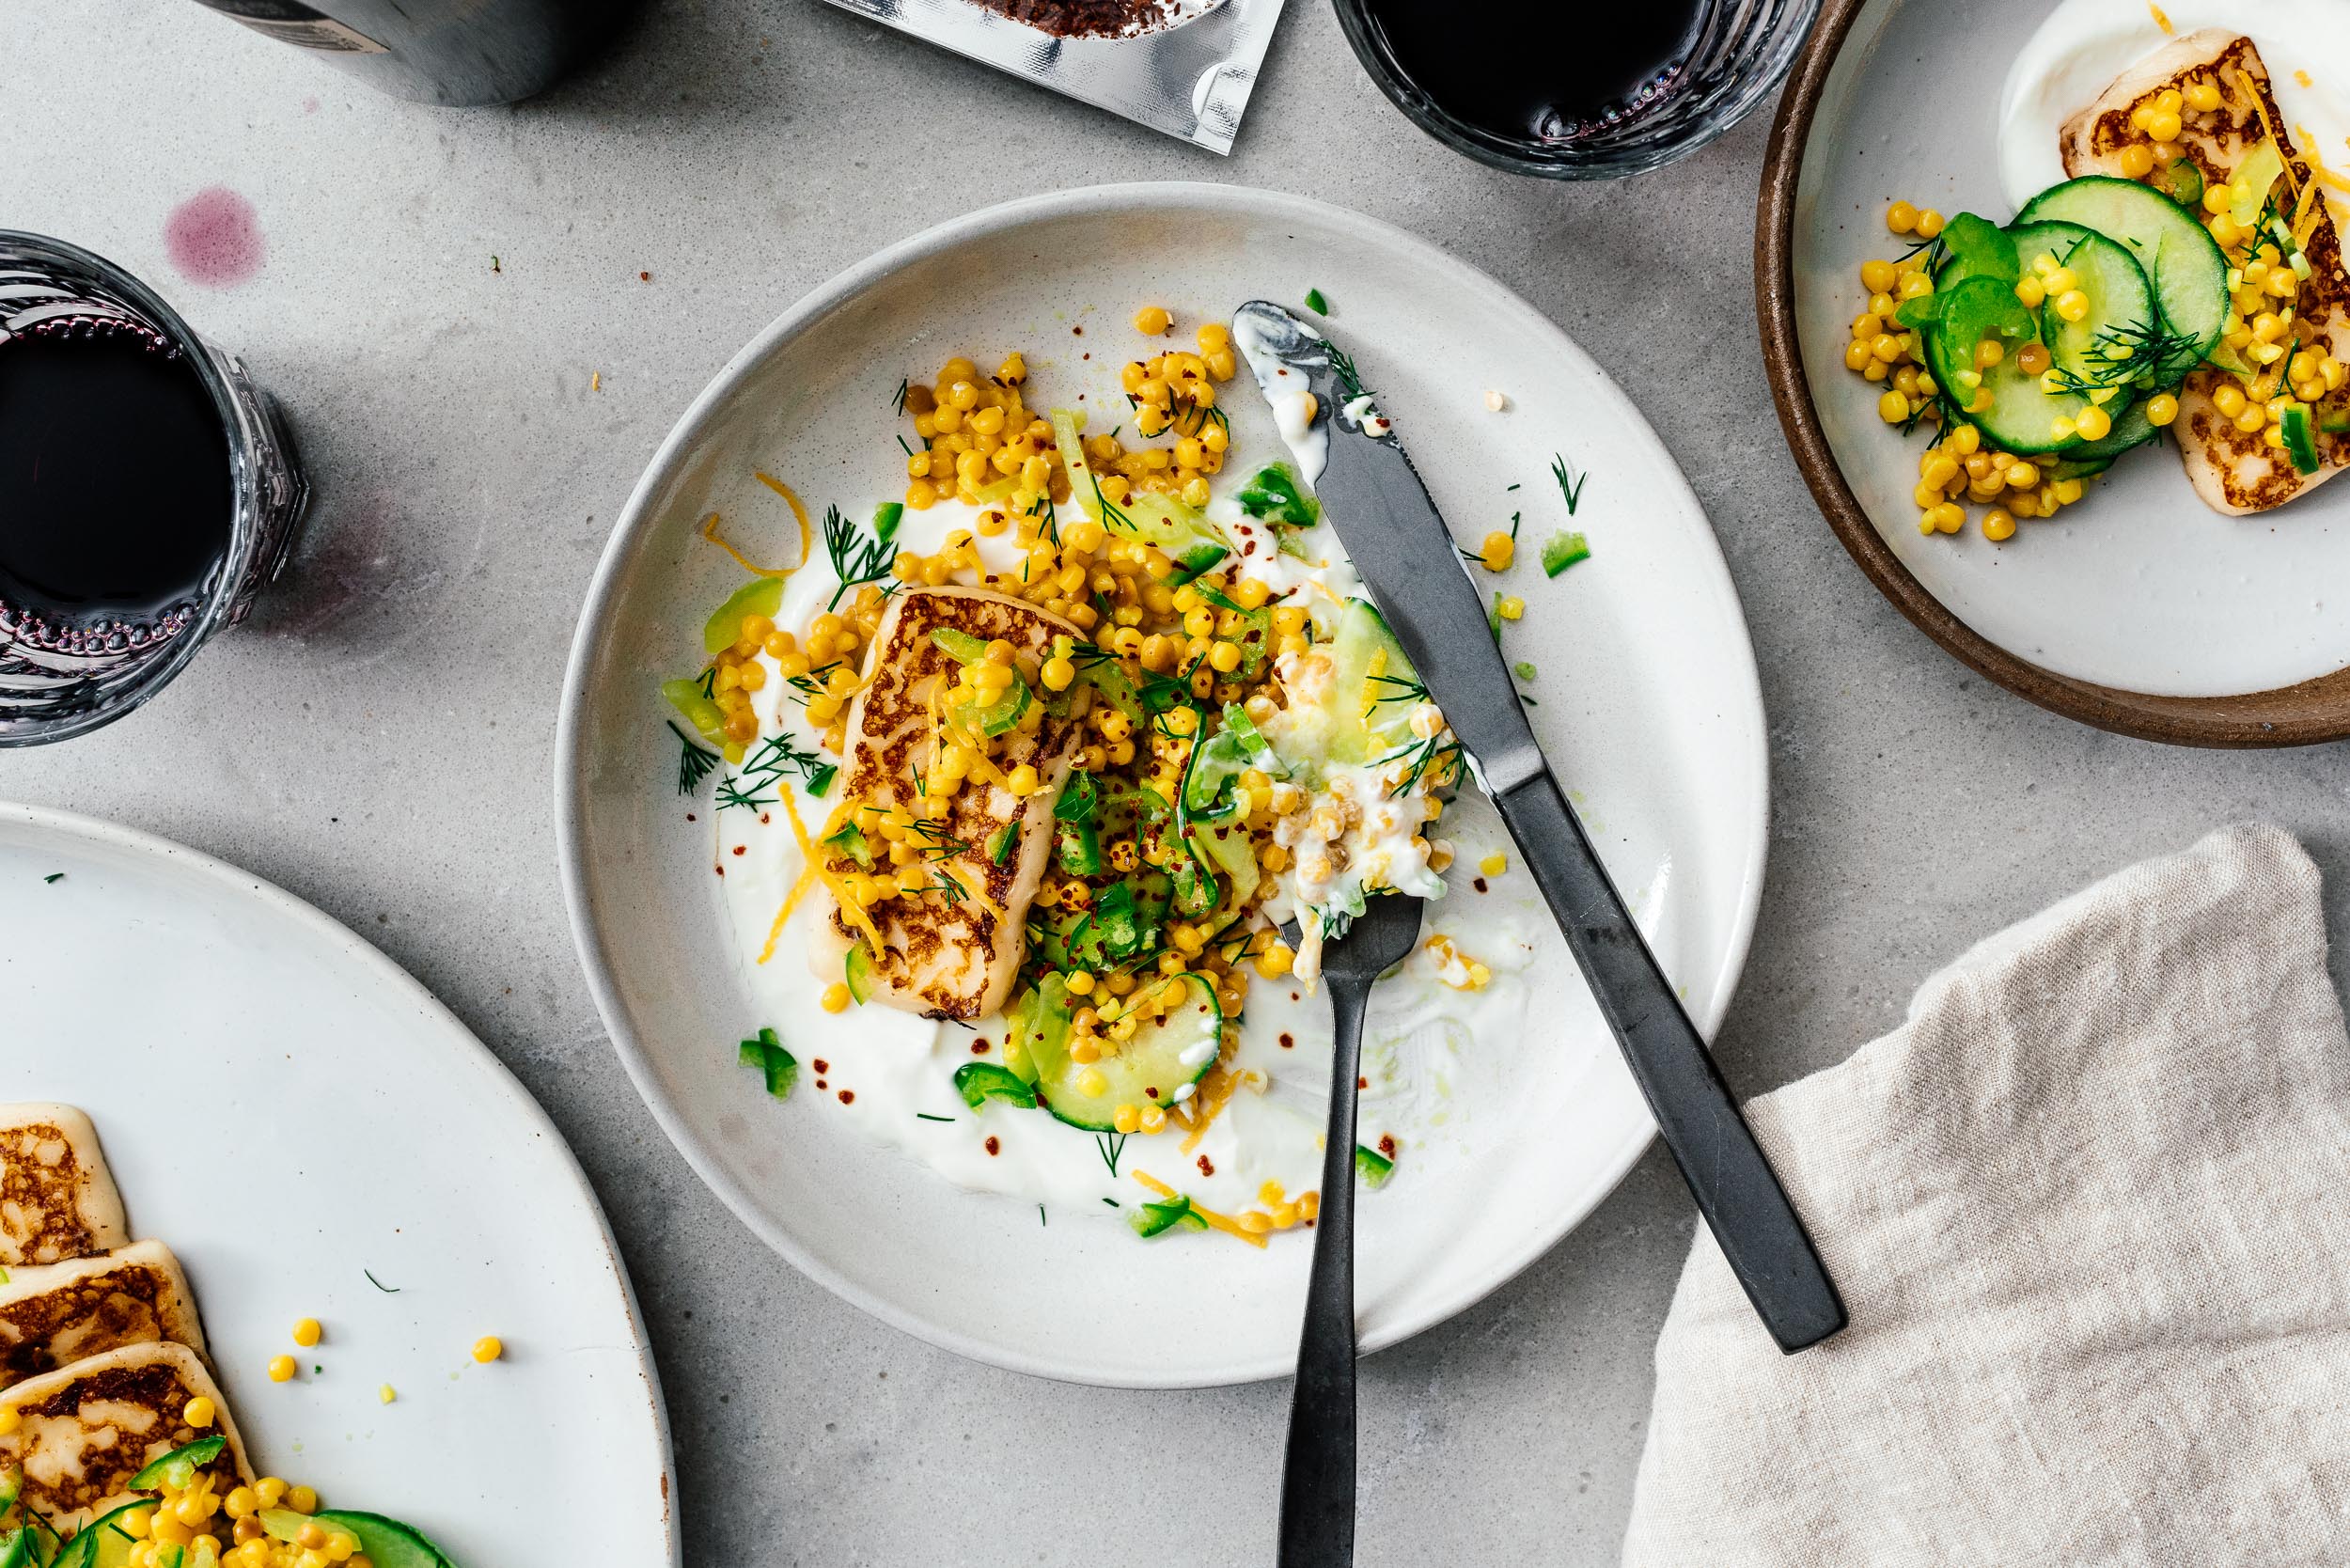
I Am... Pan-fried Halloumi with Israeli Cous Cous Salad
Pan-fried halloumi and Israeli cous cous is the perfect Mediterranean diet summer meal, full of freshness and all the bright and beautiful flavors. I’ve been playing around with the Mediterranean diet lately, trying to make more and more of our meals focused on grains and vegetables. For those of you who don’t know, the Mediterranean diet is considered one of the best in the world, simply because it’s not really a diet in the sense of a weight loss plan, but a diet as in what people in and around the Mediterranean traditionally eat. Essentially, you want to eat vegetables, fruits, nuts, seeds, legumes, potatoes, whole grains, herbs, spices, fish, seafood, and extra virgin olive oil. You can also eat a bit of chicken, eggs, cheese and yogurt. Red meat is a special occasion kind of thing and you should avoid added sugars, processed meats, refine grains, and other processed foods. It sounds healthy and fresh and pretty easy to do so we’ve been playing around with a bunch of different dishes and they’ve all turned out delicious. This pan-fried halloumi and Israeli cous cous has been on repeat because I’m in love with halloumi. I don’t remember the first time I had it – it was years and years ago – but one of my favorite memories of eating halloumi is of a backyard barbecue where the halloumi was the one thing everyone kept going back for. It was a late summer evening where the heat of the day was just easing into a pleasant warmth. I can still remember the warm oozy squeakiness of the smoky chargrilled pieces paired with a refreshing cucumber salad. Pure summer flavors. I recreated that here with a lemony yogurt, dill cous-cous, and pan-fried halloumi, of course. It’s pretty, healthy, and so, so good.
What is halloumi
Halloumi, if you haven’t had it, is a semi-soft, un-ripened, brined cheese. Compared to most other cheeses it has a high melting point which means it retains it shape after frying or grilling. If you’ve had paneer before, it kind of has the same texture. Taste-wise halloumi is pretty mild, with a salty finish. It has a distinctive squeak when you eat it and when it’s grilled or fried, the outside gets a delicious golden crust and the inside is melty and gooey. It’s one of my favorite cheeses, hands down.How to serve halloumi
You can have it simply pan-fried or grilled with a squeeze of lemon, use it in salads, have it in sandwiches, or use it as the “meat” of your main dish. Here I simply pan-fried it until golden and gooey, then served it will a lemon-y dill cucumber and celery cous cous salad.What is Israeli pearl cous cous
Pearl cous cous is just the thing to pair with halloumi – it’s a toasted pasta that’s shaped in little balls. It was invented in Israel when rice was scare but now it’s super popular essentially everywhere. Most pearl cous cous is made from semolina or whole wheat flour, which makes it a tiny bit healthier than regular pasta. It’s chewy and tender and takes on flavor like a boss.How to serve cous cous
Just like pasta, it’s boiled, but before you do that, it’s usually toasted in a bit of extra virgin olive oil or butter for a bit of toasty goodness and extra flavor. You can eat it as a side (like rice), pop it into soups, use it in a pilaf, or use it in a salad, like I did here.How to make pan fried halloumi with Israeli cous cous
1. First, we’re going to start by cooking our pearl cous cous. Heat up a bit of butter or oil in a small pot then toast the cous cous, much like you toast grains of arborio rice for risotto. After the cous cous is toasted, add some water (you can also use vegetable stock or chicken stock for extra flavor), and bring to a simmer, covered. 2. While the cous cous is cooking, zest and juice your lemon, and prep the rest of your vegetables and herbs. I used cucumber and celery but you can use any fresh summer-y vegetables you have on hand, just make sure you cut them up into bite size pieces. Same deal with the dill. I love lemon and dill together but if you have basil or chives, you can use those too. 3. After your herbs and vegetables are prepped, it’s time to make some lemon-y yogurt. All you do is stir together some lemon juice, zest, and Greek yogurt. 4. By now your cous cous should be cooked. I always like to taste one to make sure it’s just the texture I like – some people like their cous cous more bouncy and al dente and some people like it a little more tender. If you want it a bit more tender, just cook for a minute or so more. After your cous cous is cooked to your liking, give it a stir and spread it out on a plate so it can cool off a bit. If you don’t cool it, your vegetables will wilt a bit, which isn’t a big deal, but for aesthetic reasons, we’re going to spread the cous cous out. Once the cous cous is cool, all you need to do to make the salad is mix together the cous cous with the lemon juice, zest, dill, cucumbers, and celery. Taste and season with salt and pepper then set aside so you can pan fry the halloumi. 5. Cut the halloumi into 1/4 inch thick slices. Add the slices to a dry non-stick pan and fry over medium-high heat, until golden brown. It’ll take about 1-2 minutes per size. I like using a small off-set spatula to flip the pieces instead of a big spatula because you can get under the pieces easily. After they’re done, remove them from the pan and it’s time to plate. 6. Pick out your prettiest plates and place a generous scoop of lemon-y yogurt in the middle. Use the back of your spoon and push down and pull to one side to create a swoosh. Top with some of the cous cous salad and place a couple pieces of grilled halloumi on top. Finish off with extra herbs and some diced jalapeños for heat. If you want to be extra, drizzle with a bit of extra virgin olive oil or even a bit of honey!Some other Mediterranean diet ideas:
If you like the sound of the Mediterranean diet, try our creamy homemade hummus, jammy eggs and yogurt, falafel, garlic butter mushrooms, lemon pepper chicken with dill cous cous, eggplant and tomato pasta, penne pesto, chicken souvlaki, salmon and soba salad, or burrata and kale too!Pan-fried Halloumi with Israeli cous cous salad recipe
- 1 tbsp olive oil (or butter)
- 1/2 cup dried Israeli pearl cous cous
- 1 lemon
- 3/4 cup greek yogurt
- 1/4 cucumber (sliced)
- 1 stalk celery (sliced)
- 1 package of halloumi (sliced)
- 1 jalapeño (diced, optional)
- fresh dill (chopped)
- salt and pepper
In a small pot, heat up the butter or olive oil over medium high heat. When shimmery, add the cous cous and cook, stirring, until lightly toasted and coated, 1-2 minutes.
Add 1/2 cup + 2 tbsp water and simmer for 8-10 minutes or until the cous cous is al dente. While the cous cous is cooking, zest the lemon and set aside the zest. Juice the lemon.
Stir the yogurt with 1/2 the lemon zest and 1/2 of the lemon juice and set aside.
By now your cous cous should be cooked through. Let cool then stir in the remaining lemon zest, remaining lemon juice, and a generous pinch of chopped dill. Mix in the cucumber and celery. Taste and season with salt and pepper.
Slice the halloumi and pan fry over medium high heat until golden and crispy, flipping once.
Plate by swooshing on some of the lemon-y yogurt. Top with some of the lemon cous cous salad. Top with halloumi, optional jalapeños, and salt and pepper. Enjoy!
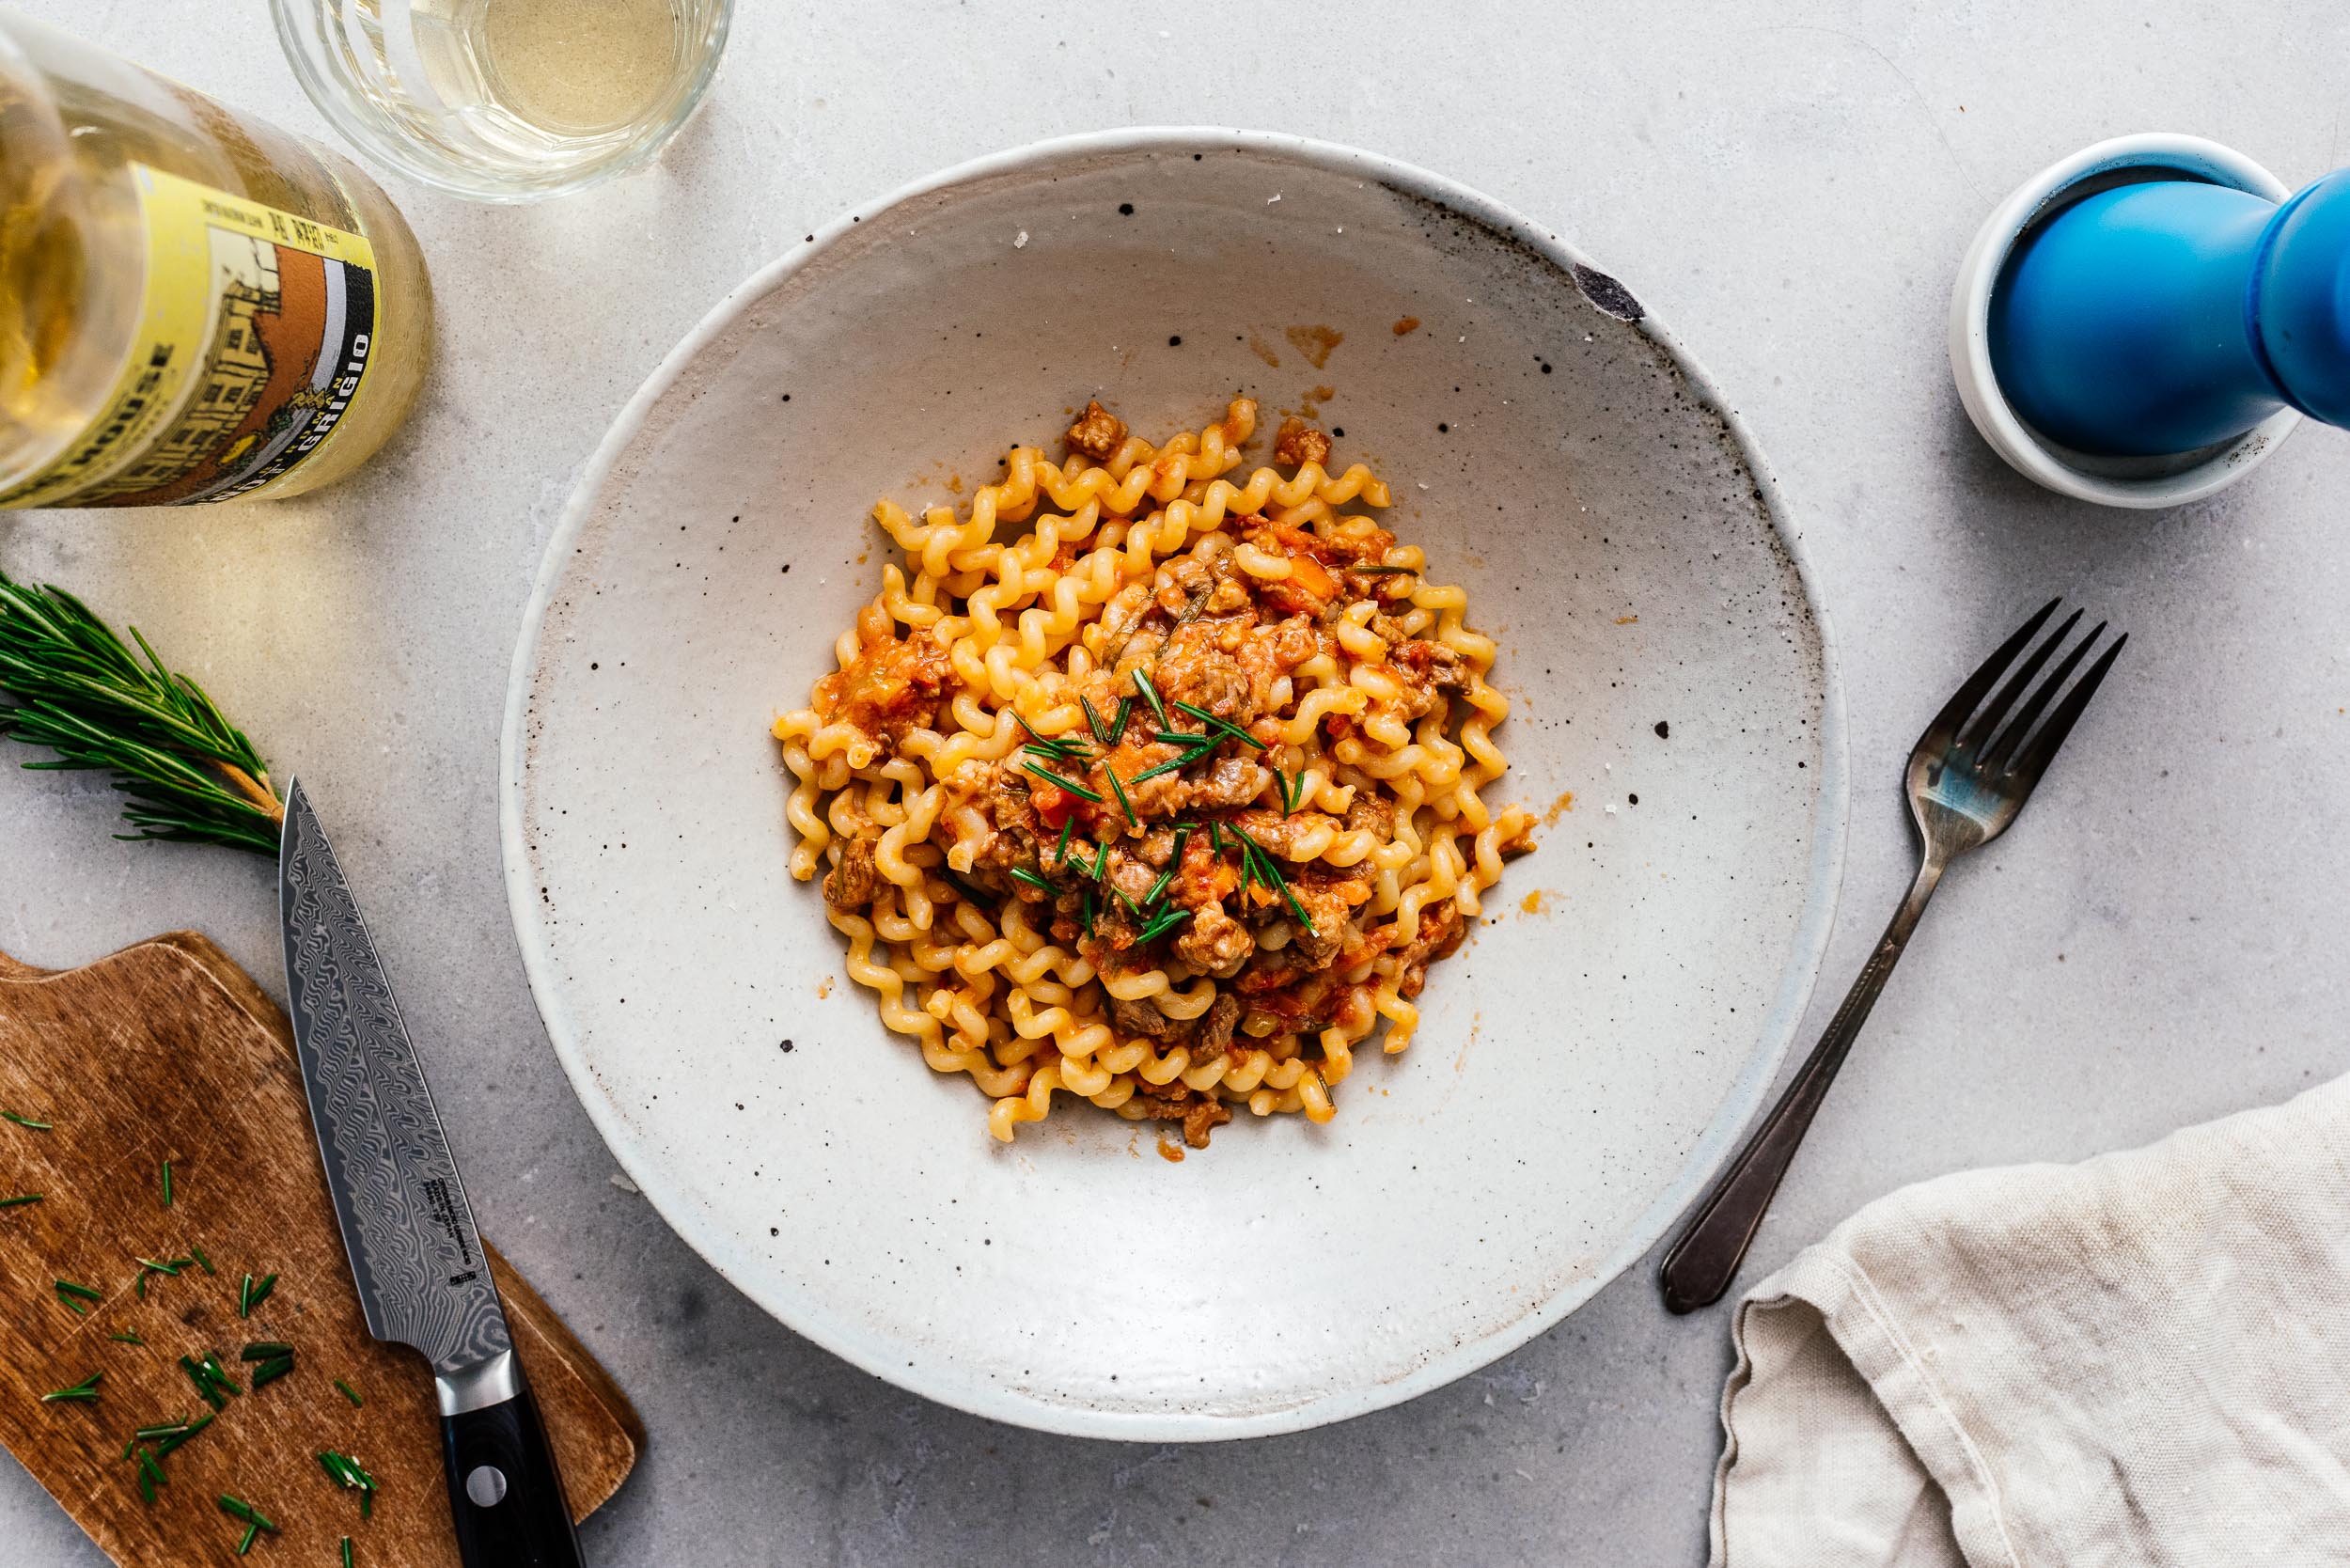
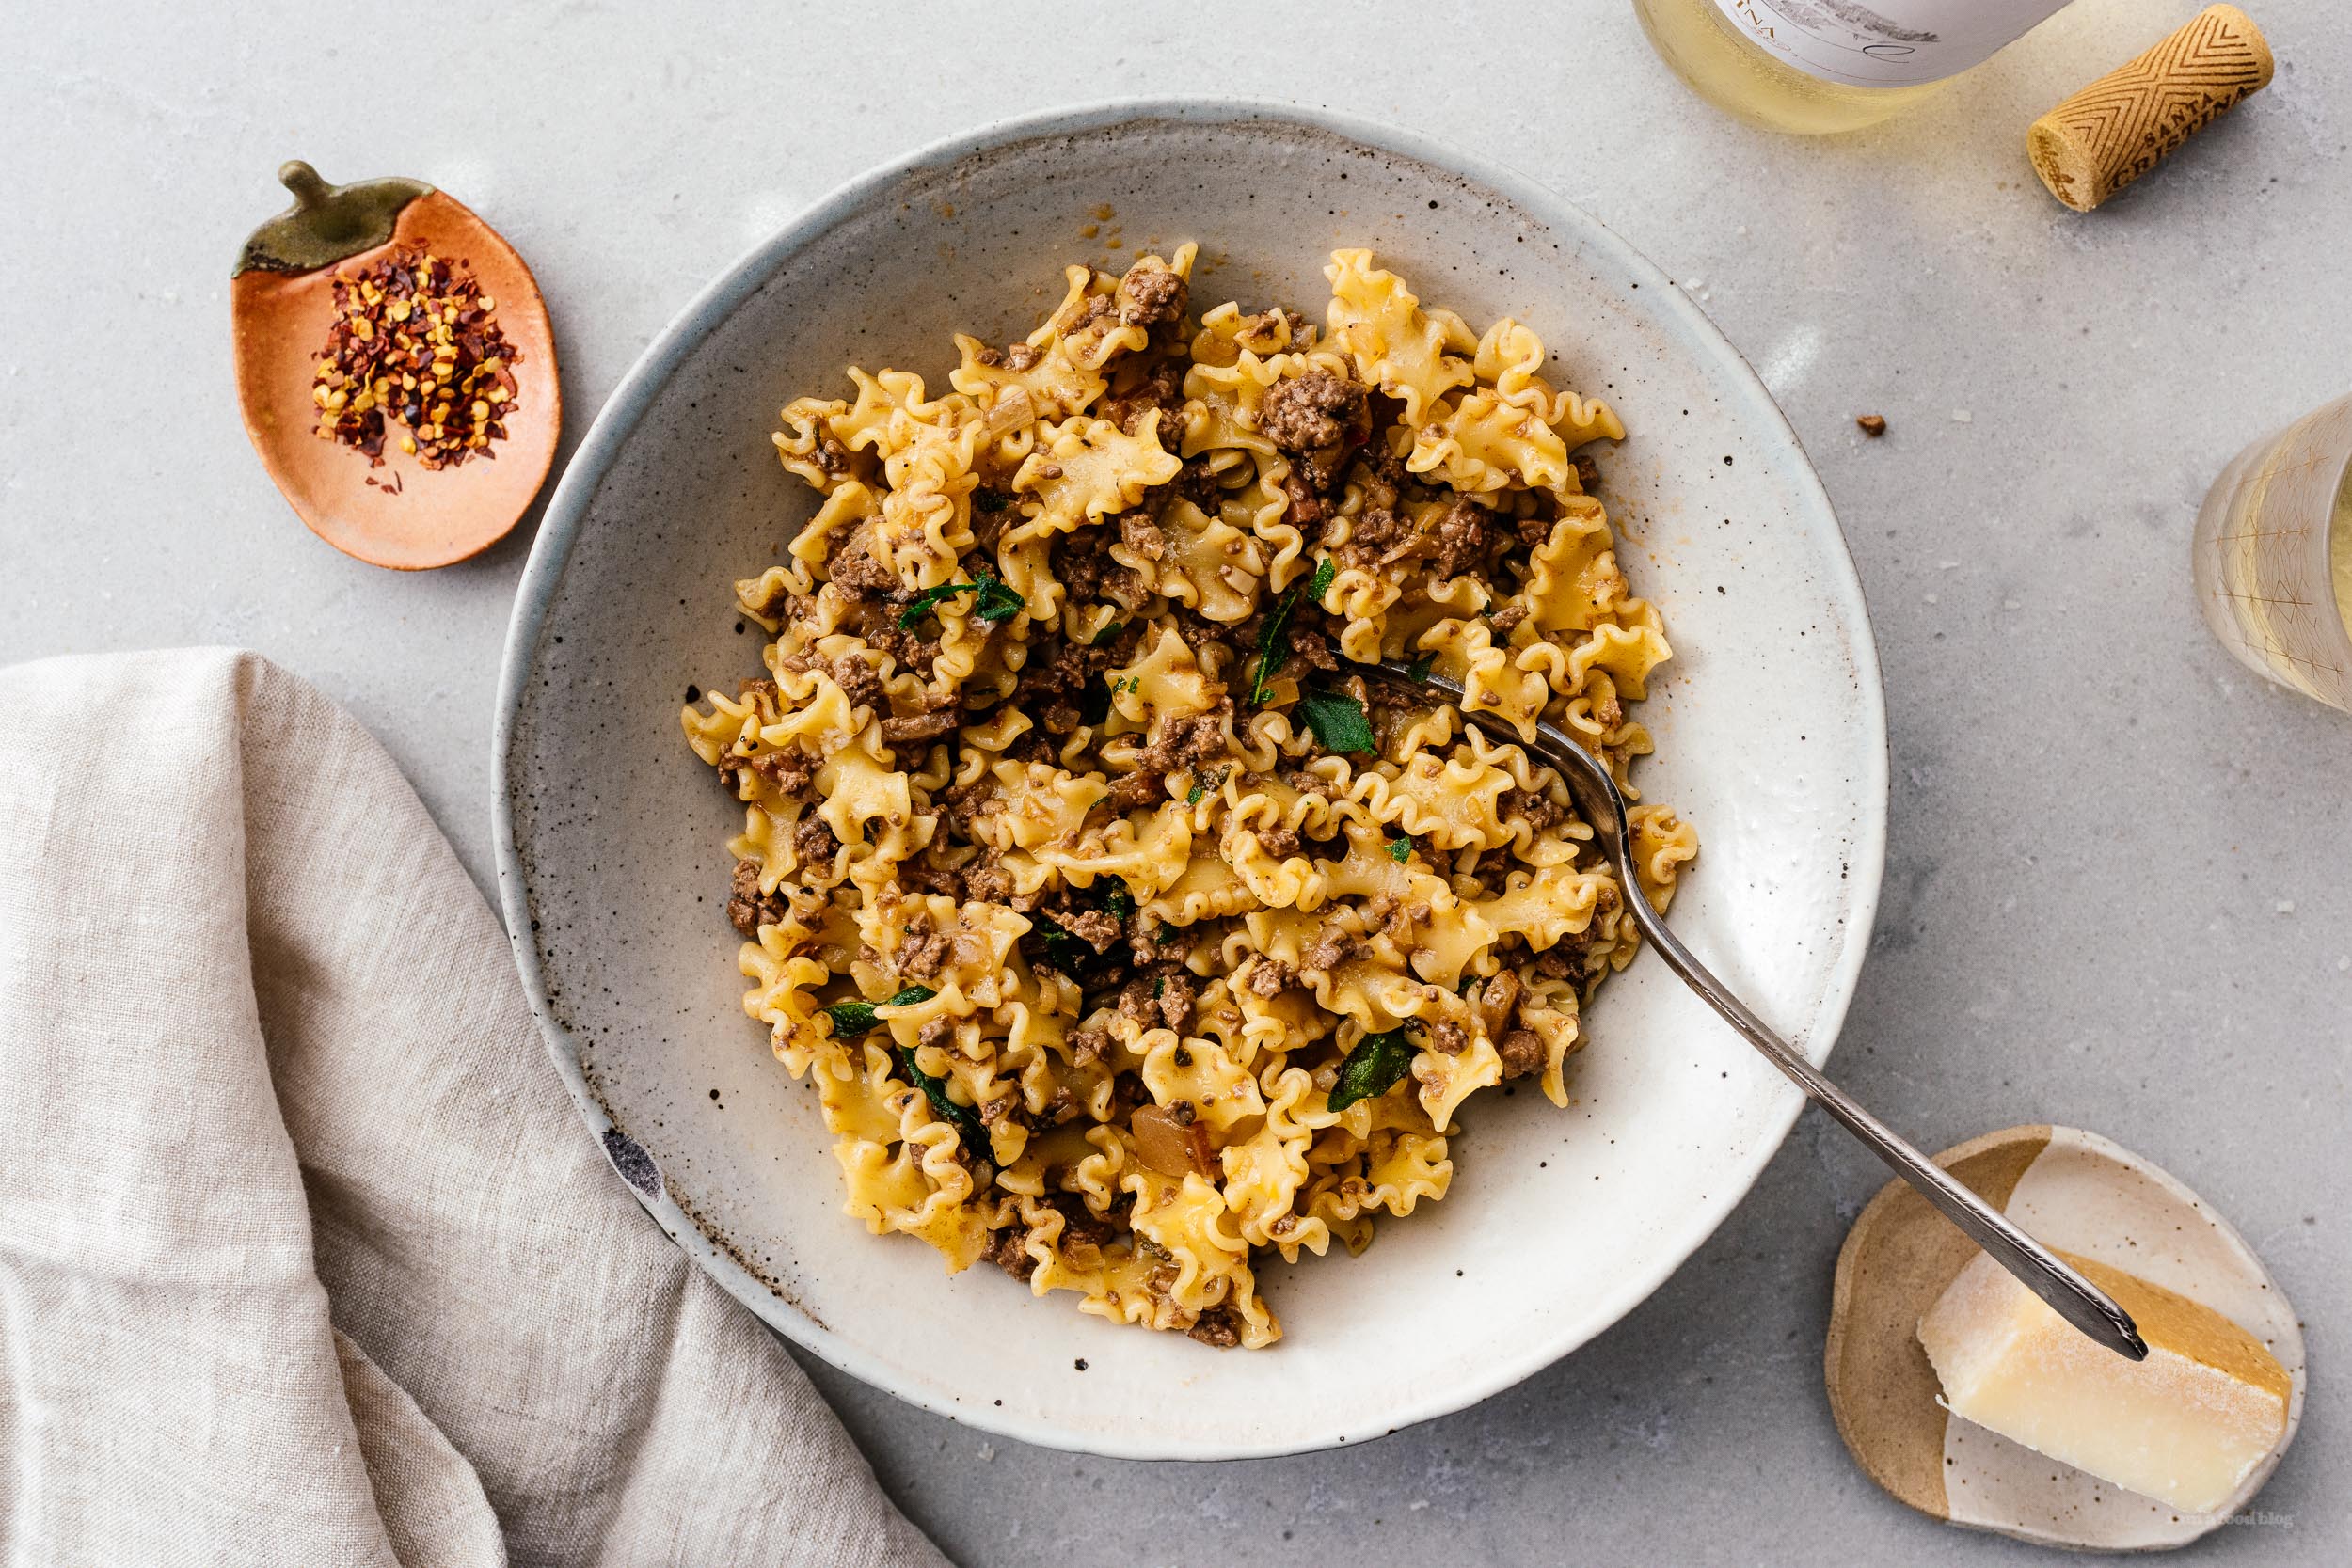
I Am... Umbria Bone Marrow Ragu with Rosemary
I’m continuing my love affair with Umbria with one of the best pasta sauces I’ve ever had; an irresistably rich celebration of beef, sausage, and rosemary. This is an alternative to ragu Bolognese you’ll be glad you tried. Umbria is the land of many of the best things about Italy: porchetta, truffles, and sausages. Because it’s landlocked, the people of Umbria make the best use of the bounty of the earth, and it shows in this rosemary-heavy ragu. A lot of people may know that rosemary originally came from the Mediterranean area, so it features heavily in the cuisines of Italy, Greece, Spain, and the Levant, but not a lot of people know that rosemary grows wild in the deserts of the American Southwest, and thrives as native landscaping too. Because of that, for me, this pasta sauce tastes like late summer afternoons in Palm Springs: warm and sunny, with wild bunnies eating dinner on the golf courses and the fragrance of rosemary bushes hovering in the air where the wind dies down. It’s the perfect summer pasta for perfect summer nights, or any season, really. This recipe was inspired by a very traditional Umbrian recipe called Ragu di Chianina, which is a ragu of a particular breed of cow. Like most of Umbria's famous foods, Chianina beef never really leaves Italy, so our version won't taste quite the same, but we can still be inspired by the process and celebration of beefiness that is this ragu, which is still unabashedly beefy and delicious.
Where do you buy bone marrow?
Bone marrow can usually be bought as soup bones in the frozen section of most grocery stores, or the meat counter will often have some in the back if you ask. I made this sauce twice though. Once with the bone marrow and once without. It tastes just great without as well, so the bone marrow is definitely an optional component. It adds a huge layer of deep richness, so I wouldn’t skip it, but I also wouldn’t drive across town to get the bones. I also made this both with hand cut angus beef and lean ground beef. If you look carefully, you can see that the photos are mixed together. It wasn't enough of a difference to recommend taking that trouble, either.How do you make ragu?
1. Cook your aromatics over medium low heat until they are golden brown. 2. Add and very briefly sauté your meats 3. Add wine and reduce, add tomato sauce, stock, and herbs 5. Simmer for 2 hours And that’s it.Tips and tricks for the best pasta
I remember a long time ago I could never get pasta to taste like it does in restaurants, even though I followed dozens of different recipes. It turned out I was making a few simple mistakes, the fixes to which are basically summarized below: 1. Choose high quality canned tomatoes. My favorite brand that's widely available is Mutti. 2. Cook covered on low heat for a couple of hours. If your pasta sauce tastes like prego or ragu brand, you probably need to give it another 30 minutes. 3. Reduce your wine thoroughly. For a long time, my pasta tasted very wine-y when I made it, because I didn't give the wine enough time. Once you move onto adding other ingredients, the wine won't reduce properly, so be sure to give it a minute or two of boiling off before you add the tomato sauce and beef broth. 4. Deeply brown your soffritto low and slow. On the subject of giving your ingredients enough time to cook, the soffritto needs the most time. Most recipes tell you to just sauté the aromatics and move onto the next step, but really, the aromatics are the most important step and form the base of your flavors, so take your time on them. 5. Add the appropriate amount of cheese. Which is to say, a lot. I like to go with 1/4 cup of grated cheese (unpacked) per plate of pasta. This is the real tip right here, most people just lightly dust the top of the pasta with parmesan, but it should be closer to at least half an ounce of cheese per portion. This was a really good ragu that I plan on coming back to again and again. If you're a fan of rosemary, this one is for you. #thatnoodlelife MikeUmbria Inspired Bone Marrow Ragu with Rosemary
- 2 tbsp olive oil
- 1 carrot (minced, about 1/3 cup)
- 1 celery (minced, about 1/3 cup)
- 1/2 medium onion (minced, about 1 cup)
- 8 oz ground beef
- 8 oz mild Italian sausage (removed from casing)
- 3 marrow bones (about 1lb)
- 1/2 cup Italian white wine (such as pinot grigio)
- 1 14oz can crushed tomatoes
- 2 sprigs of fresh rosemary
- 1 bay leaf
- 1 cup no sodium chicken stock (or beef stock/water)
- 4 oz pecorino toscana (finely grated, or parmigiano reggiano)
Heat the olive oil in a large pan or pot over medium heat. Add the carrots, onions, and celery, and cook until golden brown and translucent, 5 minutes. Season very lightly with salt and pepper.
Add the sausage and beef. Season very lightly with salt and pepper again, then break up the sausage into small chunks and cook for 3 minutes.
Add the wine and reduce by half, 1 minute or so, then add the marrow bone if using, making small pools so that the bones sit on the bottom of the pot. Add the tomatoes, rosemary and bay leaf, and enough stock to cover the top of the marrow bones, about 1 cup.
Turn the heat up to high to bring to a boil, then reduce the heat down to low and cover. Simmer for 2 hours. Check for seasoning and add salt and pepper as needed.
When you are ready to eat, pop out the bone marrow with a small spoon or the back of a wooden spoon and stir it in along with the cheese over low heat. Cook your pasta 1 minute shy of al dente, then drain and transfer to sauce. Toss lightly, then serve with chopped rosemary, pepper flakes, and cheese, as desired.
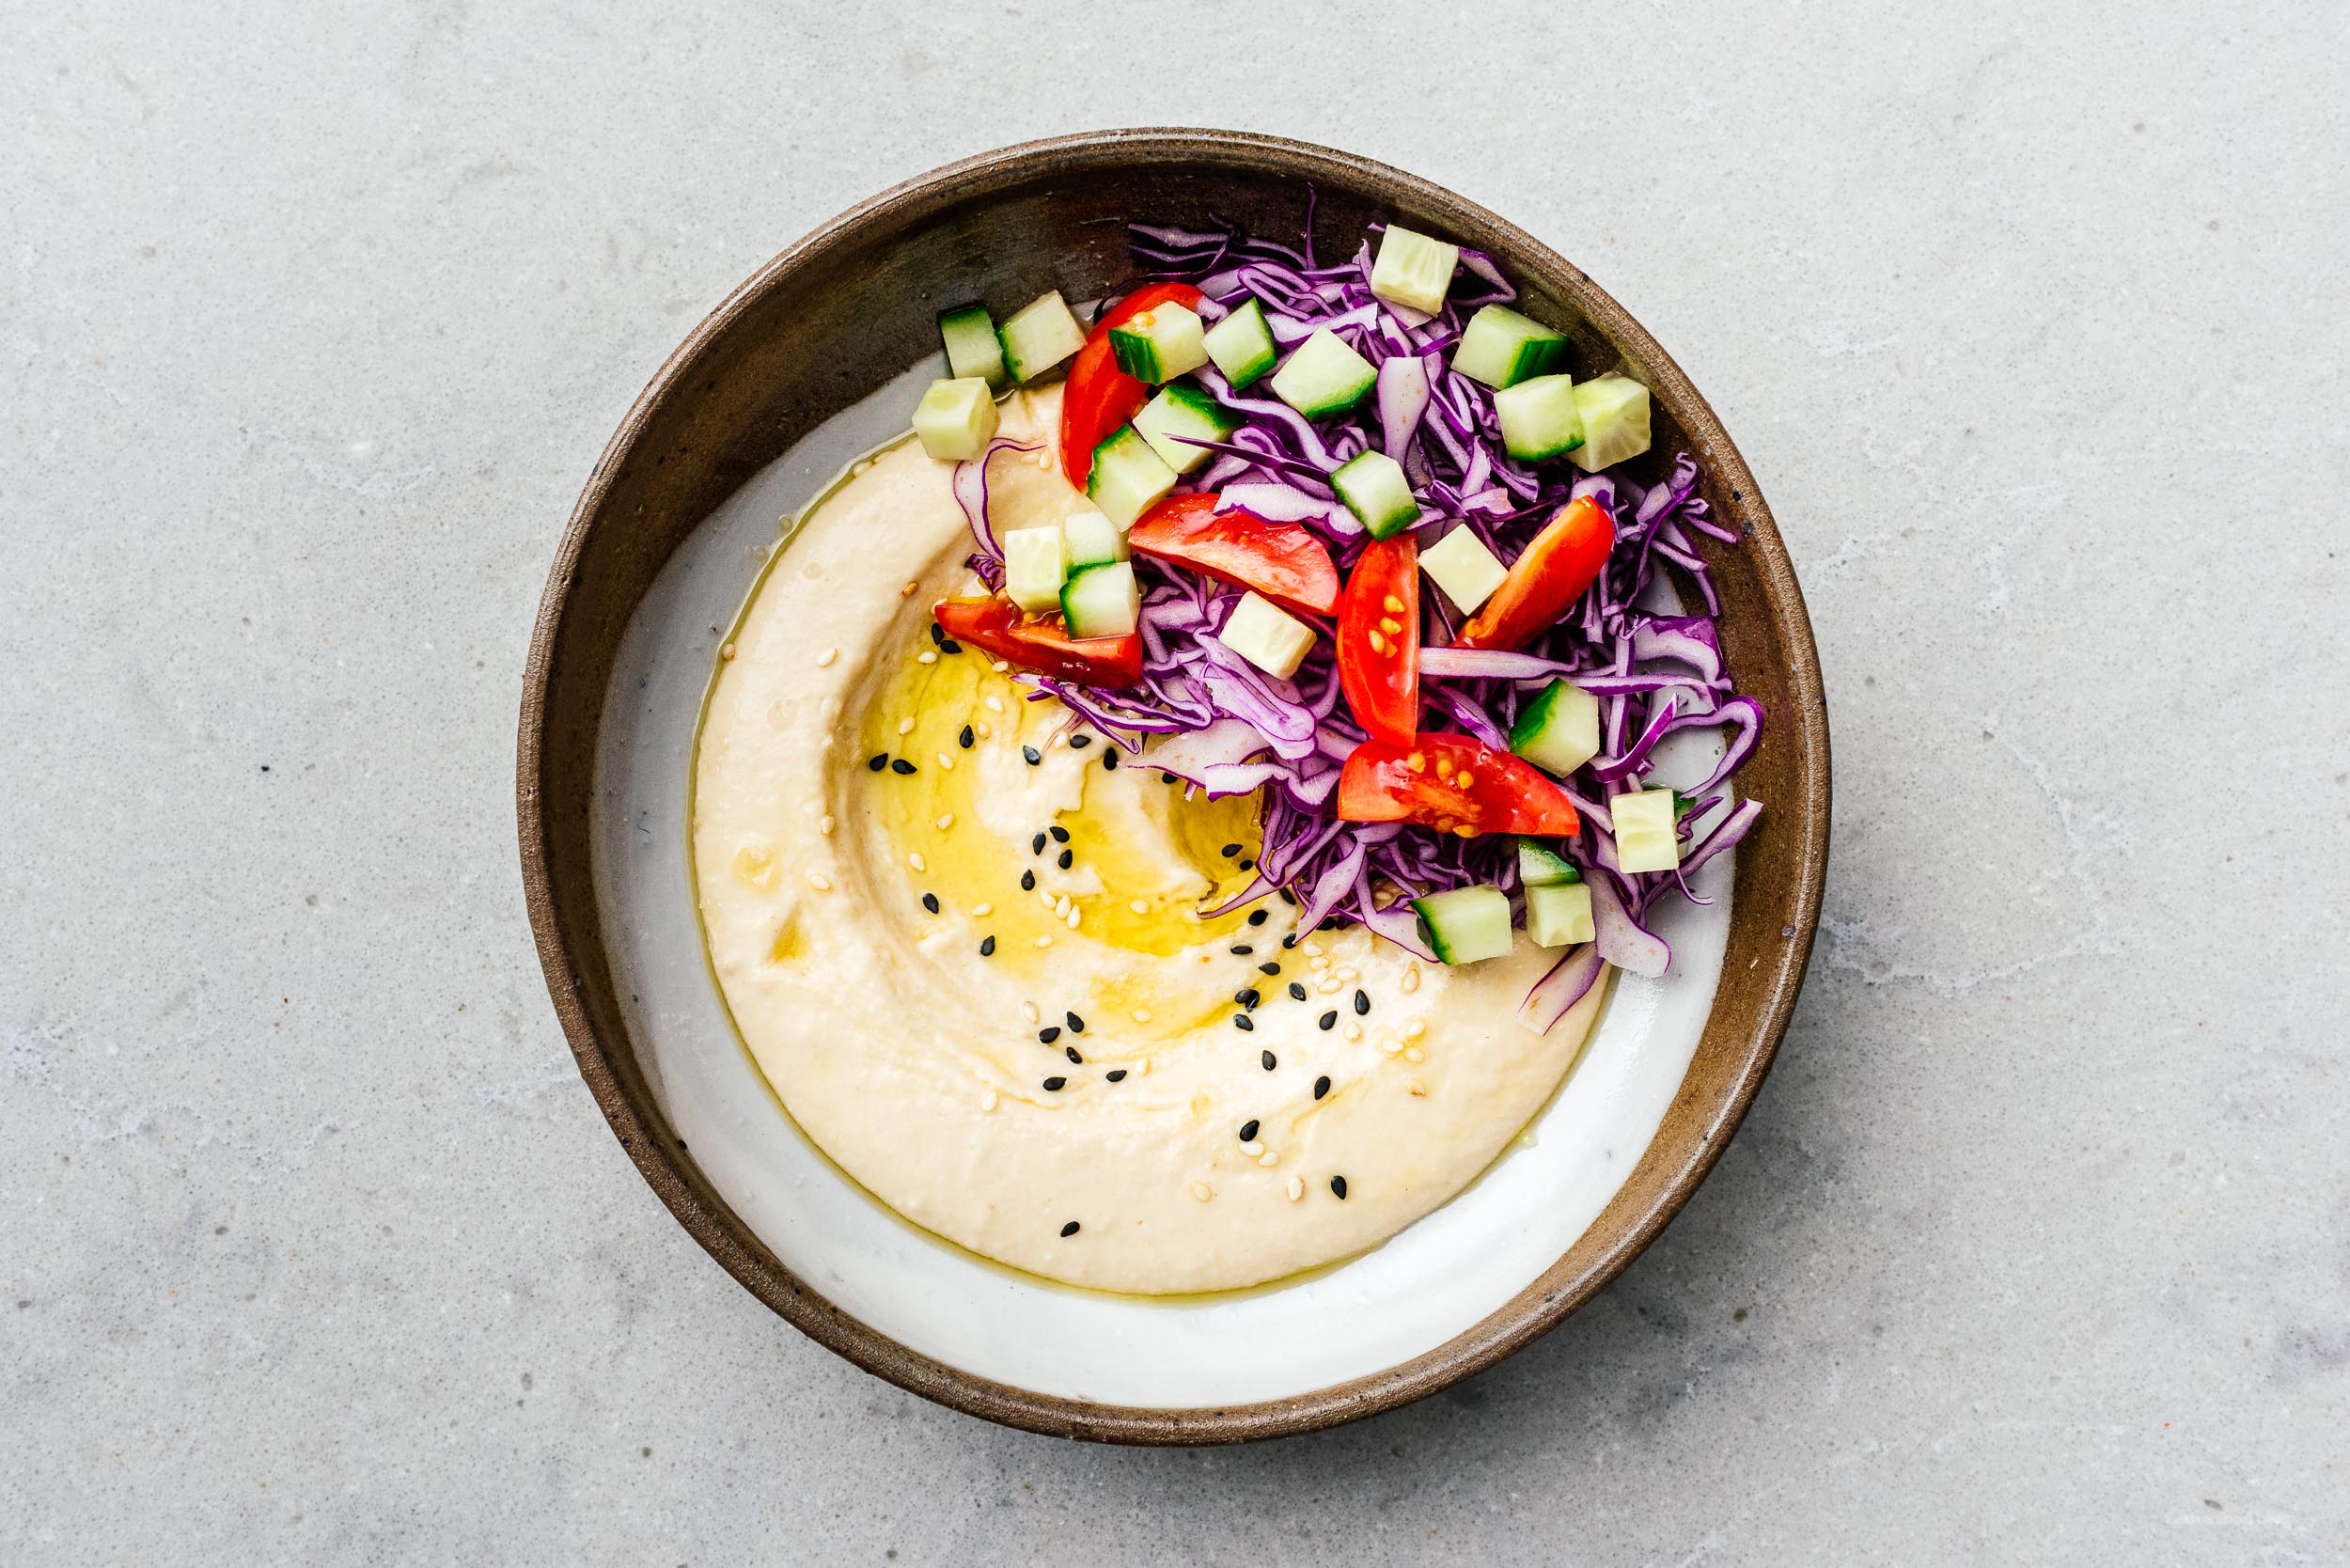
I Am... Super Easy Smooth and Creamy Hummus
My most favorite thing to make with dried chickpeas is hummus. So creamy, so dreamy, so many feels for a humble little bean. Do you love hummus? I can (and have) eaten it by the spoonful, no edible vehicle needed. Most recipes on the internet used canned chickpeas but after tasting this hummus made from chickpeas you’ve cooked yourself, you may never go back! When you make hummus from scratch, from dried chickpeas, you get to use hot-n-freshly cooked peas meaning your hummus is warm. If you’ve never had warm hummus before, stop everything and make this recipe because it is a game changer.
What is hummus?
In case you aren’t familiar with it, hummus is a delicious vegan dip/spread made from chickpeas, tahini (more on this later), lemon, garlic, and spices. It’s originally from the Middle East and is popular around the world thanks to the fact that it’s both delicious and nutritious. It has a rich and long history and you’ve probably seen it at the grocery store in little tubs but you can make it at home easily - better than store-bought. Usually it’s eaten as a dip/appetizer, drizzled with olive oil and herbs, served up with fresh pita. You’ll also find it garnished with cilantro, tomatoes, onions, and cucumbers and served up with falafel or as part of a mezze platter with a bunch of different prepared small dishes, such as tzatziki, muhammara, or baba ganoush. You can also use it as a spread in sandwiches or wraps, serve it with a bunch of fresh vegetables for scooping, dollop it on salads, eat it with eggs, or just scoop it up with a spoon (my favorite method!)What goes in hummus/hummus ingredients
Chickpeas (garbanzo beans) Chickpeas (or garbanzo beans) are the bulk of hummus. They’re super nutritious: both high in protein and low in fat with a bunch of vitamins and fiber. You can buy them dried or in cans but we prefer dried chickpeas. Why use dried chickpeas? I get it, it’s super convenient to pop open a can of chickpeas and make hummus. It’s fast and easy and it tastes pretty darn good too. BUT, soaking and cooking your own chickpeas is so much more flavorful and cost effective. You can add extra aromatics to the water you cook them in and they take up less space in your pantry. Win, win, win! We have a giant container of dried chickpeas in the pantry just for the express purpose of adding to coconut curry chickpea and other soups, making falafels, making Taiwanese chick-pea nuggets, and crispy cacio e pepe chickpeas. Tahini Tahini is a paste made from toasted ground hulled sesame. It has the consistency of a nut butter and is toasty, fragrant, and super delicious. It adds a nutty creaminess to hummus and can’t be skipped. You can make it at home (recipe coming soon!) or simply buy it at the store. A jar should make several batches of hummus. Lemon Juice You absolutely need a bit of freshly squeezed lemon juice to make your hummus sing. It adds a welcome bit of acid and freshness to contrast the richness of the tahini and chickpeas. You can tweak the lemon juice amount you add just to your liking. If you’re a lemon-head, squeeze a bit extra on! Garlic A garlic clove (or two) adds a tiny bit of heat – because it’s added in raw – and bite. If you’re not a fan of fresh garlic, you can go with roasted which will be more sweet and mellow, but the raw garlic in hummus is what gives it an addictiveness that will make you want to eat more. Salt and Spices Don’t forget to salt your hummus because under-salted hummus is just sad. Cumin adds a warm earthiness. You can sprinkle on a bit of smoked paprika, sumac, or a bit of aleppo at the end for a bit of jazz too if you like! Extra Virgin Olive Oil I don’t put any olive oil in the actual hummus, but we ALWAYS finish with a nice drizzle of fruity extra virgin olive oil.How to make super creamy smooth hummus
Now that we know what we need, here’s how to do it: 1. Soak your dried chickpeas overnight. I like to add a little bit of baking soda which helps soften the chickpeas, but it’s completely optional. 2. Cook the chickpeas. Pop the rinsed off soaked chickpeas into a pot with a LOT of water and simmer for about an hour or until the chickpeas are very soft. At this point you can add some aromatics in if you’re feeling adventurous - I kept it simple here but you can add any alliums (onions, shallots, green onions, leeks, etc). Keep them big so you can pick them out before blending. 3. Blend! Well, wait, you can also peel your chickpeas if you’re crazy about super-smooth hummus. It taste a little extra time and some people swear that that’s what makes their hummus super smooth but if you use baking soda and cook you chickpeas enough I don’t personally think it’s necessary. But if you need a little meditative time, this is when you would peel your chickpeas! Back to blending. We use a mini food processor to blend everything up. You want to start by blending the tahini, lemon juice, garlic, and a bit of ice cold water until smooth and fluffy. The ice water is what helps the tahini whip up into a smooth emulsion. Start with the tahini and lemon because it’s a lot easier to smooth out the tahini when there’s nothing else in the food processor. After your tahini lemon mix is smooth and fluffy, add your drained chickpeas and blend until completely smooth. Give it an extra minute after you think it looks done to make sure everything is super creamy. The best time to eat hummus is right after you’ve made it and it’s still warm. SO DREAMY. Pile some on a plate, make swoosh in the middle, fill it up with a puddle of extra virgin olive oil, sprinkle on some herbs or some chopped up tomatoes, cucumbers, and onions and go to town. PS - Once you master the classic hummus, try this miso hummus with crispy onion furikake, it’s TO DIE FOR.Super Easy Smooth and Creamy Hummus Recipe
- 1/2 cup dried chickpeas
- 1 tsp baking soda (divided)
- 2 garlic cloves (unpeeled)
- 3 tbsp fresh lemon juice (or to taste)
- 1/3 cup tahini
- 2 tbsp ice water
- 1/8 tsp ground cumin
Place chickpeas and 1/2 teaspoon baking soda in a medium bowl and add cold water to cover by 2 inches. Cover and let sit, at room temperature overnight, until chickpeas have doubled in size. Drain and rinse.
In a large saucepan, combine the soaked chickpeas and remaining 1/2 teaspoon baking soda and add cold water to cover by at least 2 inches. Bring to a boil, skimming if needed. Reduce the heat to medium-low, partially cover, and simmer until chickpeas are tender and squish easily between your fingers, about 45–60 minutes. Drain and set aside.
While the chickpeas are cooking, place the garlic, 2 tablespoons + 2 teaspoons of the lemon juice, and tahini in a blender or food processor and pulse until smooth. With the motor running, Add the ice water, 1 tablespoon at a time (it may seize up at first) until mixture is very smooth, pale, and thick.
Add the drained chickpeas and cumin and process, scraping down the sides as needed, until very smooth, about 4 minutes. Thin with water if a looser consistency is needed. Taste and season with lemon juice, and cumin, as desired.
I Am... The Best Japanese Cheesecake Recipe
If you’ve had the pleasure of visiting Japan, you’ll notice that if there’s one thing that people are willing to line up for, it’s good food. Be it chewy udon noodles, fluffy shokupan, or crispy gyoza, if it’s good there’s going to be a line. We’ve joined many lines in Tokyo and the results were almost always out of this world.
The best Japanese cheesecake
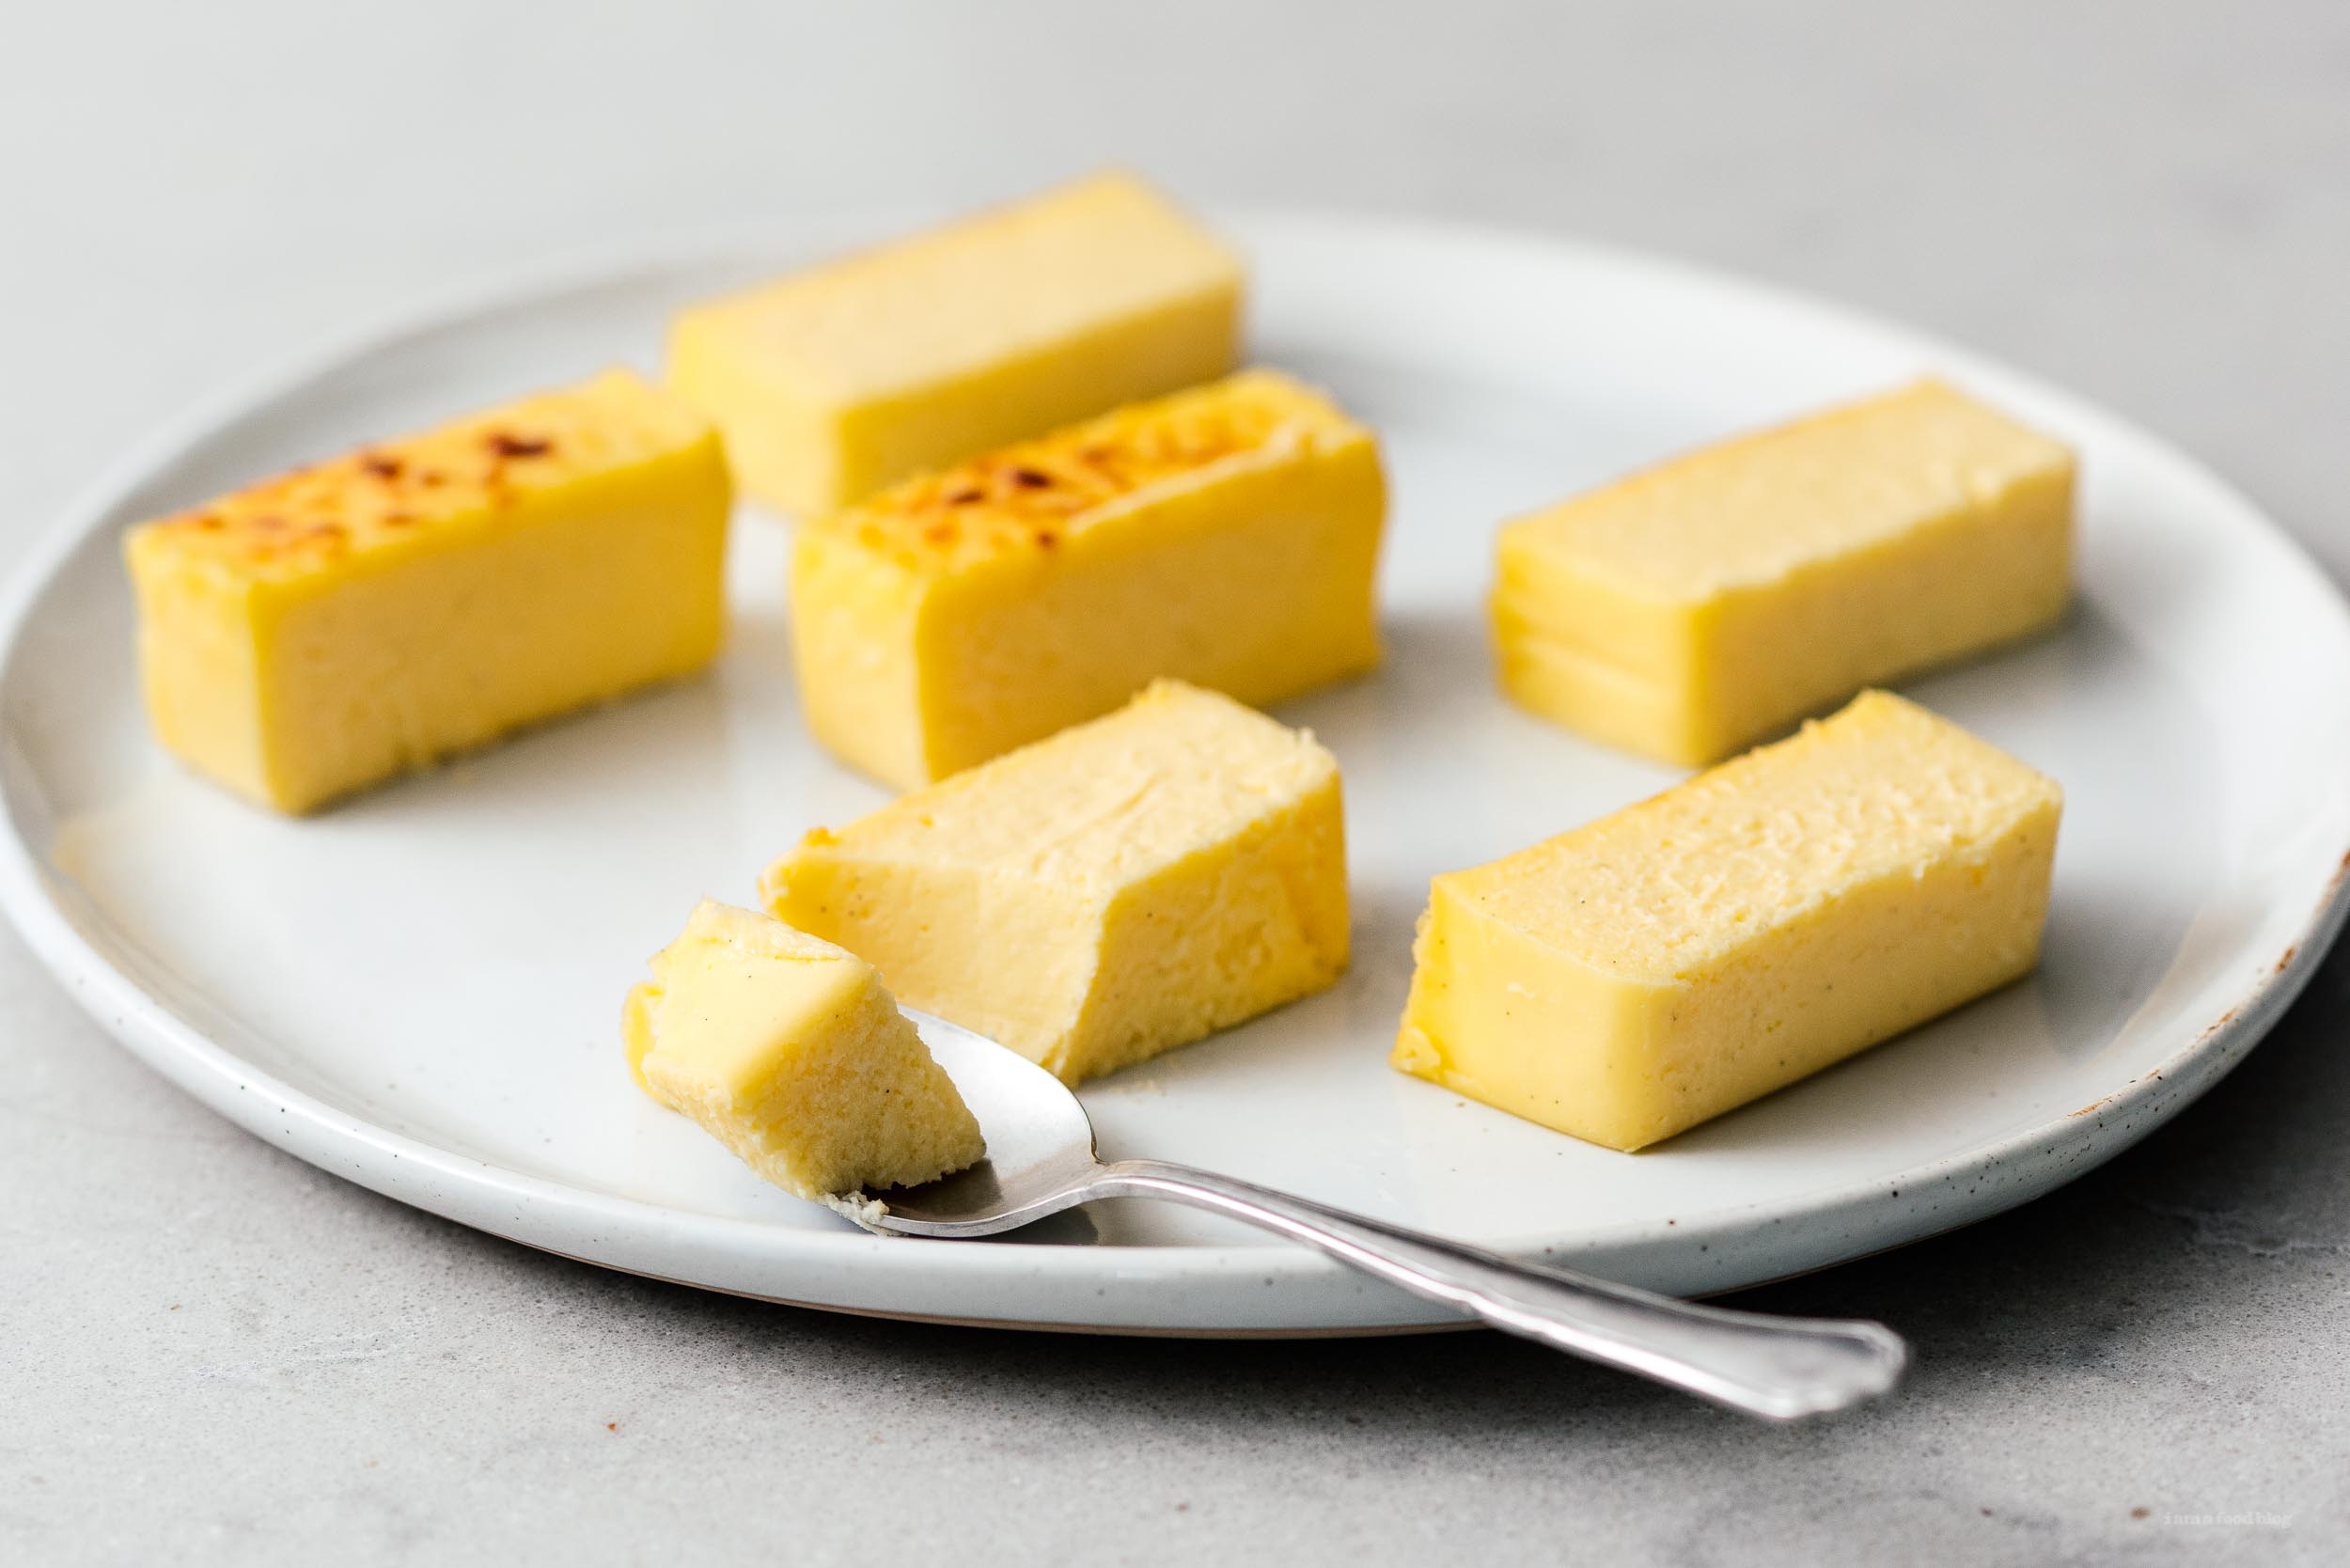
Promised to be one of the greatest cheesecakes in Tokyo is Mr. Cheesecake. Mr. Cheesecake is touted as Tokyo’s most elusive and exclusive cheesecake. Ironically, there are no lines...but only because they don’t have a physical store. The creamy rectangular shaped cheesecakes are sold online for just two days a week and sell out in minutes. Japanese food fanatics have started calling it the phantom cheesecake. Even if you do manage to be one of the lucky ones who get to purchase a cheesecake, you can’t choose the date or time of delivery. Behind Mr. Cheesecake is chef Koji Tamura. His cheesecakes are made with an indulgent combination of cream cheese, sour cream, heavy cream, yogurt, tonka beans (a super fragrant bean with warming flavors like vanilla, cherry, almond, and cinnamon), white chocolate, vanilla beans, and lemon. The result is an incredibly creamy yet light cheesecake that’s reminiscent of Basque cheesecake, but much more delicate. Tamara recommends having it three ways: frozen, straight from the fridge, and at room temperature. The different temperatures affect the taste and texture. Unfortunately we never had the chance to order a Mr. Cheesecake while in Tokyo, but luckily chef Tamura released an official recipe online in light of Covid. The recipe, while having several different steps, is really simple to execute. And the result is delicious: super creamy, super luscious, lightly sweetened, tangy cheesecake. I made the cheesecake twice, once in a regular loaf pan and once in a mini pan. I didn’t quite get the height that I wanted in the regular size loaf pan or in the mini, so I suspect that they must use a Japanese standard size. Nonetheless, I love this cheesecake. I froze some for the sake of doing three side-by-side taste tests.What makes this cheesecake so delicious?
The frozen cheesecake from the fridge had a firm frozen custardy texture with the lemon really shining through. From the fridge the cheesecake had that classic melt in your mouth texture with a hint of vanilla and balance of sweetness. Room temp was my favorite with a melty almost creamy middle that was velvety and soft, almost reminiscent of a creme brûlée but cheesecake-y and a bit more firm.How to make Mr. Cheesecake
- Cream. Stir the cream cheese along with the sugar over a double boiler until smooth.
- Melt. Heat the cream with the chocolate until the chocolate is melted.
- Mix. Combine the cream cheese mix and chocolate cream mix.
- Make the batter. In a seperate bowl, mix together the sour cream, yogurt, egg yolks, and vanilla. Whisk the cornstarch in until smooth.
- Combine. Stir everything together.
- Bake. Pour the batter into a lined baking tin and bake in a water bath. Let cool completely and enjoy!
The Best Japanese Cheesecake Recipe
A creamy Japanese cheesecake recipe that is so popular it sells out in minutes!
- 200 grams cream cheese (room temp, about 3/4 cups)
- 100 grams sugar (about 1/2 cup)
- 100 grams cream (about 6 tbsp)
- 50 grams white chocolate (about 1/3 cup)
- 180 grams sour cream (about 3/4 cup)
- 50 grams greek yogurt (about 1/4 cup)
- 2 egg yolks (room temp)
- 9 grams lemon juice (about 2 tsp)
- 1/4 vanilla bean (optional)
- 1 tsp vanilla extract
- 20 grams cornstarch (about 2.5 tbsp)
Preheat the oven to 365°F. In a bowl over a double boiler, mix together the cream cheese and sugar, stirring until the sugar is dissolved and the cream cheese is smooth. Remove and set aside to cool slightly.
In a small saucepan, heat the cream just until the edges start to bubble. Take it off the heat and add the chocolate and stir until the chocolate is melted and the mixture is smooth.
Pour the cream and chocolate mixture into the cream cheese mixture and combine until smooth. Stir in the vanilla bean, if using.
In another bowl, mix the sour cream and yogurt together. Mix in the egg yolk, lemon juice (if using), and vanilla extract. Whisk in the cornstarch.
Stir the yogurt mix into the cream cheese mix, whisking until smooth. Strain through a sieve to remove any lumps (and the vanilla bean). Transfer the batter to a standard size loaf pan lined with baking paper.
Place in a large baking dish and pour hot water into the dish to create a water bath. Bake for 25 minutes at 365°F then rotate and reduce the temp down to 300°F and bake for another 15-20 minutes. Broil slightly for a charred golden top, if desired.
Remove the pan from the water bath and cool on a rack for 30 minutes before removing the cheesecake from the pan and chilling in the fridge to cool completely.
Enjoy either from the fridge, frozen, or at room temp. From the fridge the cheesecake will have that classic melt in your mouth texture with a hint of vanilla and balance of sweetness. Frozen tastes a little bit like frozen custard with lemon and room temp tastes velvety and soft.
I’ve included cups and tablespoon measures here for convenience, but I strongly recommend using the weight measures as cream cheese, yogurt, and sour cream don’t lend themselves well to being measured with dry measures.
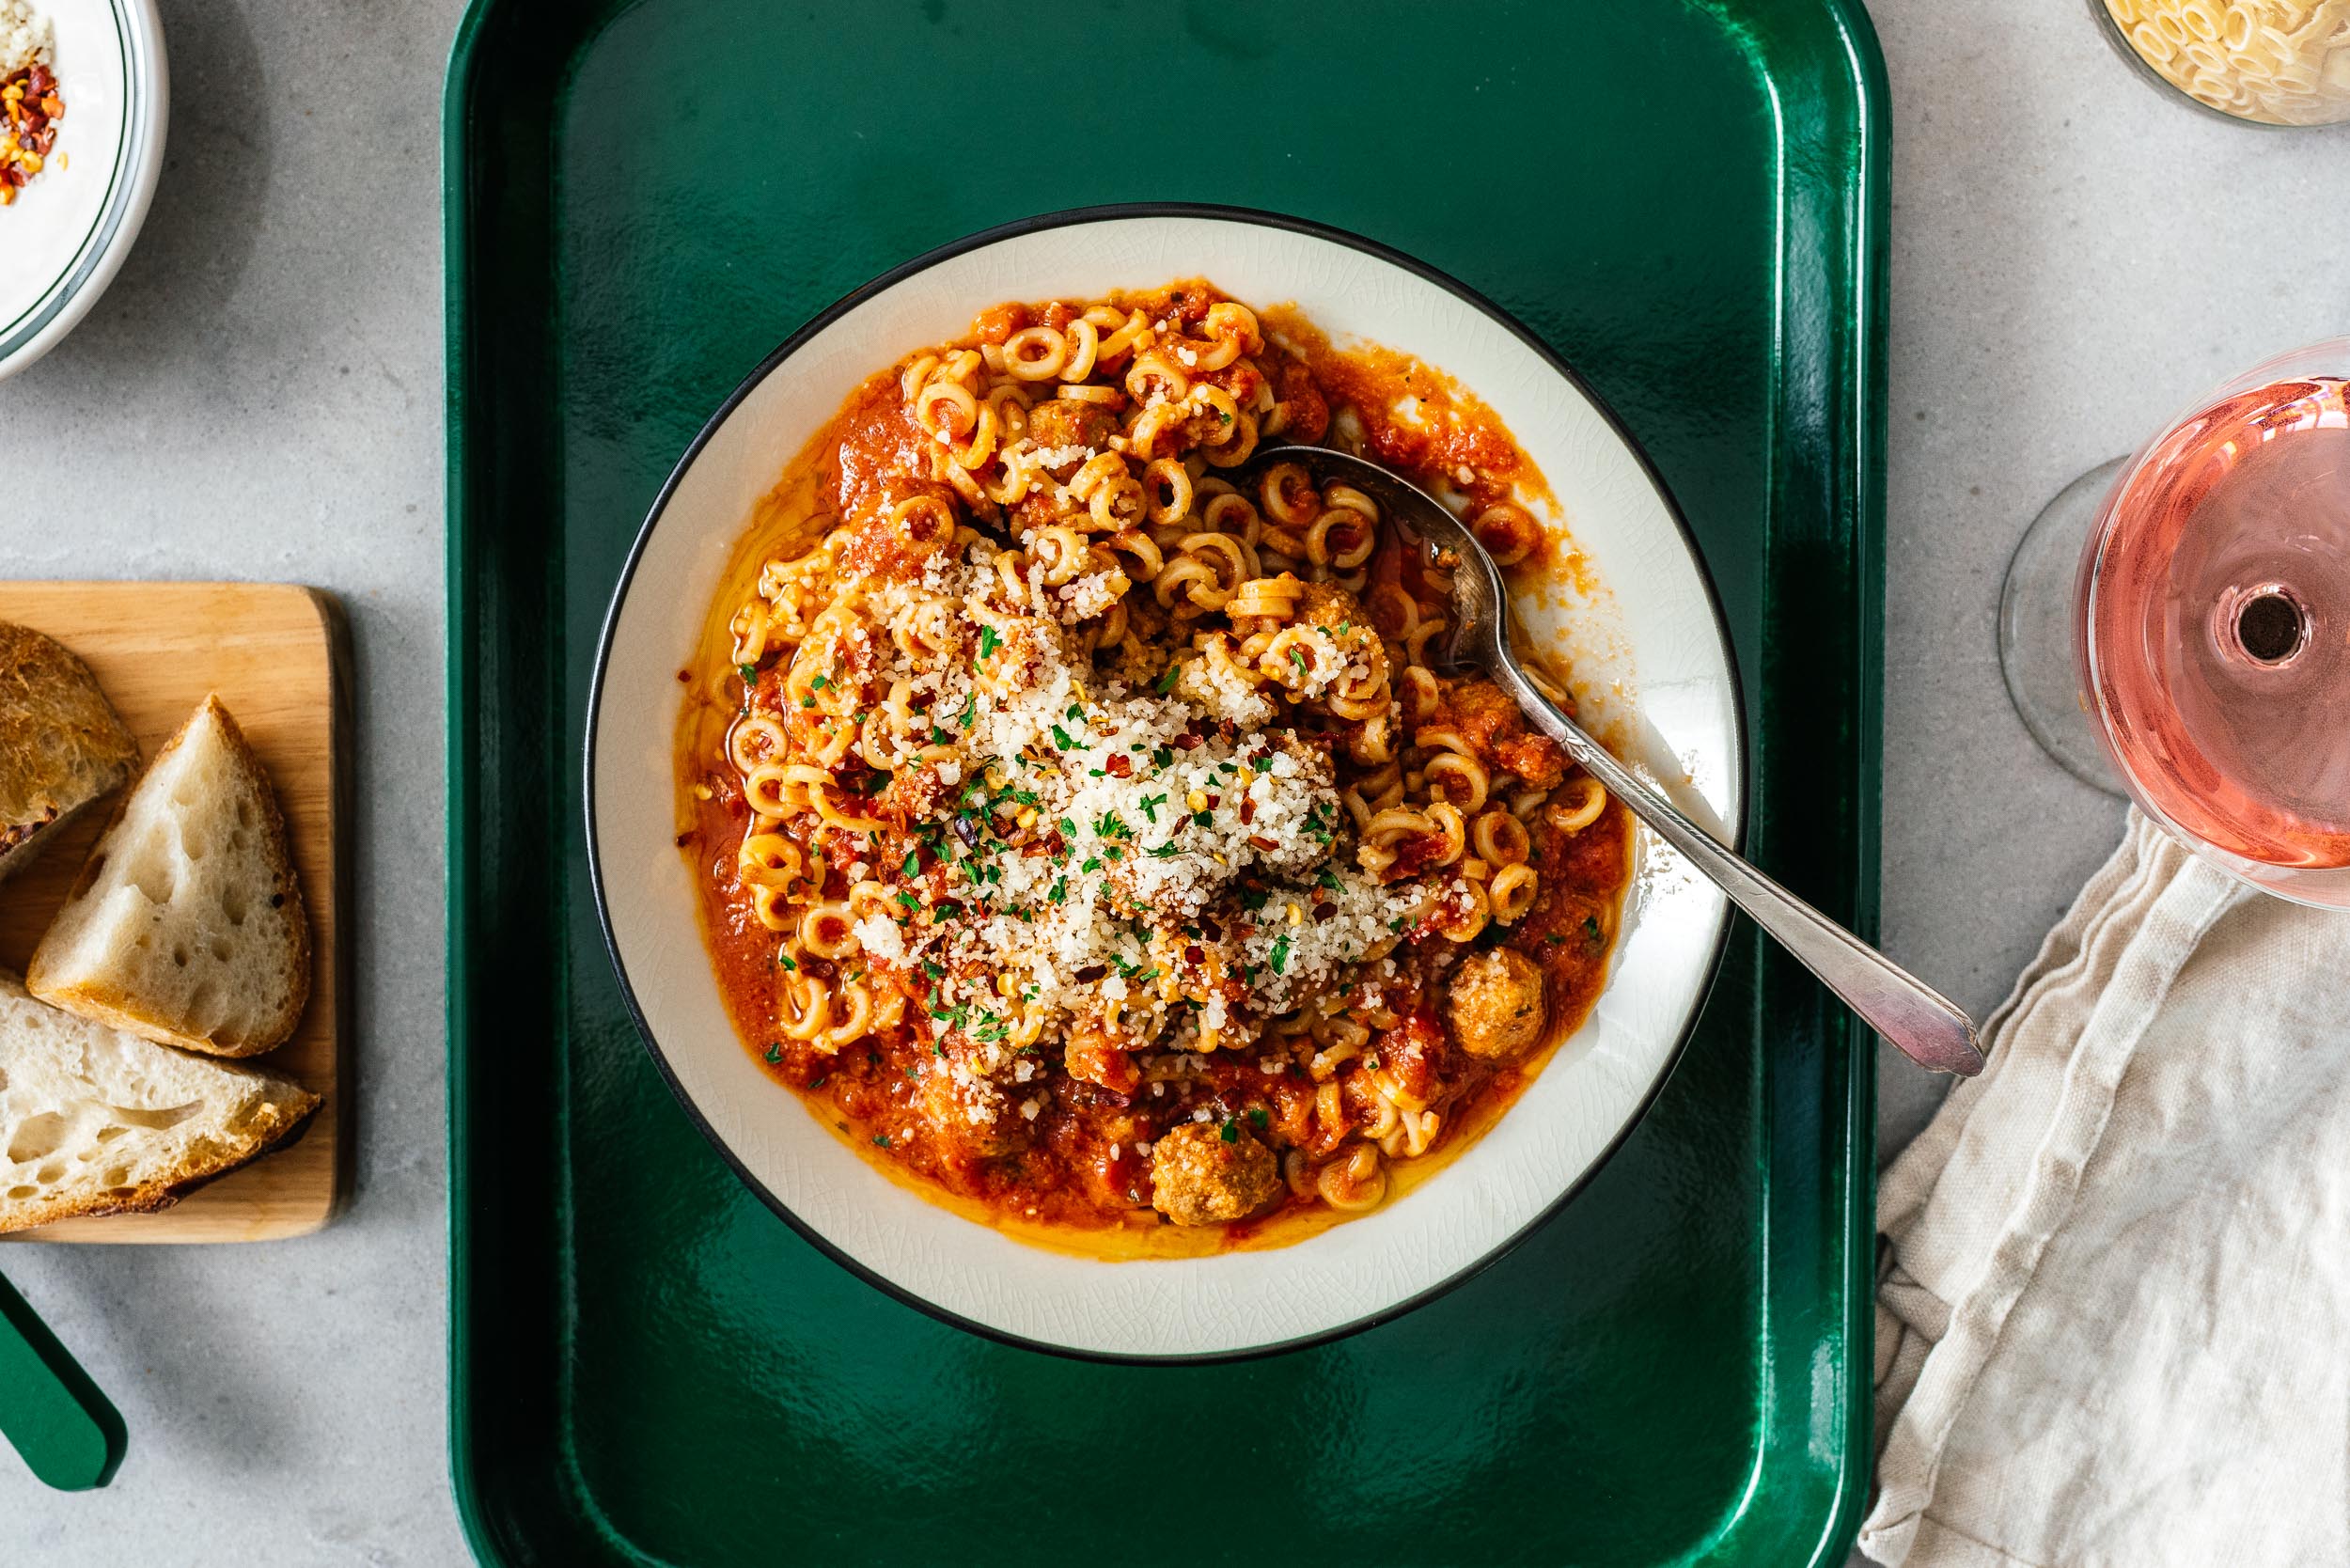
I Am... Homemade SpaghettiOs with Mini Meatballs
Did you grow up eating pasta out of a can? I sure did and I LOVED it. Our pantry would always have an abundance of 2-for-1 on sale cans of the saucy stuff and I would heat one up whenever I felt like a snack. I miss my kid metabolism…I can’t believe I used to eat cans of pasta as a snack! If only my snacks now were the snacks of my youth…I would be so happy. Anyway, snacks aside I still love a tiny pasta and mini meatball because they’re spoonable and who doesn’t love spoonable food that you eat out of a bowl? Did you know that SpaghettiOs were apparently invented because back in the day they thought that kids didn’t know how to eat long pasta neatly? It also had something to do with the fact that small pasta retains it’s texture better in a can. Doesn’t really matter to me but I do admit there’s something fun about spooning up pasta. It seems a lot more efficient somehow. As fun as spooning is, this recipe almost didn’t happen even though I’ve been wanting to make homemade spaghettiOs forever. Like so many other ideas I just never got around it it. Luckily (or maybe unluckily) these guys got made because of a failed experiment. I had a bunch of mini meatballs in tomato sauce because I wanted to create a bread cube stuffed with spaghetti and mini meatballs. The bread cube didn’t quite work out (I didn’t sauce the spaghetti enough) but the mini meatballs in sauce turned out to be SO delicious that they had to be mixed up with mini rings. Those iconic spaghettiO mini rings are actually not that easy to find. We had some anelli pasta in the pantry, but it was the kind that had cut edges instead of those smooth rings you find in a can. I mean, they worked, but had I had time to plan in advance I would have scoured the internet for those smooth rings. Taste-wise they were practically the same except when you make pasta at home it invariably ends up more al dente from pasta in a can. Sweet and slightly tangy tomato sauce, tender lil meatballs and spoonable scoopable pasta. This was a satisfying taste of nostalgia and I would totally do it again even though shaping those little meatballs was a pain in the butt!
Homemade SpaghettiOs with Mini Meatballs Recipe
Sauce
- 1 tbsp olive oil
- 1 tbsp butter
- 1 tbsp sugar
- 1 tsp dried oregano
- 1 tsp garlic powder
- 1 tsp onion powder
- 1/2 tsp red pepper flakes (optional)
- 28 oz crushed tomatoes (1 can)
- 1 tbsp chopped flat leaf parsley
- 12 oz anelletti or small shaped ring pasta
Meatballs
- 1/2 cup panko (or breadcrumbs)
- 1 tbsp fresh flat leaf parsley (chopped)
- 1 tsp garlic powder
- 1 tsp onion powder
- 1/2 tsp salt
- 1/2 tsp pepper
- 1/2 cup milk
- 1 large egg
- 8 oz ground beef
- 8 oz ground pork
In a large, deep skillet, heat up the olive and and butter. Add the sugar, oregano, garlic powder, onion powder, and red pepper flakes and cook, stirring, until the sugar dissolves, 1-2 minutes. Stir in the crushed tomatoes and parsley. Bring to a simmer, then reduce the heat and cook until the flavors meld, about 20 minutes (or as long as it takes you to make the meatballs). Taste and season with salt and pepper.
While the sauce is simmering, make the meatballs. In a large bowl, mix together the panko, 1 flat leaf parsley, garlic powder, onion powder, salt, and pepper. Stir in the milk and whisk in the egg. Add the beef and pork and mix until just combined, being careful not to overwork. Form into tiny dime sized meatballs, wetting your hands lightly as you go along so the meat doesn’t stick to your hands. Place the meatballs on a tray.
Gently place the meatballs into the simmering sauce. If there isn’t enough room for the meatballs to be covered by the sauce, add a bit of water or stock to ensure all the meatballs are fully covered. Simmer covered for 10-15 minutes or until the meatballs are tender and cooked through (cut one open to check).
While the meatballs are simmering, cook the pasta according to the package in a large pot of salted water.
When al dente, drain well and top with the mini meatball sauce, stirring to combine everything together. Enjoy topped with parmesan, chili flakes, and extra flat leaf parsley if desired.
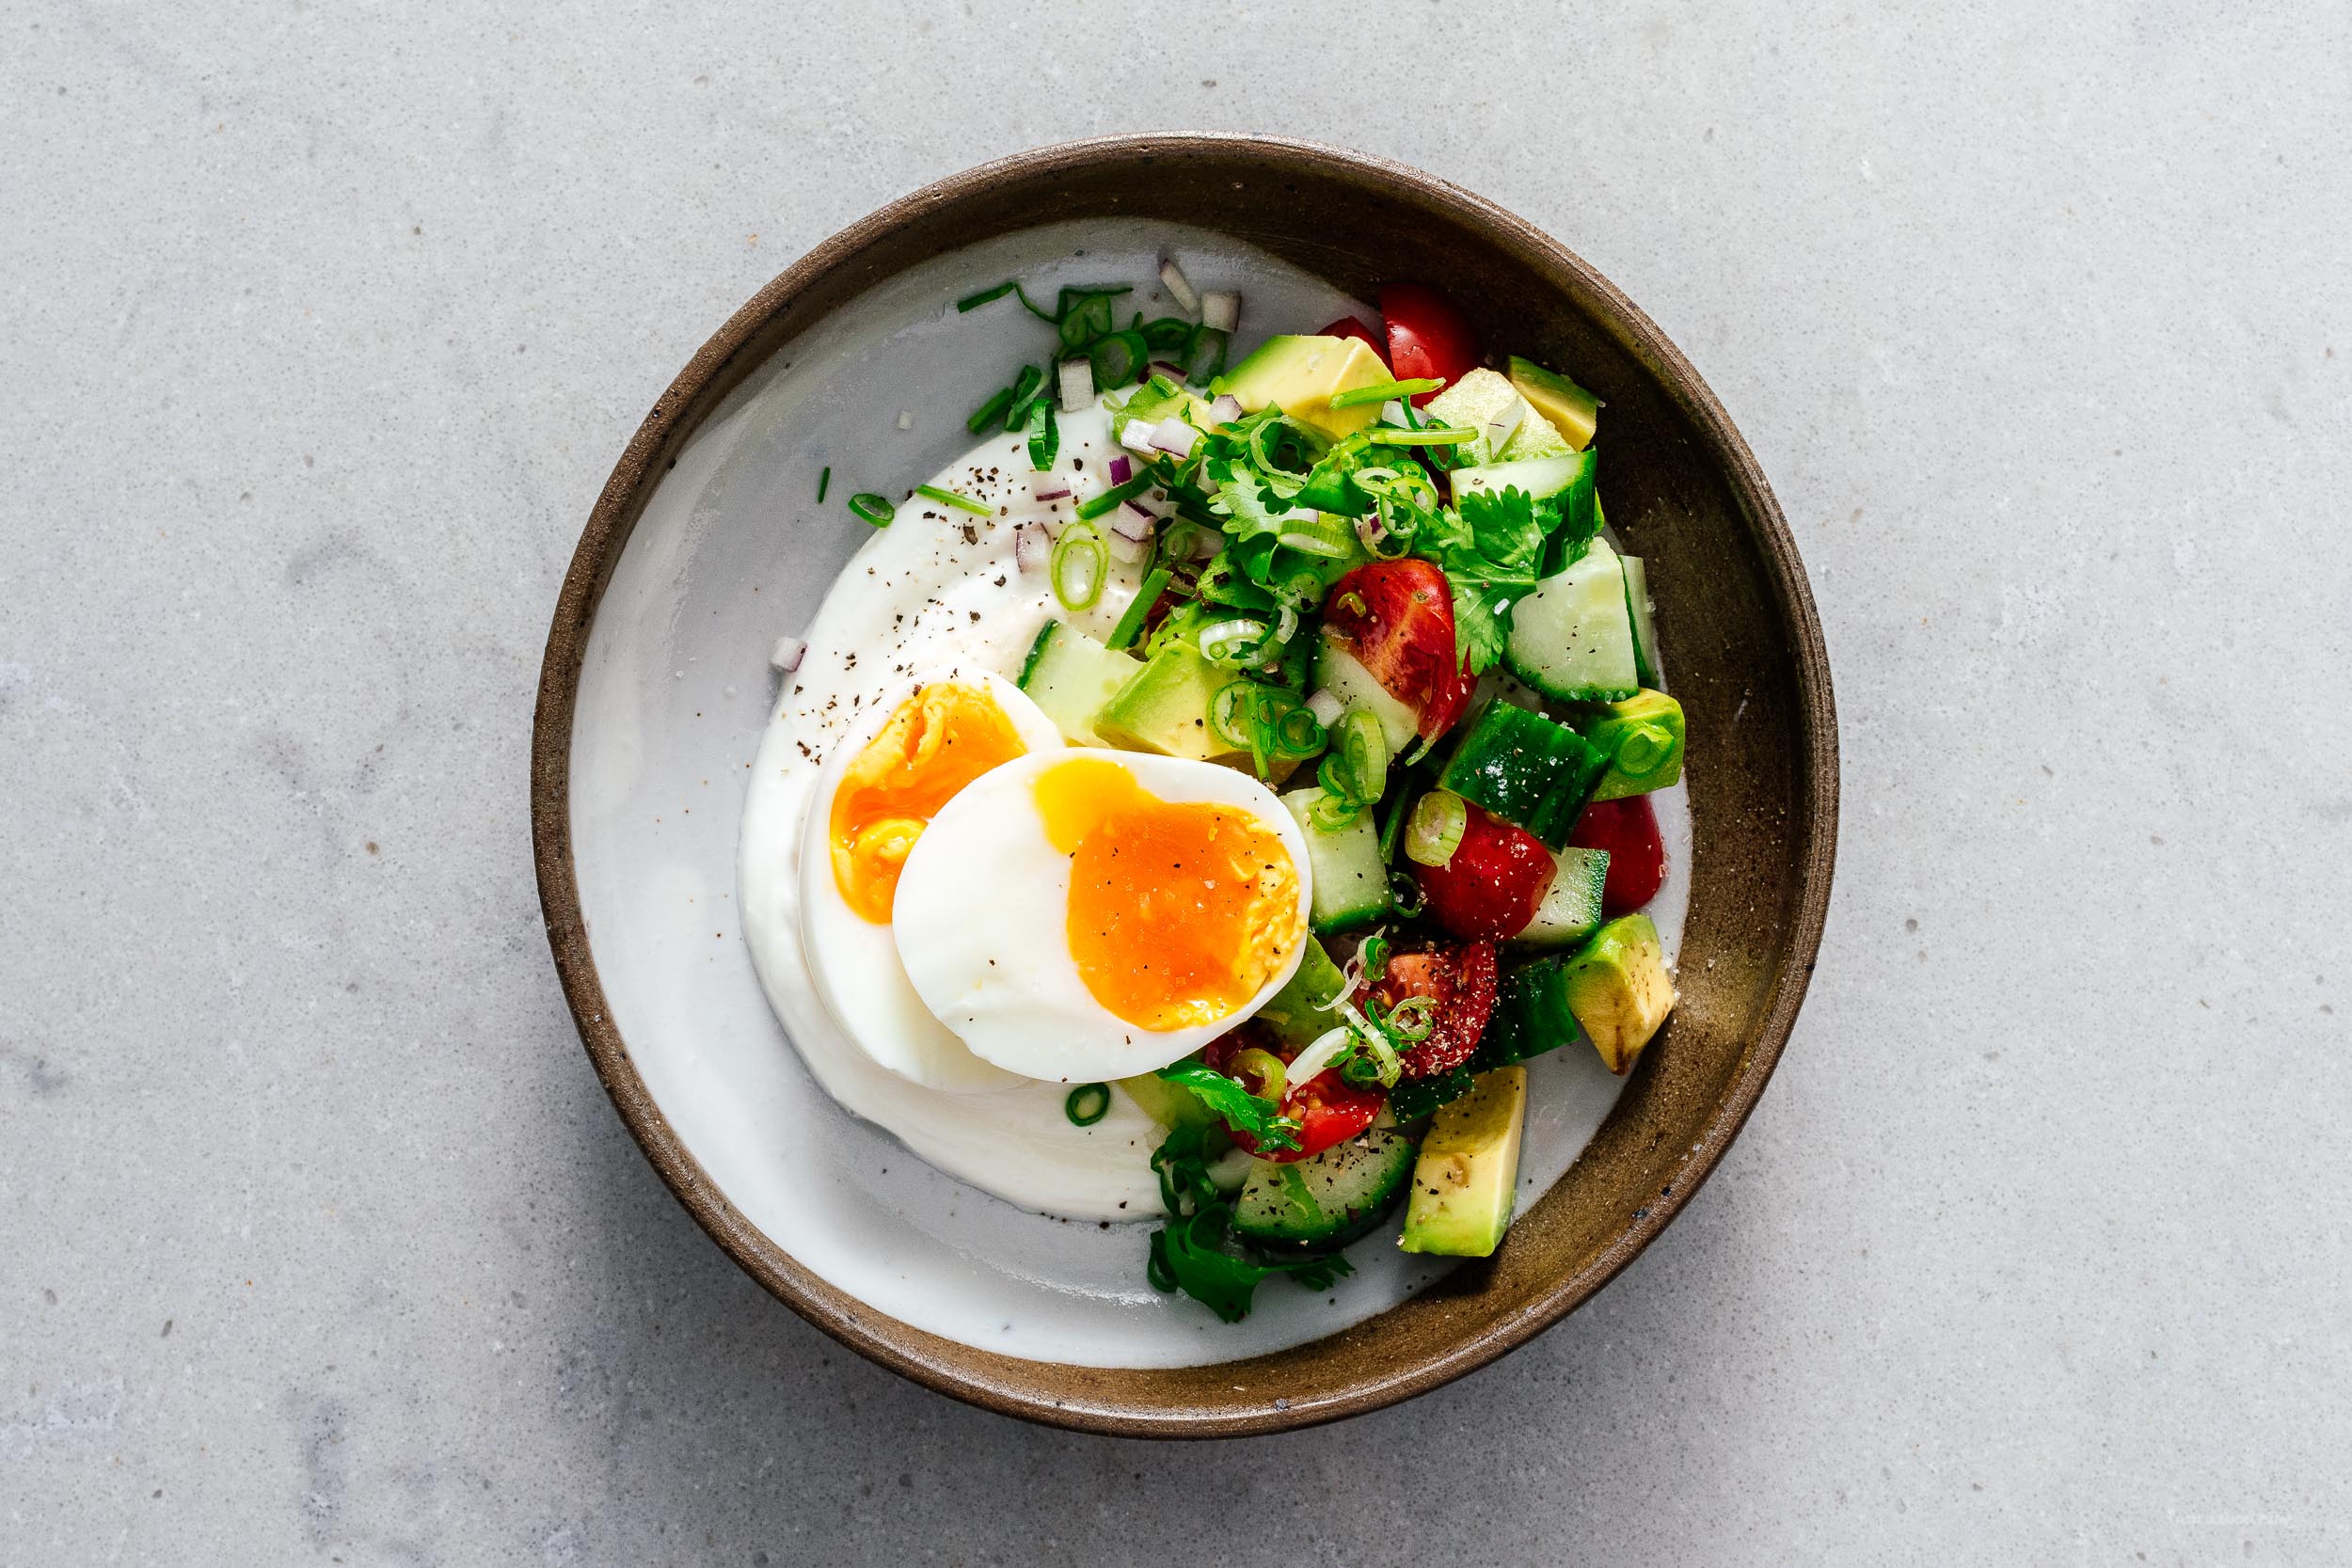
I Am... Jammy Eggs and Yogurt Breakfast Bowl Recipe
I’m the worst at eating breakfast. I LOVE breakfast foods but I’m always grumpy in the morning and starting the day by making breakfast just doesn’t seem ideal to me. This is why I like to eat breakfast foods at dinner. Or at brunch. Preferably after I’ve already had a coffee or two. Anyway, not eating breakfast makes me not very fun to be around so in an attempt to be a morning person, I’ve been eating this particular breakfast on repeat. I start every day the same: soft boiling a jammy egg and cutting up vegetables while Mike makes pour over coffee. The good thing about eating the same breakfast every morning is that you never have to think about it. Part of the reason why I don’t make a variety of breakfasts is because before my brain wakes up I can’t really think or make decisions. I’m pretty indecisive even in the best of times so having my breakfast decision made for me is just about the best thing ever. Other pros for eating the same breakfast over and over again:
- you can prep most of your breakfast the night before
- grocery shopping is as lot easier because you know exactly what you need for breakfast
- according to science, eating the same breakfast everyday could possibly make you happier because you don’t get as much decision fatigue since your very first decision of the day is made for you
- you save time because you’re not waffling (heehee waffles) about what to make for breakfast
- make it saucy: sauce makes everything look more appetizing and delicious. Dry food doesn’t appeal that much. Even things that are supposed to be dry and crunchy (like fried chicken or fries) get paired with sauce because humans like sauce. Give us ALL THE SAUCE. In this cause the sauce is the yogurt which is swooshed on in a dramatic fashion.
- stack things: you could put the yogurt on one section of the plate, then the vegetables on another, and the egg on another, but when you stack them all together the dish looks more well thought out and restaurant like. Don’t be inspired by those keep it separate dishes. Stack everything, always.
- garnish: when in doubt, garnish with herbs, spices, or other things. There is a reason why the food at restaurants is pretty. It’s because they all have garnish stations. Garnish is the make up of the food world. Sure you could go out bare-faced, but why? Make it rain garnish.
Jammy Eggs and Yogurt Breakfast Bowl Recipe
- 1 large egg
- 2 tbsp yogurt
- 4 cherry tomatoes (quartered)
- 1/4 cup cucumbers (diced)
- 1/4 avocado (diced)
- 1 tbsp red onion (diced)
- herbs of choice
- salt and freshly ground pepper
Bring a small pot of water up to a boil. When at a hard boil, add a large egg, straight from the fridge into the water. Set a timer for 6 minutes and 30 seconds.
Swoosh a spoonful yogurt on a plate. I added an extra swoosh of hummus as well.
Top with the vegetables. I prefer to keep my veggies on one side, for aesthetic reasons.
Chill the egg in very cold tap water and peel. Slice in half and place on top of the vegetables. Finish with salt and pepper and enjoy!
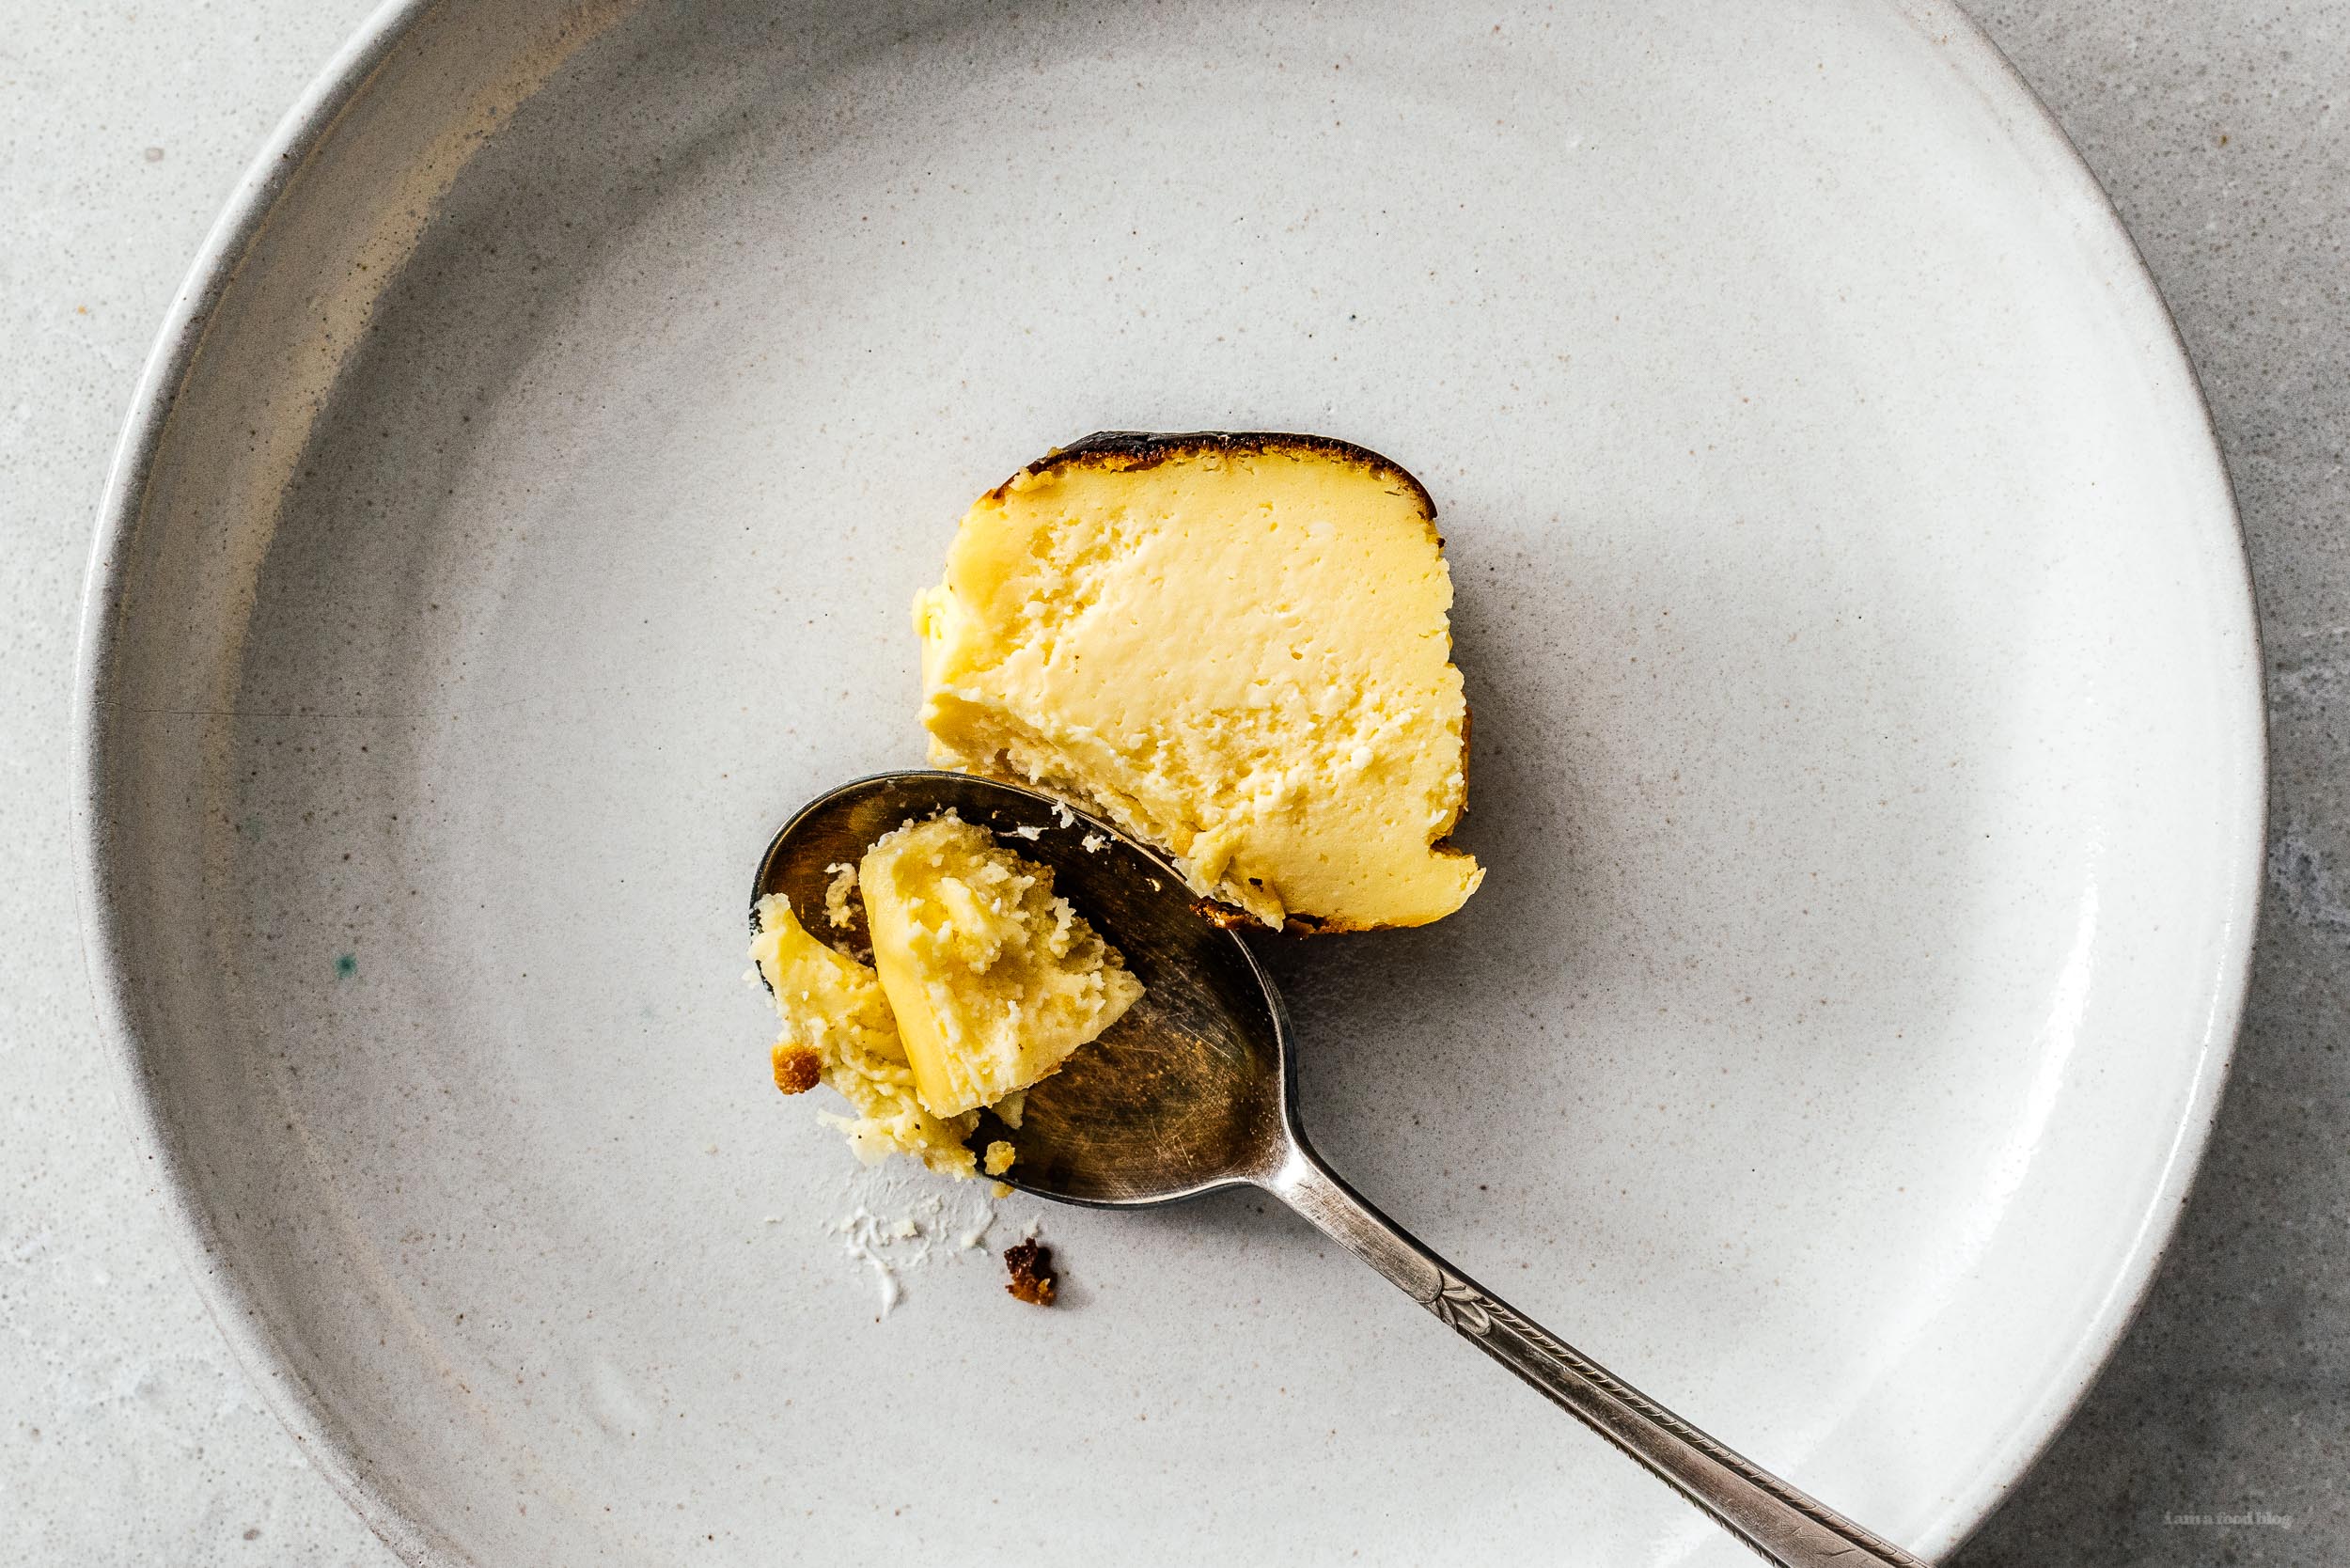
I Am... Small Batch Basque Burnt Cheesecake Recipe
I have a confession to make. I have eaten 3 whole cheesecakes in the last two weeks alone. Granted, they were all small batch cheesecakes, but really, it essentially amounts to me eating one cheesecake, all by myself. I know we’re in the middle of summer and everyone is trying to work off their quarantine 15 but here I am, still soft and plump and not quite ready to stop stress eating sweets. Okay, I lie. I am totally ready to stop stress eating sweets. In fact, I have been looking into the Mediterranean diet. It sounds good! It sounds more sane than keto (which I flirt with still, on occasion) because you can eat loads of vegetables and whole grains. I’m thinking of experimenting with some Mediterranean diet recipes on the blog so if you’re into that, please leave a comment below. Or tell me what your favorite recipes are – I’m excited to learn. But you’re not here for the diet recipes so let’s talk about this Basque burnt cheesecake. I love it because it’s made in a mini loaf pan so you can take slices off of it like a loaf cake. It makes it feel like less of a dessert and more like one of those morning cakes that masquerade as “bread”. You know, lemon loaf and banana bread and the like. Which, let’s face it, are kind of just lemon cake and banana cake but in a different form factor. I love the loaf form factor so it’s no surprise that I love this small batch Basque cheesecake. It’s just a tiny bit different than the other Basque cheesecake recipe on the blog. I wanted to play around with the proportions and bit and try using cornstarch instead of flour for a completely gluten-free cheesecake. This lil cheesecake loaf was sweet and creamy with a hint of burnt caramel from the burnished top. I loved it and now it’s a part of me forever :) PS - If you haven’t heard of Basque cheesecake, please read my original post here!
Small Batch Basque Burnt Cheesecake Recipe
- 8 oz cream cheese (1 package, 226 grams, very soft)
- 60 grams sugar (1/4 cup plus 1 tablespoon)
- 1 large egg
- 1 tbsp cornstarch
- 35 grams heavy cream (2 tablespoons + 2 teaspoons)
Line a small loaf pan (6×3 inches or a pan that fits 2 cups liquid) with baking paper. Heat the oven to 450°F.
Beat together the cream cheese and sugar until very smooth and fluffy, making sure all the sugar is dissolved. If you’re super particular, melt the cream cheese along with the sugar in a bowl over a double boiler. Add the egg and beat until smooth.
In another bowl, add the cornstarch and tiny bit of cream, whisking until smooth, ensuring that the cornstarch doesn’t lump up. Slowly stream in the remaining cream, whisking until very smooth.
Slowly pour the cream and cornstarch mix into the cheese mix. Mix well to ensure everything is combined.
Bake for 20 minutes or until the top is very dark and charred but the middle still has a bit of a jiggle. Broil for a couple of minutes to get extra char if desired. Let cool on a wire rack until room temperature. Remove from the tin, slice, and enjoy!
I Am... Sage and Chicken Liver Ragù Recipe
If you love pâté (and who doesn’t?) this chicken liver ragù is an absolute must try. It’s deeply old school Italian - with a suitably deeply old school Italian name: ragù di fegatini di pollo - like the way meatloaf or shepherd’s pie is for us, and it’s genius. I’m deeply in love with all the classic Italian sauces that we never hear about outside of Italy or high-end autentico restaurants. I’m talking way beyond amatriciana or carbonara; I love stuff like pasta alla norcina or ragù modenese. These sauces are so quick, so simple, and so cheap, it’s a shame many of us have to go to expensive Italian restaurants to experience it. I was inspired to make this after seeing it on the menu of our local aforementioned expensive Italian restaurant a couple of months ago. It just clicked with me: chicken livers are the secret ingredient in ragù Bolognese, why wouldn’t they taste good on their own? I’ve been obsessed with making this for months, but somehow never found the time, until now, and I'm so happy I did. If you have everything prepped, this sauce comes together in the time it takes to cook your pasta. There's no 6 hour simmer here. The most expensive ingredient is the cheese, but even so, all in it was about a dollar a plate, and it literally tastes like the love child of a really good chicken liver pâté and an amazing restaurant-made plate of authentic Italian pasta. A note on guanciale, the only ingredient that might be hard to find: if you’ve never had guanciale, it’s a sweet cured pork cheek that you can probably find locally made by someone in most major cities. I'm sure I'll get some grief from some Italians for saying this, but you can use it anytime the base of your pasta calls for any form of cured pork. In keeping with the theme of this post, one cheek keeps me and Steph in pasta for months, and costs less than $10 at our local charcuterie. The equivalent amount of pancetta/proscuitto would be 10x that much. It’s so worth it to seek it out. And the same goes for this pasta. I made it two nights in a row (because I bought a pound of liver) and we were sad when it was all gone. I was tempted to make this sauce senza-liver, because it was so pretty with just guanciale, shallots, sage, and garlic, but the liver was so good we decided to wait until we get more liver and do it justice.
Sage and Chicken Liver Ragù Recipe
- 6 oz chicken livers (trimmed and roughly chopped)
- 2 tbsp olive oil
- 1 shallot (minced)
- 1 garlic clove (minced)
- 1 oz guanciale (chopped, see note)
- 4 fresh sage leaves (chopped, plus extra for frying)
- 1 tsp double concentrated tomato paste (see note)
- 1/3 cup white wine (italian preferred)
- 1 cup parmigiano reggiano (grated)
Bring a large pot of well salted water to a boil over high heat. Add your pasta and cook to 1 minute before the package time. Sprinkle a little salt on your chicken livers at the same time. (Note the photo here is pre-chopped, your liver should be more chopped than this).
While the pasta is cooking, heat up your oil in a large non stick skillet over medium heat. If you are going to fry sage leaves, drop them carefully in the oil for 30 seconds per side, then remove to a paper towel to drain.
Cook the shallot and guanciale until the shallots are translucent, about 2 minutes. Add the garlic and chopped sage. Cook until the garlic is fragrant, stirring frequently so the garlic doesn’t burn, 1-2 minutes.
Add the tomato paste and continue to stir. Cook until the tomato paste has darkened slightly, 1-2 minutes.
Add the liver and wine, turning the heat up to medium-high. Crush the liver into tiny bits if needed. Once the wine has reduced by half (about 2 minutes), add most of the cheese, toss to mix lightly, then reduce the heat to low while you wait for the pasta to finish. Taste and season the sauce with salt and pepper.
Once the pasta has finished cooking, transfer it to the skillet using soft tongs or a spider. Alternately, reserve 1/2 cup of pasta water and drain the pasta, then transfer to skillet without rinsing. Turn the heat up on the skillet to medium high and toss until well coated. If the sauce seems dry, add pasta water, 1/4 cup at a time, as needed.
Top with remaining cheese, black pepper, and sage leaves, if using.
If you can't find guanciale, you can sub pancetta or bacon.
Use 2 tsp regular tomato sauce, but a tube of double concentrated tomato sauce can live in your fridge as needed. We love Mutti.
Inspired by https://www.internazionale.it/notizie/rachel-roddy/2019/02/27/ricetta-fettuccine-ragu-fegatini
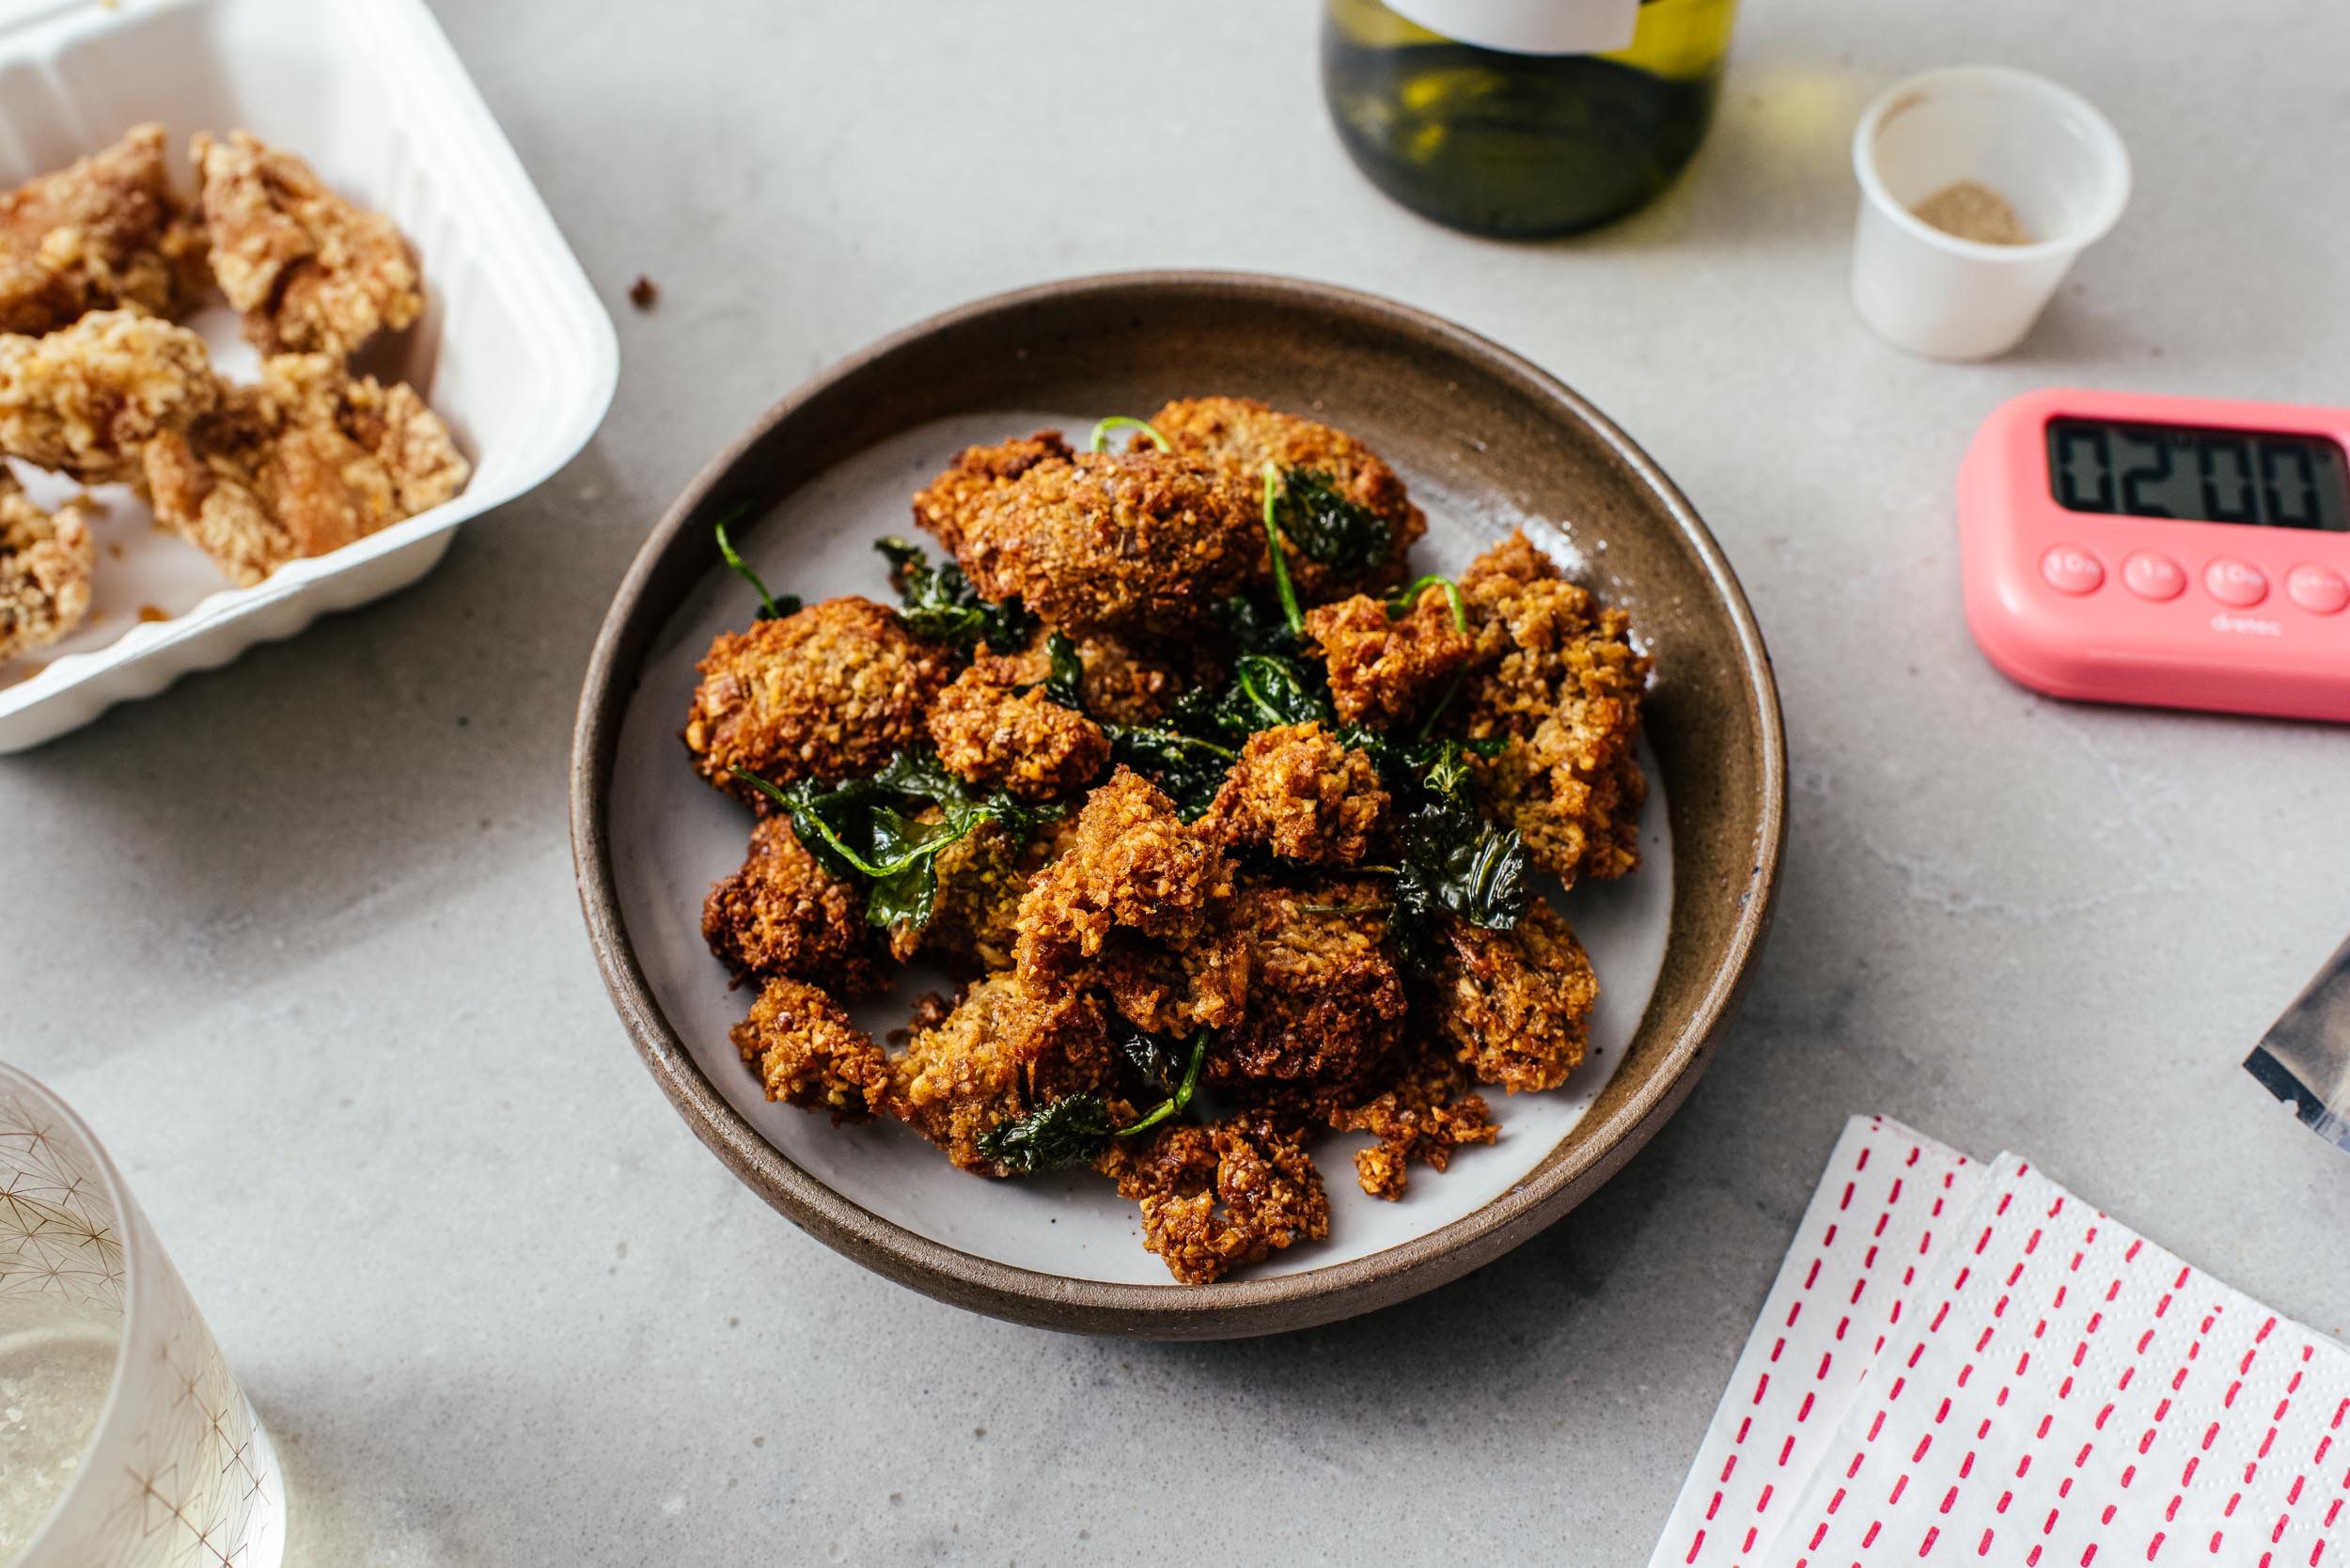
I Am... Vegan Taiwanese Popcorn Chickpea Chicken Recipe
The other day Mike made falafel and as I was nomming on those delicious little nuggets of deep-fried goodness, I thought to myself, wouldn’t these taste AMAZING as Taiwanese fried chicken!?!? I suggested it to Mike and he was off to the races. He nailed the flavor bang on and while the texture is obviously not chicken-y, I almost kind of sort of preferred the chickpea version. We did a side-by-side taste test with a takeout version and they more than held up.
What is Taiwanese fried chicken?
You may be wondering what Taiwanese fried chicken is. If you haven’t had it, they’re little juicy pieces of deep fried chicken with the most amazing crunch and flavor. They’re sold everywhere in Taiwan: at night markets, restaurants, boba cafes, even grocery stores. They are absolutely one of my favorite snacks. Pieces of chicken are marinated in soy sauce, garlic, sesame oil, five spice, white pepper, and a touch of of sugar. Different vendors have different ratios but generally, those are the main flavor components. After being marinated, the chicken pieces are coated in sweet potato flour, which is what gives it their signature crunch. A little bath in hot oil and then you’re headed to fried chicken heaven.Cooking Notes
Just like falafel, you need to use dried chickpeas to make these - using canned won’t work because the chickpeas are already cooked and when you blend them they will turn into hummus. Because you’re using dried chickpeas, you need to plan ahead a little bit - soak your chickpeas the night before you want your Taiwanese popcorn chick-pea snack. There are two ways to form the nuggets. You can either squish the chickpea mixture into organic small shapes (like falafels) or if you're more comfortable with hot oil, you can make a big patty and then break up the patty in the hot oil once it's a little solid. Making the smaller shapes are easier to deep fry and keep the oil nice and crumb free, but the more organic shapes that you get from breaking up a big patty gives you more interesting craggily crunchy bites. If you go the big patty route, your oil will definitely have more random crumbs in it, so go with what is most comfortable.Ingredient Notes
These totally have the flavor of Taiwanese fried chicken thanks to the generous amount of five spice and white pepper. Five spice is a common Chinese spice mix made up of star anise, cloves, cinnamon, Sichuan peppercorns, and fennel. The mix is sold in most grocery stores and online so there’s no need to make your own. Taste-wise, five spice has a hint of licorice from the star anise and fennel and a warm undertone from the cinnamon and cloves. It has just the tiniest memory of spice with a bit of a peppery note from the Sichuan peppercorns. Five spice is supposed to have the balanced five tastes of Chinese food: salty, sweet, sour, bitter, and spicy. Five spice can differ depending on brand because the blends are proprietary – if you find that you don’t like five spice it might just be that you don’t like your specific brand of five spice. When buying online, we like simply organic.Special Equipment
A food processor to process the chickpeas. We like this small one from KitchenAid. A small, deep pot for deep frying. A spider or slotted spoon for pulling the nuggets out of the hot oil.What do you serve Taiwanese fried chickpeas with?
Taiwanese popcorn chicken is usually served as a snack on its own or with a carb such as noodles or rice. These would go great with better than takeout sesame noodles, broccoli soy salad, fluffy rice, miso smashed cucumbers and green beans, or even with a homemade coffee jelly bubble tea!Garnish
Traditionally Taiwanese popcorn chicken is served with fried Thai basil but feel free to finish with any herbs you have on hand. Mike deep fried some cilantro because we didn’t have basil and it was perfect.Vegan Taiwanese Popcorn Chickpea Chicken Recipe
- 1 cup dried chickpeas
- 1 large shallot (quartered)
- 8 garlic cloves (crushed)
- 1 tbsp five spice
- 1 tbsp white peppercorns (ground or crushed)
Soak your chickpeas overnight in 2-3 cups of water. The next day, drain well and dry with a kitchen towel.
Combine the shallot, garlic, five spice, and white pepper along with the chickpeas in a food processor. Blitz into a crumbly paste.
Refrigerate your paste for 1-2 hours. Then when you are ready to fry, form into irregular shapes (see note). Before frying, optionally combine 1 teaspoon each of additional five spice and white pepper to use as a dusting powder.
Heat your oil to 300ºF. Drop your chickpea balls in a few at a time, making sure not to crowd the pan. Fry for 1-2 minutes, depending on your desired level of brownness. If you are using a dusting powder, dust your chickpea balls as soon as you remove them. Enjoy immediately.
You can form regular balls or random chicken shapes by squeezing the chickpea mixture in both hands. If your chickpeas aren't sticking together well, oil or wet your hands with water.

I Am... How to Make Homemade Garganelli
Sometimes I feel like there are so many things out there that I want to make but never have the time to. But really, let’s be honest, I probably do have the time, I just don’t have the inclination. It takes a huge amount of interest to get me to actually follow through with my millions of plans so it came as a surprise to me when I finally made these homemade garganelli! I have made garganelli before, but the smooth kind, without the ridges. Garganelli are the cutest little pasta shape – essentially a tube that is formed from a flat square noodle. They kind of look like penne except penne are extruded and are a completely seamless cylinder. Garganelli on the other hand, have a delightful little flap where the seams are pressed together giving it a nice textural contrast between where the pasta is thicker and where it is thinner. Garganelli are super easy to make at home. Just make your pasta dough as per usual. If you don’t have a favorite pasta dough, I’ve included one below, but of course this will work with all and any pasta doughs. After your pasta dough has rested, it’s just a question of rolling it out into thin (but not too thin) sheets. I usually roll mine out to #5 or #6 which results in quite puffy giant pasta shapes. I like keeping it on the thicker side because I love chewy biteable pasta and I also find the the shapes hold up better when the pasta isn’t rolled too thick. Once your pasta is rolled into sheets, it’s just a question of cutting everything into squares. I use a ruler and cut squares about 1.25 inches but if you want to freehand it, you can do that too, just try to keep the squares a consistent size. From there, it’s a question of rolling. If you have a gnocchi board, you can make garganelli with ridges but if you don’t, you can just make smooth garganelli. The ones with ridges are great because sauce clings to them but the ones without are just as tasty and probably easier to make because you don’t need to worry about aligning the pasta squares. To make: place a square diagonally on your work surface (either a wooden cutting board or a gnocchi board). Pick up the corner closest to you and hold it against a wooden dowel or the end of a wooden spoon. Roll the pasta and the rod together firmly, pressing down when the two corner edges meet. Slide the tube off the dowel and let dry out on a lightly floured or cornmeal dusted surface. These little guys cook up super fast - just cook them until they float, then serve them up with your favorite sauce! We like them with: creamy cacio e pepe, lemon sauce, pasta alla norcina, or garlicky brown butter parmesan.
How to Make Homemade Garganelli
- 100 grams flour (plus extra for dusting)
- 1 large egg
- 1 extra egg yolk
Place 100 grams flour in a large bowl and make a well in the middle. Put the egg and egg yolk into the well and use a fork to whisk the eggs, slowly incorporating the flour, little by little, until a dough starts to form - alternately, use a food processor to bring the flour and eggs together until they resemble coarse bread crumbs. Turn out onto a lightly floured board and knead the dough until smooth and elastic, then wrap with plastic wrap and let rest for 1 hour.
After the pasta has rested for an hour, lightly dust with flour and press into a rectangle shape. Working in batches, roll out the dough, starting at the thickest setting, and dialing it down after roll. You can roll it to anywhere from between #5-#7 on the pasta roller. The thicker your roll it, the more likely it will be able to hold its shape after cooking, so keep that in mind.
Cut the pasta sheet into 1.25 inch squares, being sure to cover the extra pasta dough (and cut squares) with plastic wrap so it doesn’t dry out.
Take your gnocchi board and place a square diagonally on the board. Pick up the corner closest to use and wrap the pasta square around a dowel (I used the handle of a wooden spoon) and roll while pressing down to form the ridges. Press a bit more firmly to seal where the corner edges meet.
Slide off the dowel and set aside on a lightly floured or cornmeal dusted tray or work surface. You can let these dry out slightly once they’ve been formed, it will help them keep their shape while cooking. Repeat until you have used up all of your pasta dough.

Popular
 2015 Holiday Giveaway
  One-Pot Lemon Scallop Pea Spaghetti
  Beer Battered Onion Rings, Jalapeno Aioli
  2014 Holiday Gift Guide and a Giveaway
  Easy Gourmet Hot Wings and a Giveaway!
 The Ultimate Veggie Sandwich
  Vegan(!) Creamy Corn Soup Recipe
  Sunday Brunch: Grilled Cheese Eggs Benny
